Stacks and Queues
What is a Stack
A stack is a data structure that consists of Nodes. Each Node references the next Node in the stack, but does not reference its previous.
Common terminology for a stack is
- Push - Nodes or items that are put into the stack are pushed
- Pop - Nodes or items that are removed from the stack are popped
- Top - This is the top of the stack.
- Peek - When you
peekyou will view thetopNode in the stack. If the stack is empty, and you don’tpeek, you will receive aNullReferenceExceptionif you attempt topop.
Stacks follow these concepts:
FILO
First In Last Out
This means that the first item added in the stack will be the last item popped out of the stack.
LIFO
Last In First Out
This means that the last item added to the stack will be the first item popped out of the stack.
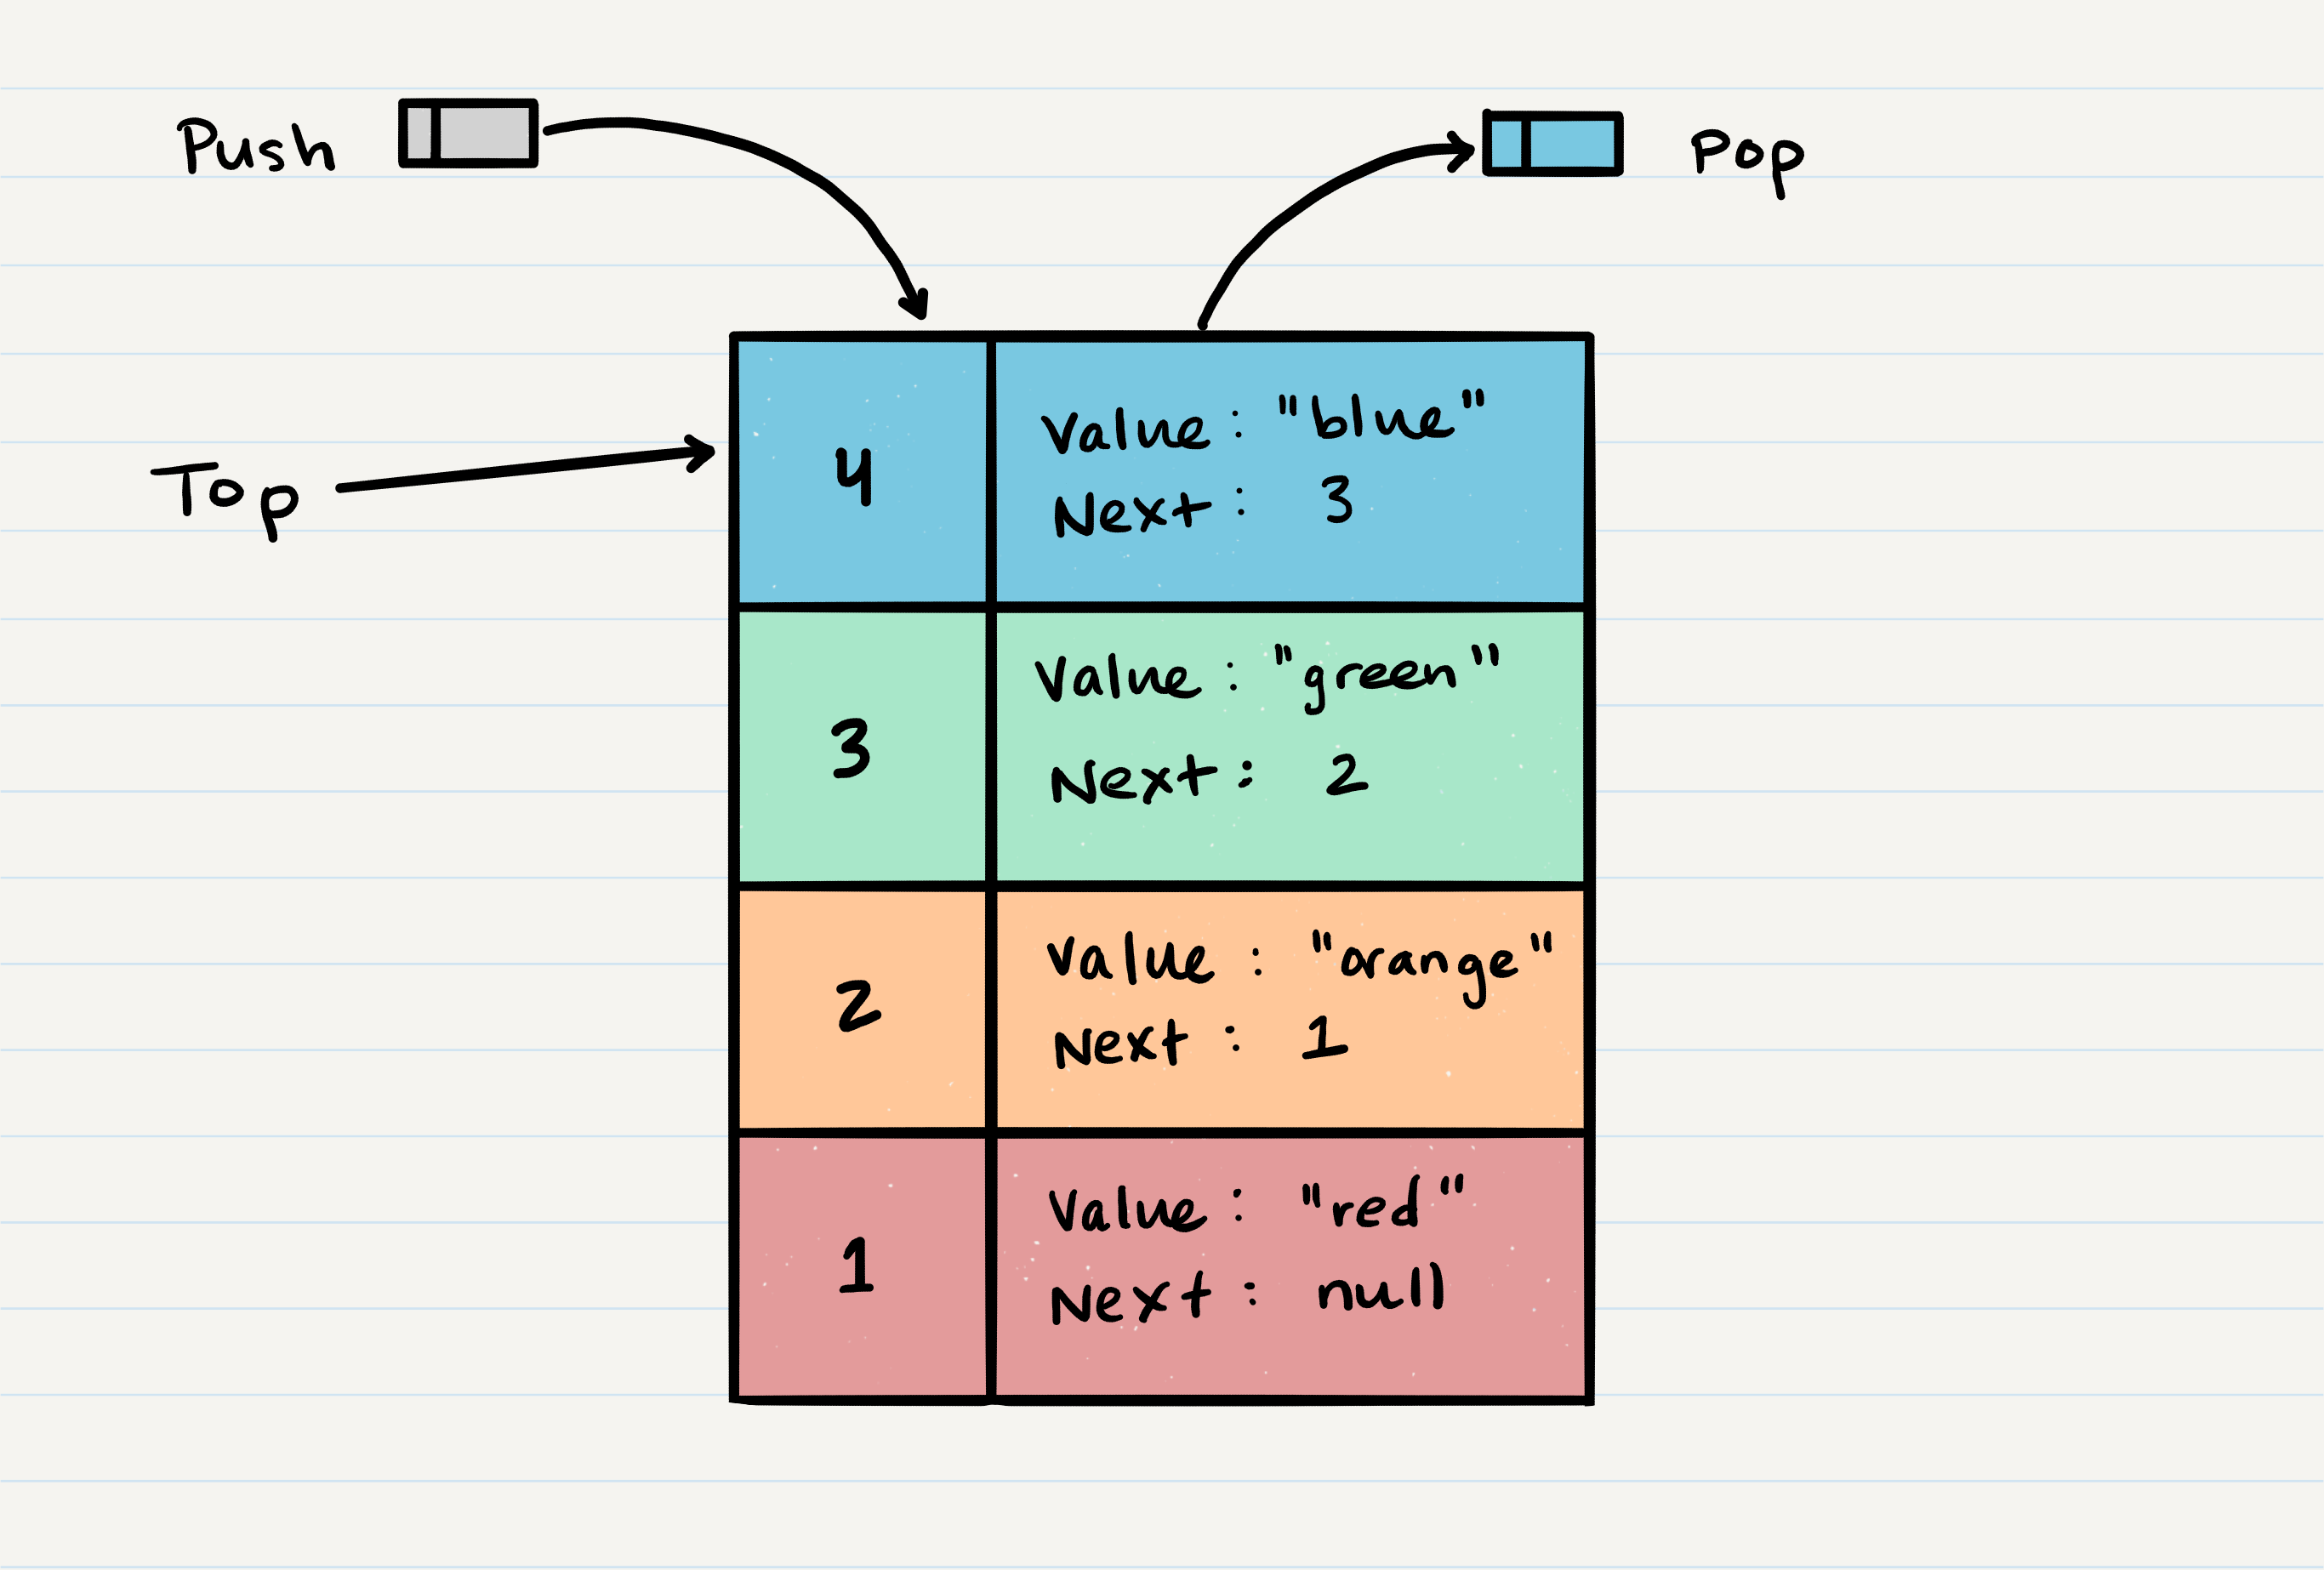
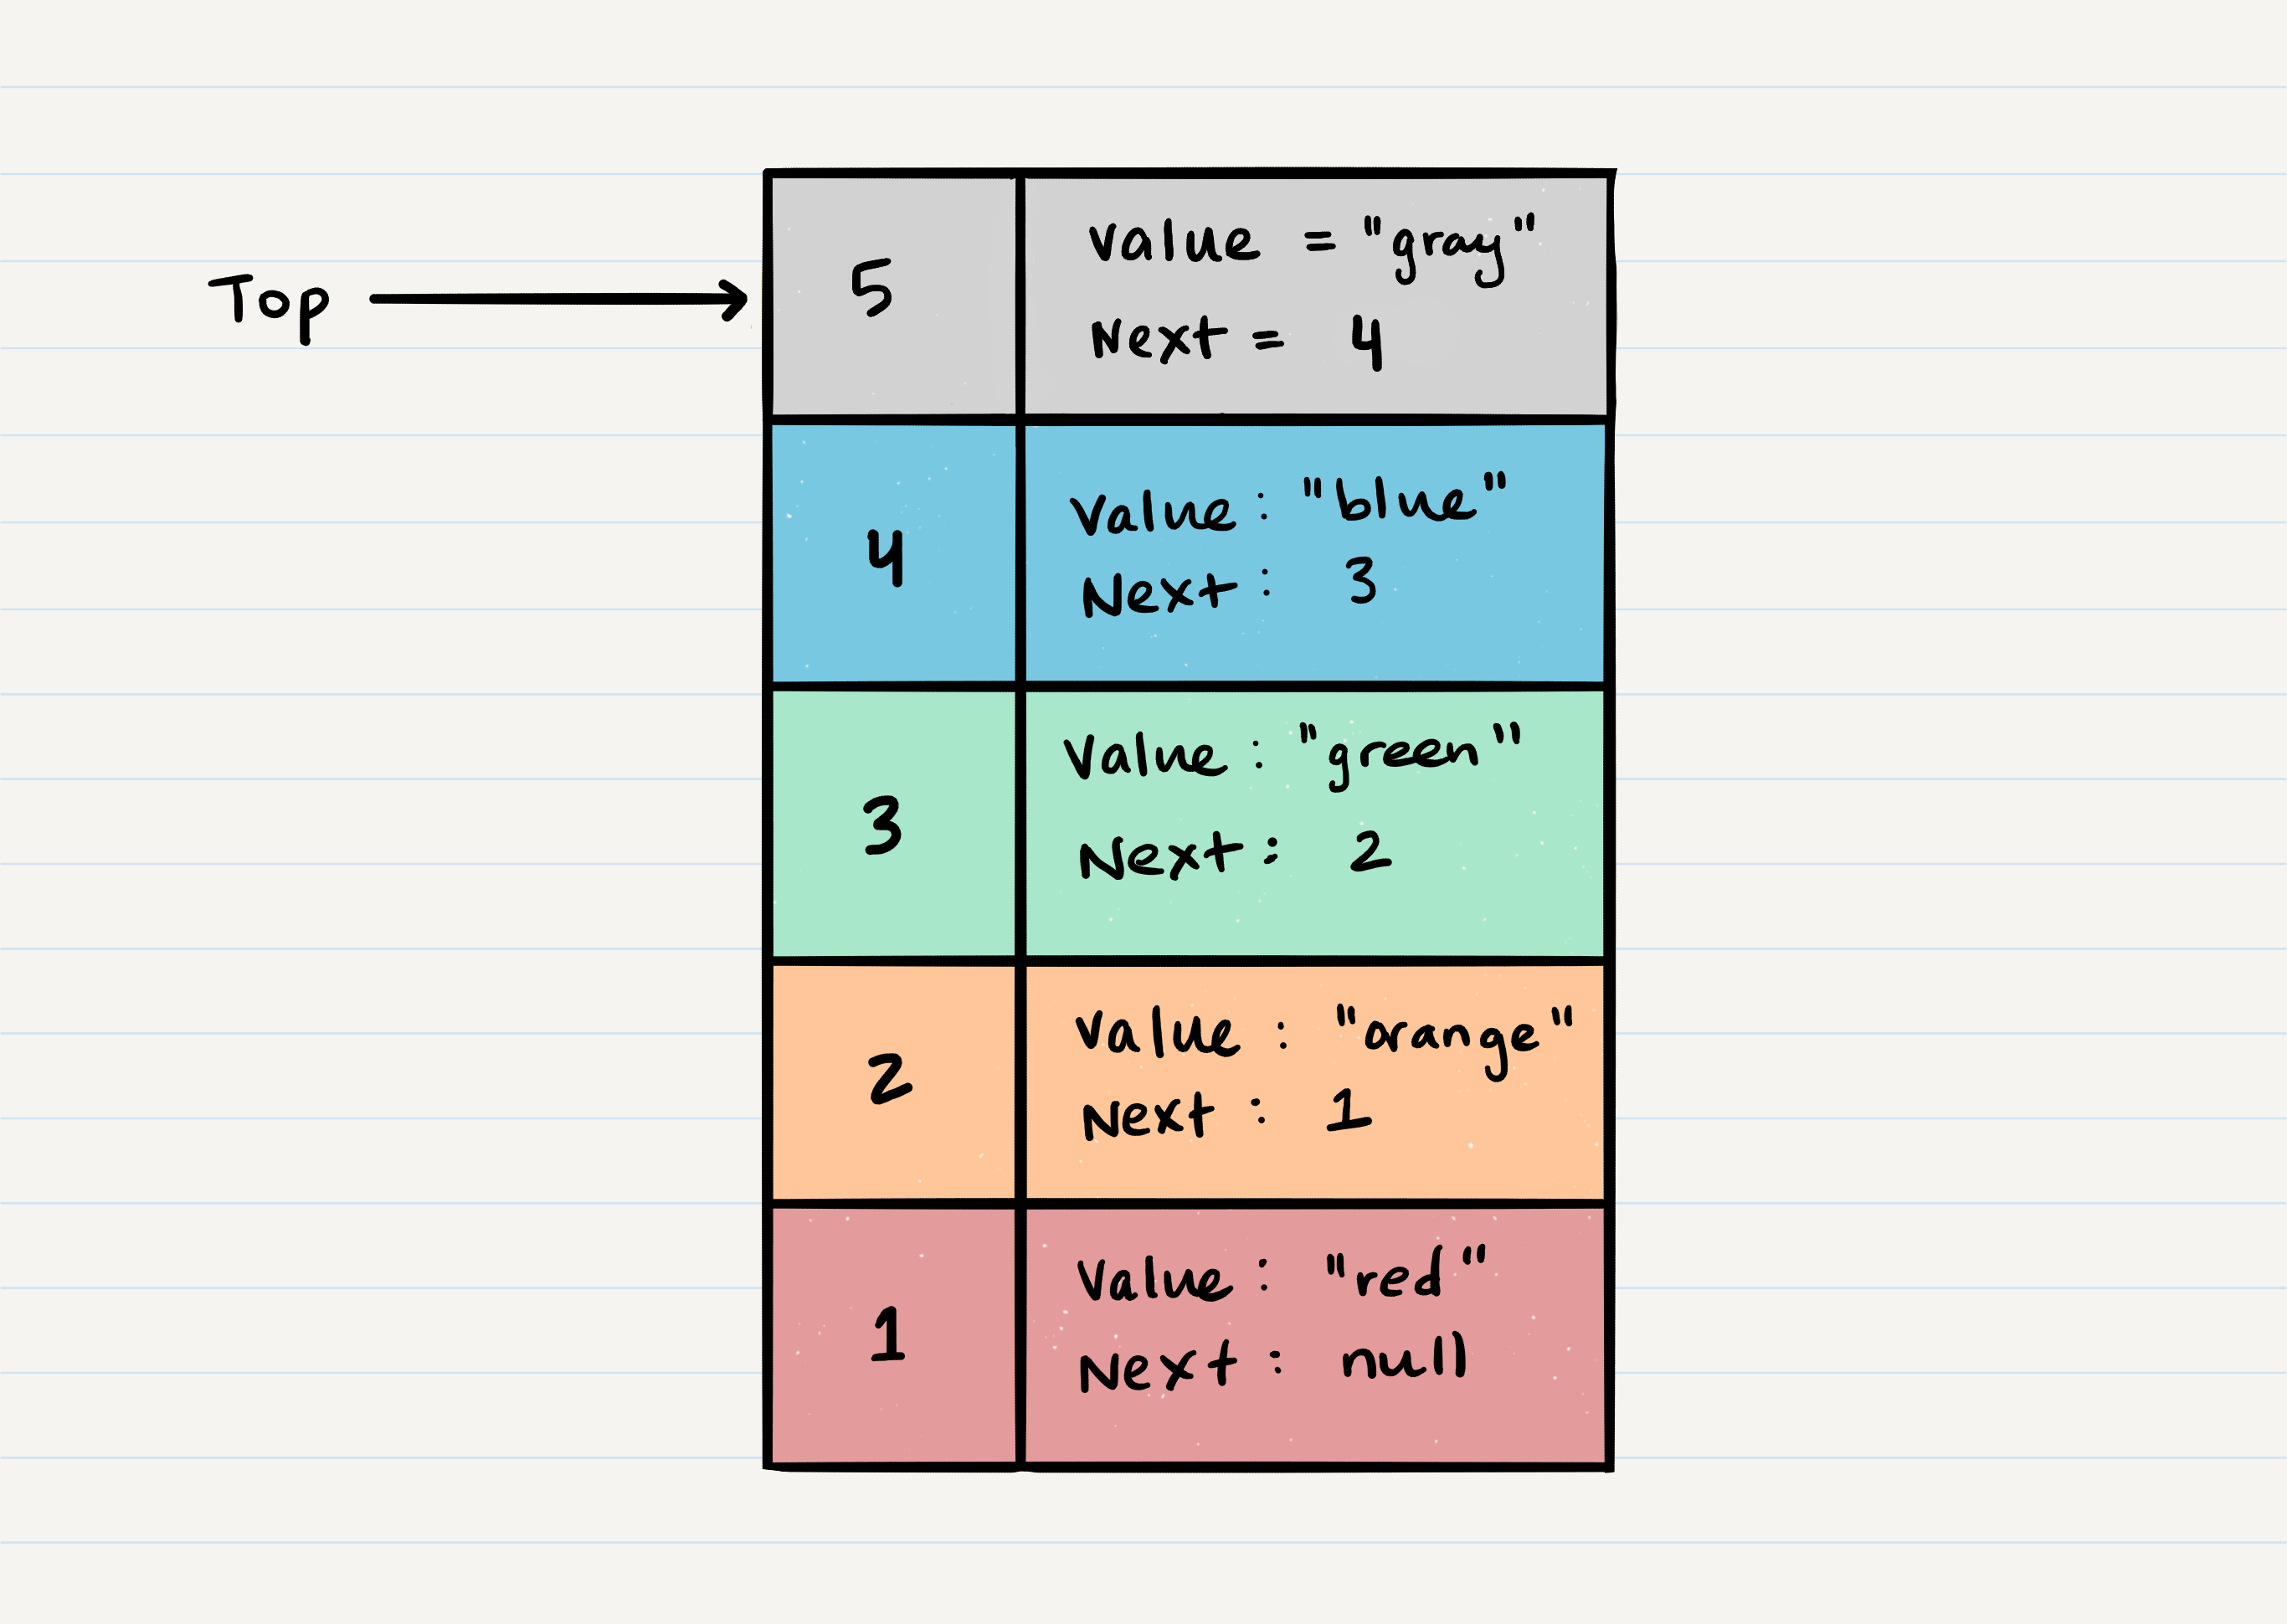
Stack Visualization
Here’s an example of what a stack looks like. As you can see, the topmost item is denoted as the top. When you push something to the stack, it becomes the new top. When you pop something from the stack, you pop the current top and set the next top as top.next.
Push O(1)
Pushing a Node onto a stack will always be an O(1) operation. This is because it takes the same amount of time no matter how many Nodes (n) you have in the stack.
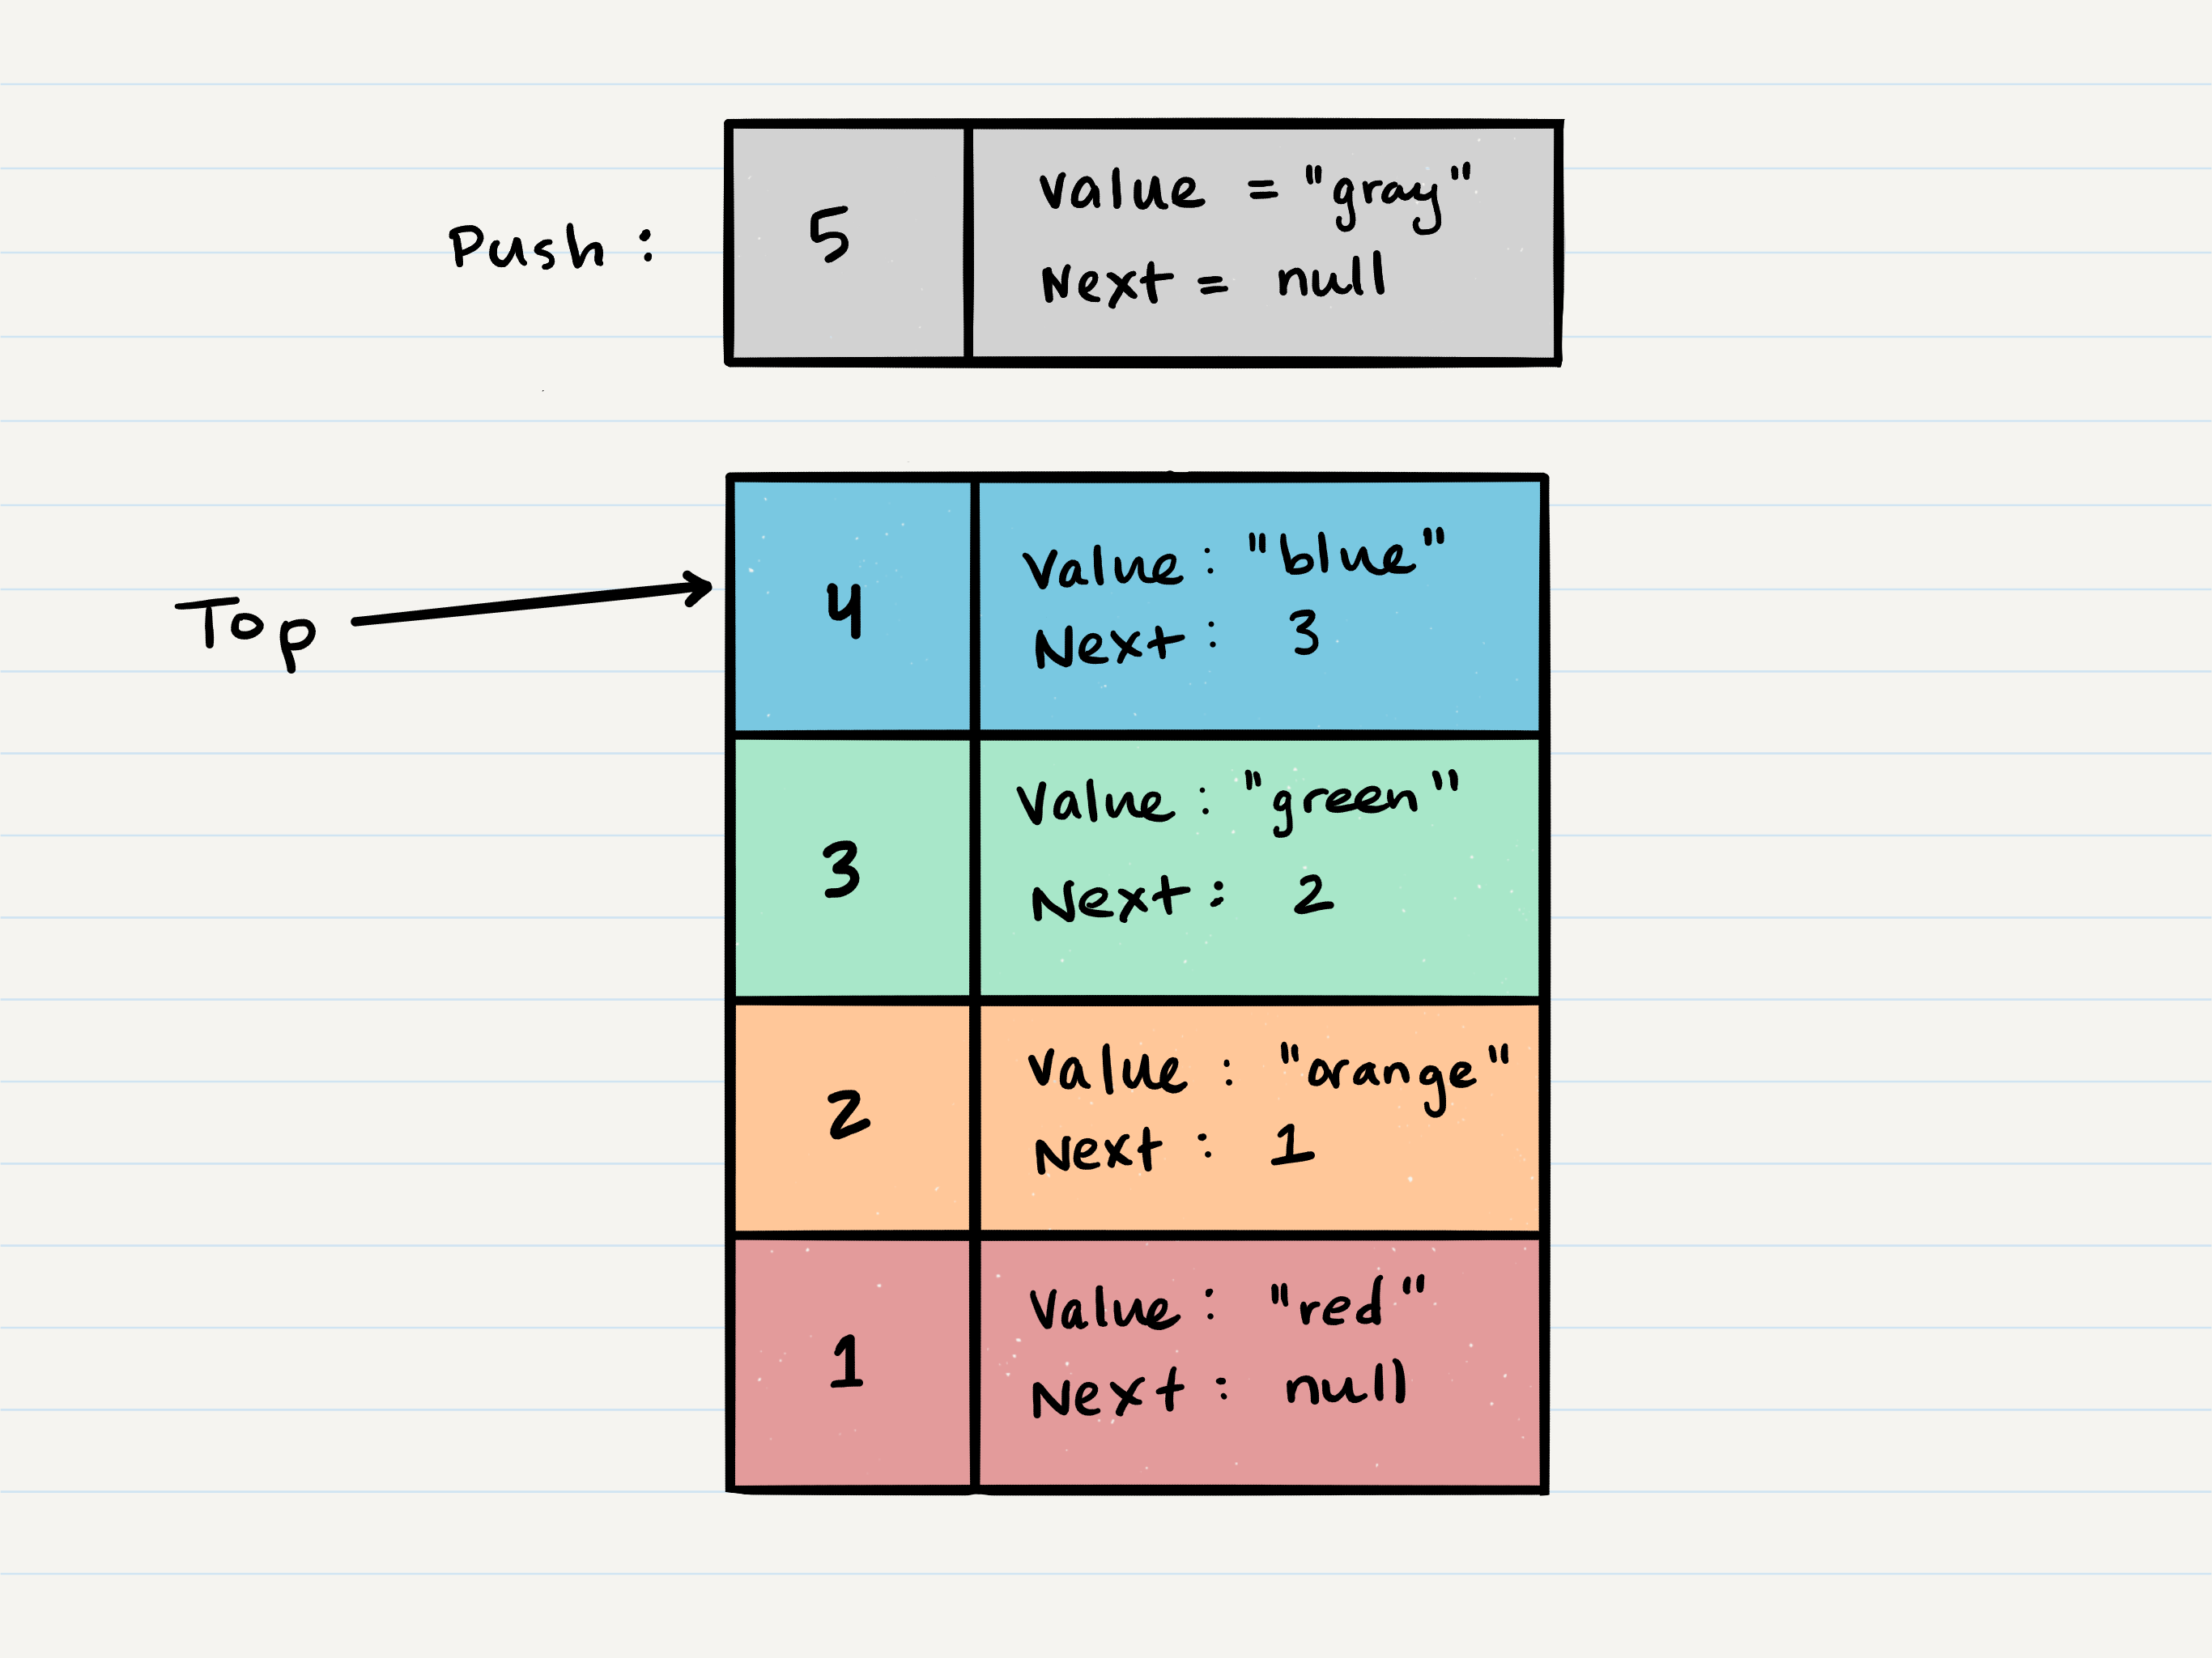
When adding a Node, you push it into the stack by assigning it as the new top, with it’s next property equal to the original/old top.
Let’s walk through the steps:
- First, you should have the Node that you want to add. Here is an example of a Node that we want to add to the stack.
- Next, you need to assign the
nextproperty ofNode 5to reference the same Node thattopis referencing:Node 4
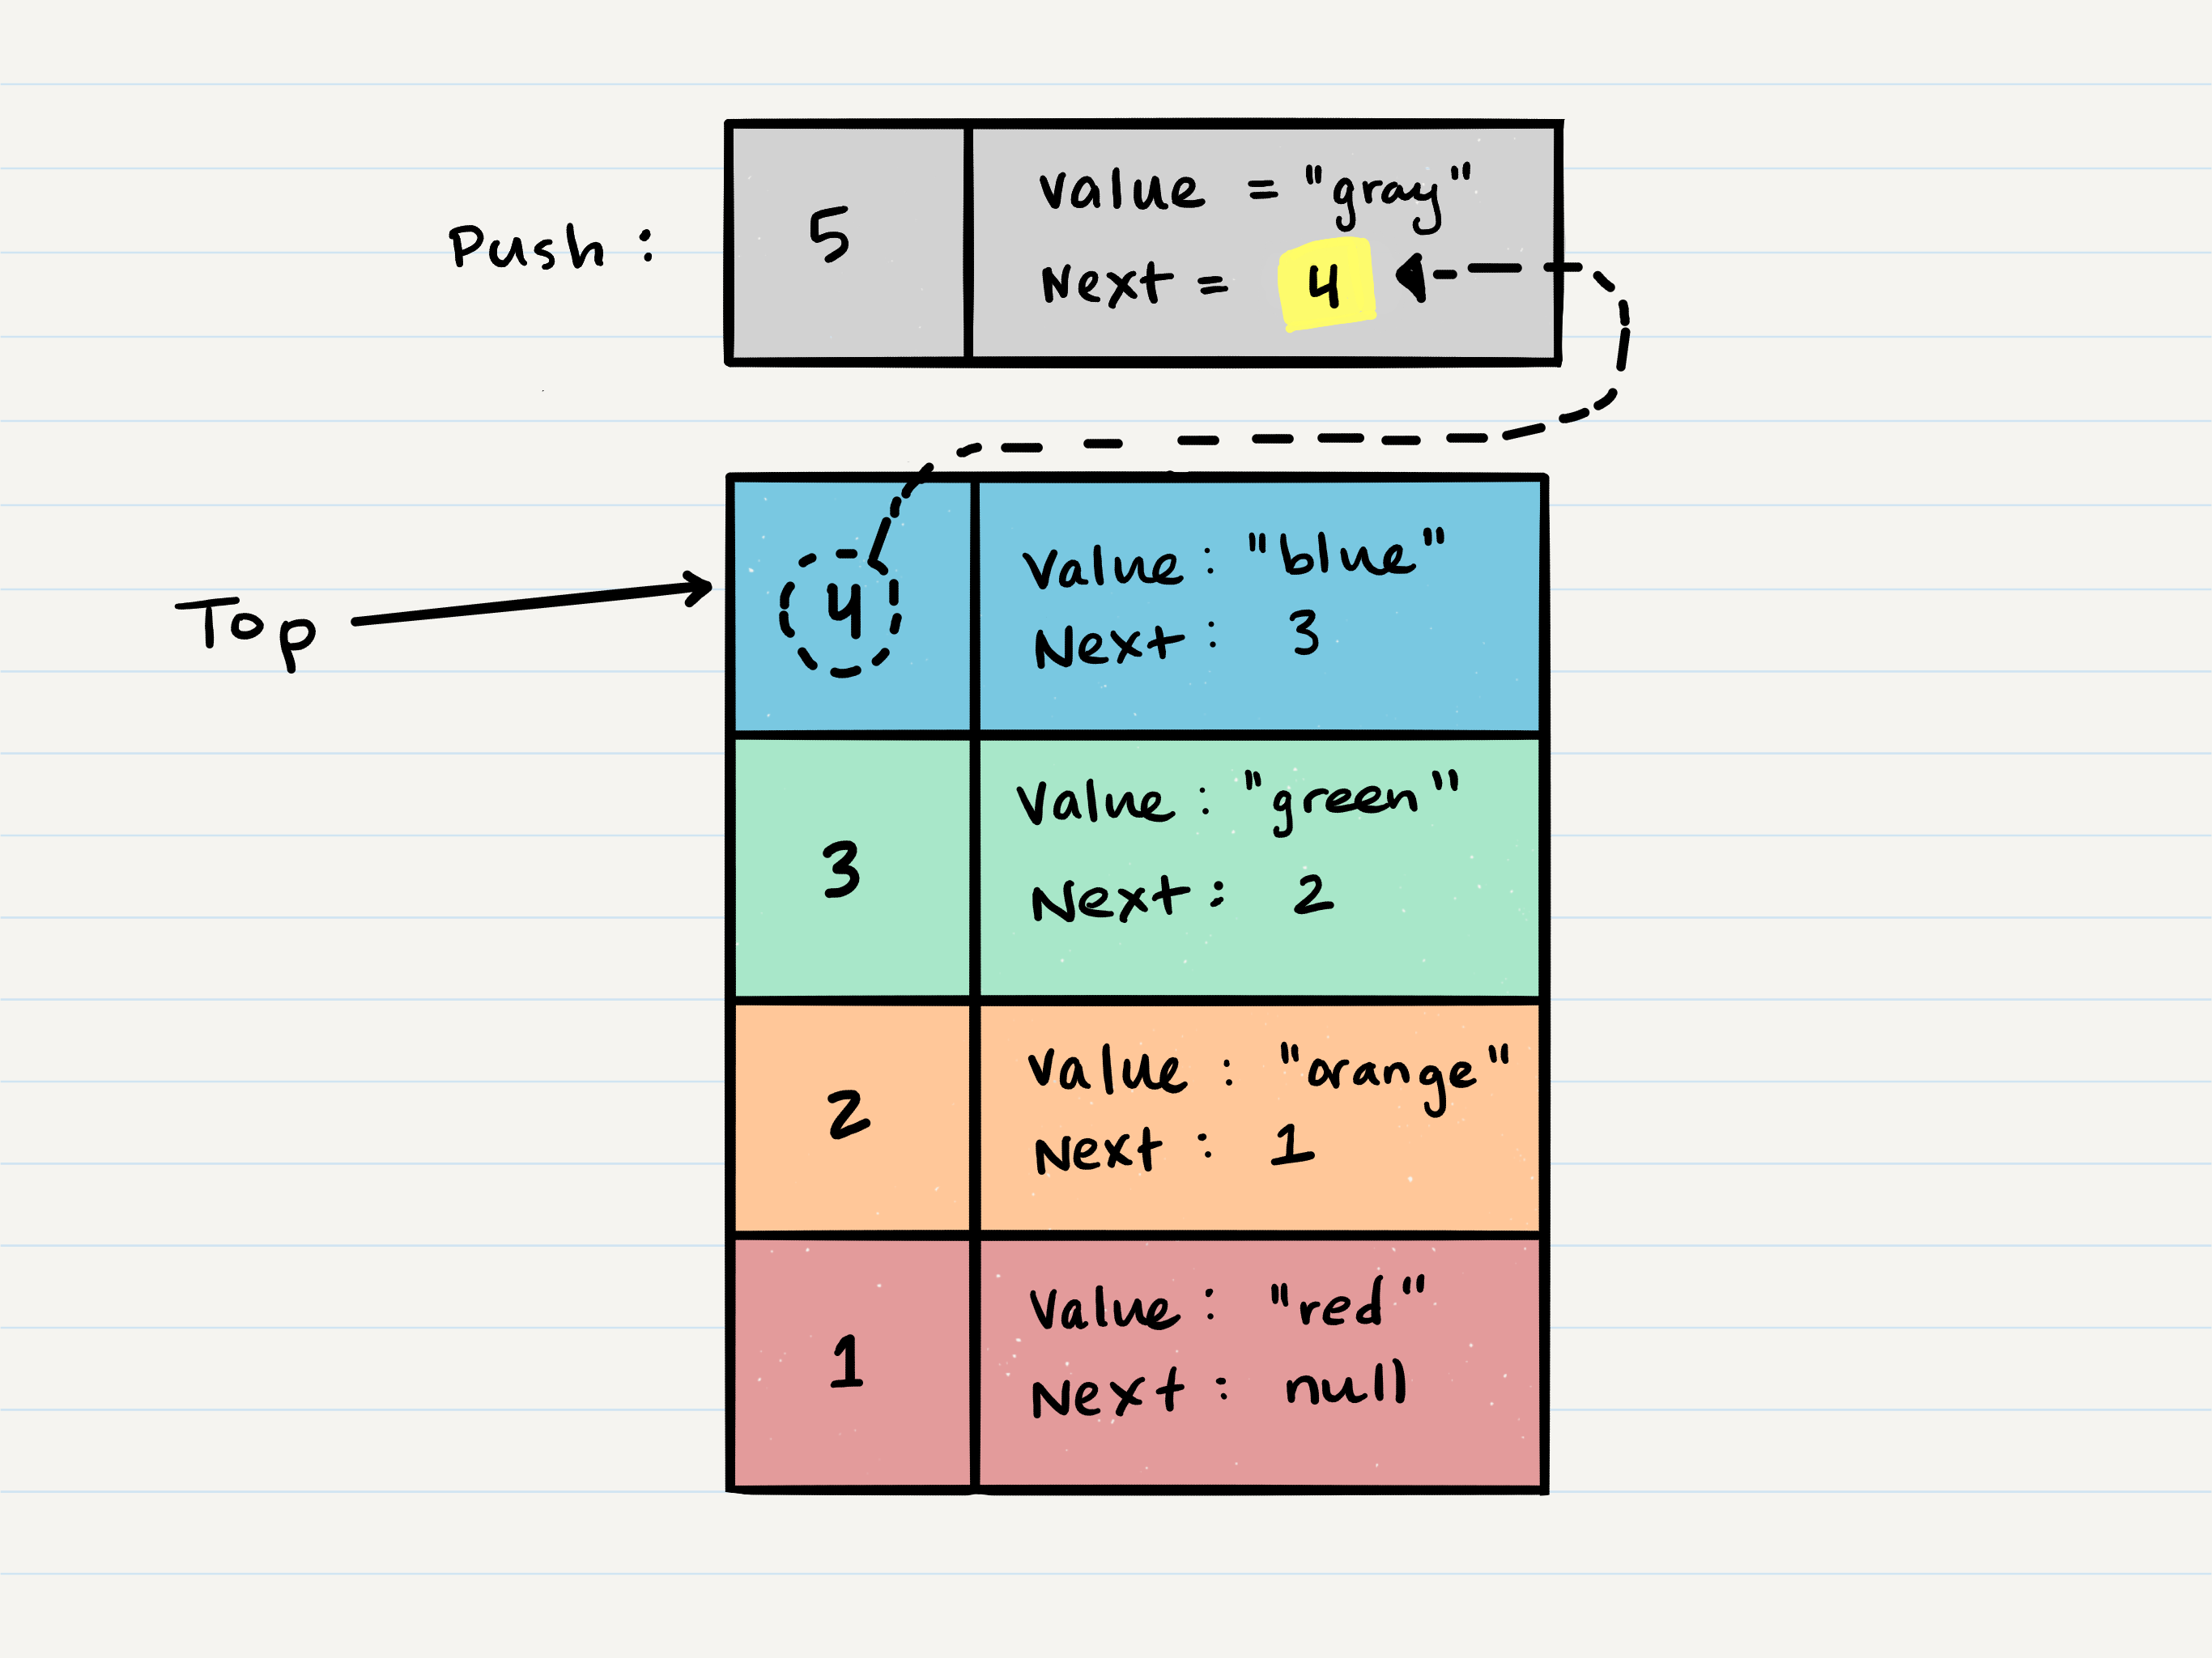
- Technically at this point, your new Node is added to your stack,
but there is no indication that it is the first Node in the stack.
To make this happen, you have to re-assign our reference
topto the newly added Node,Node 5.
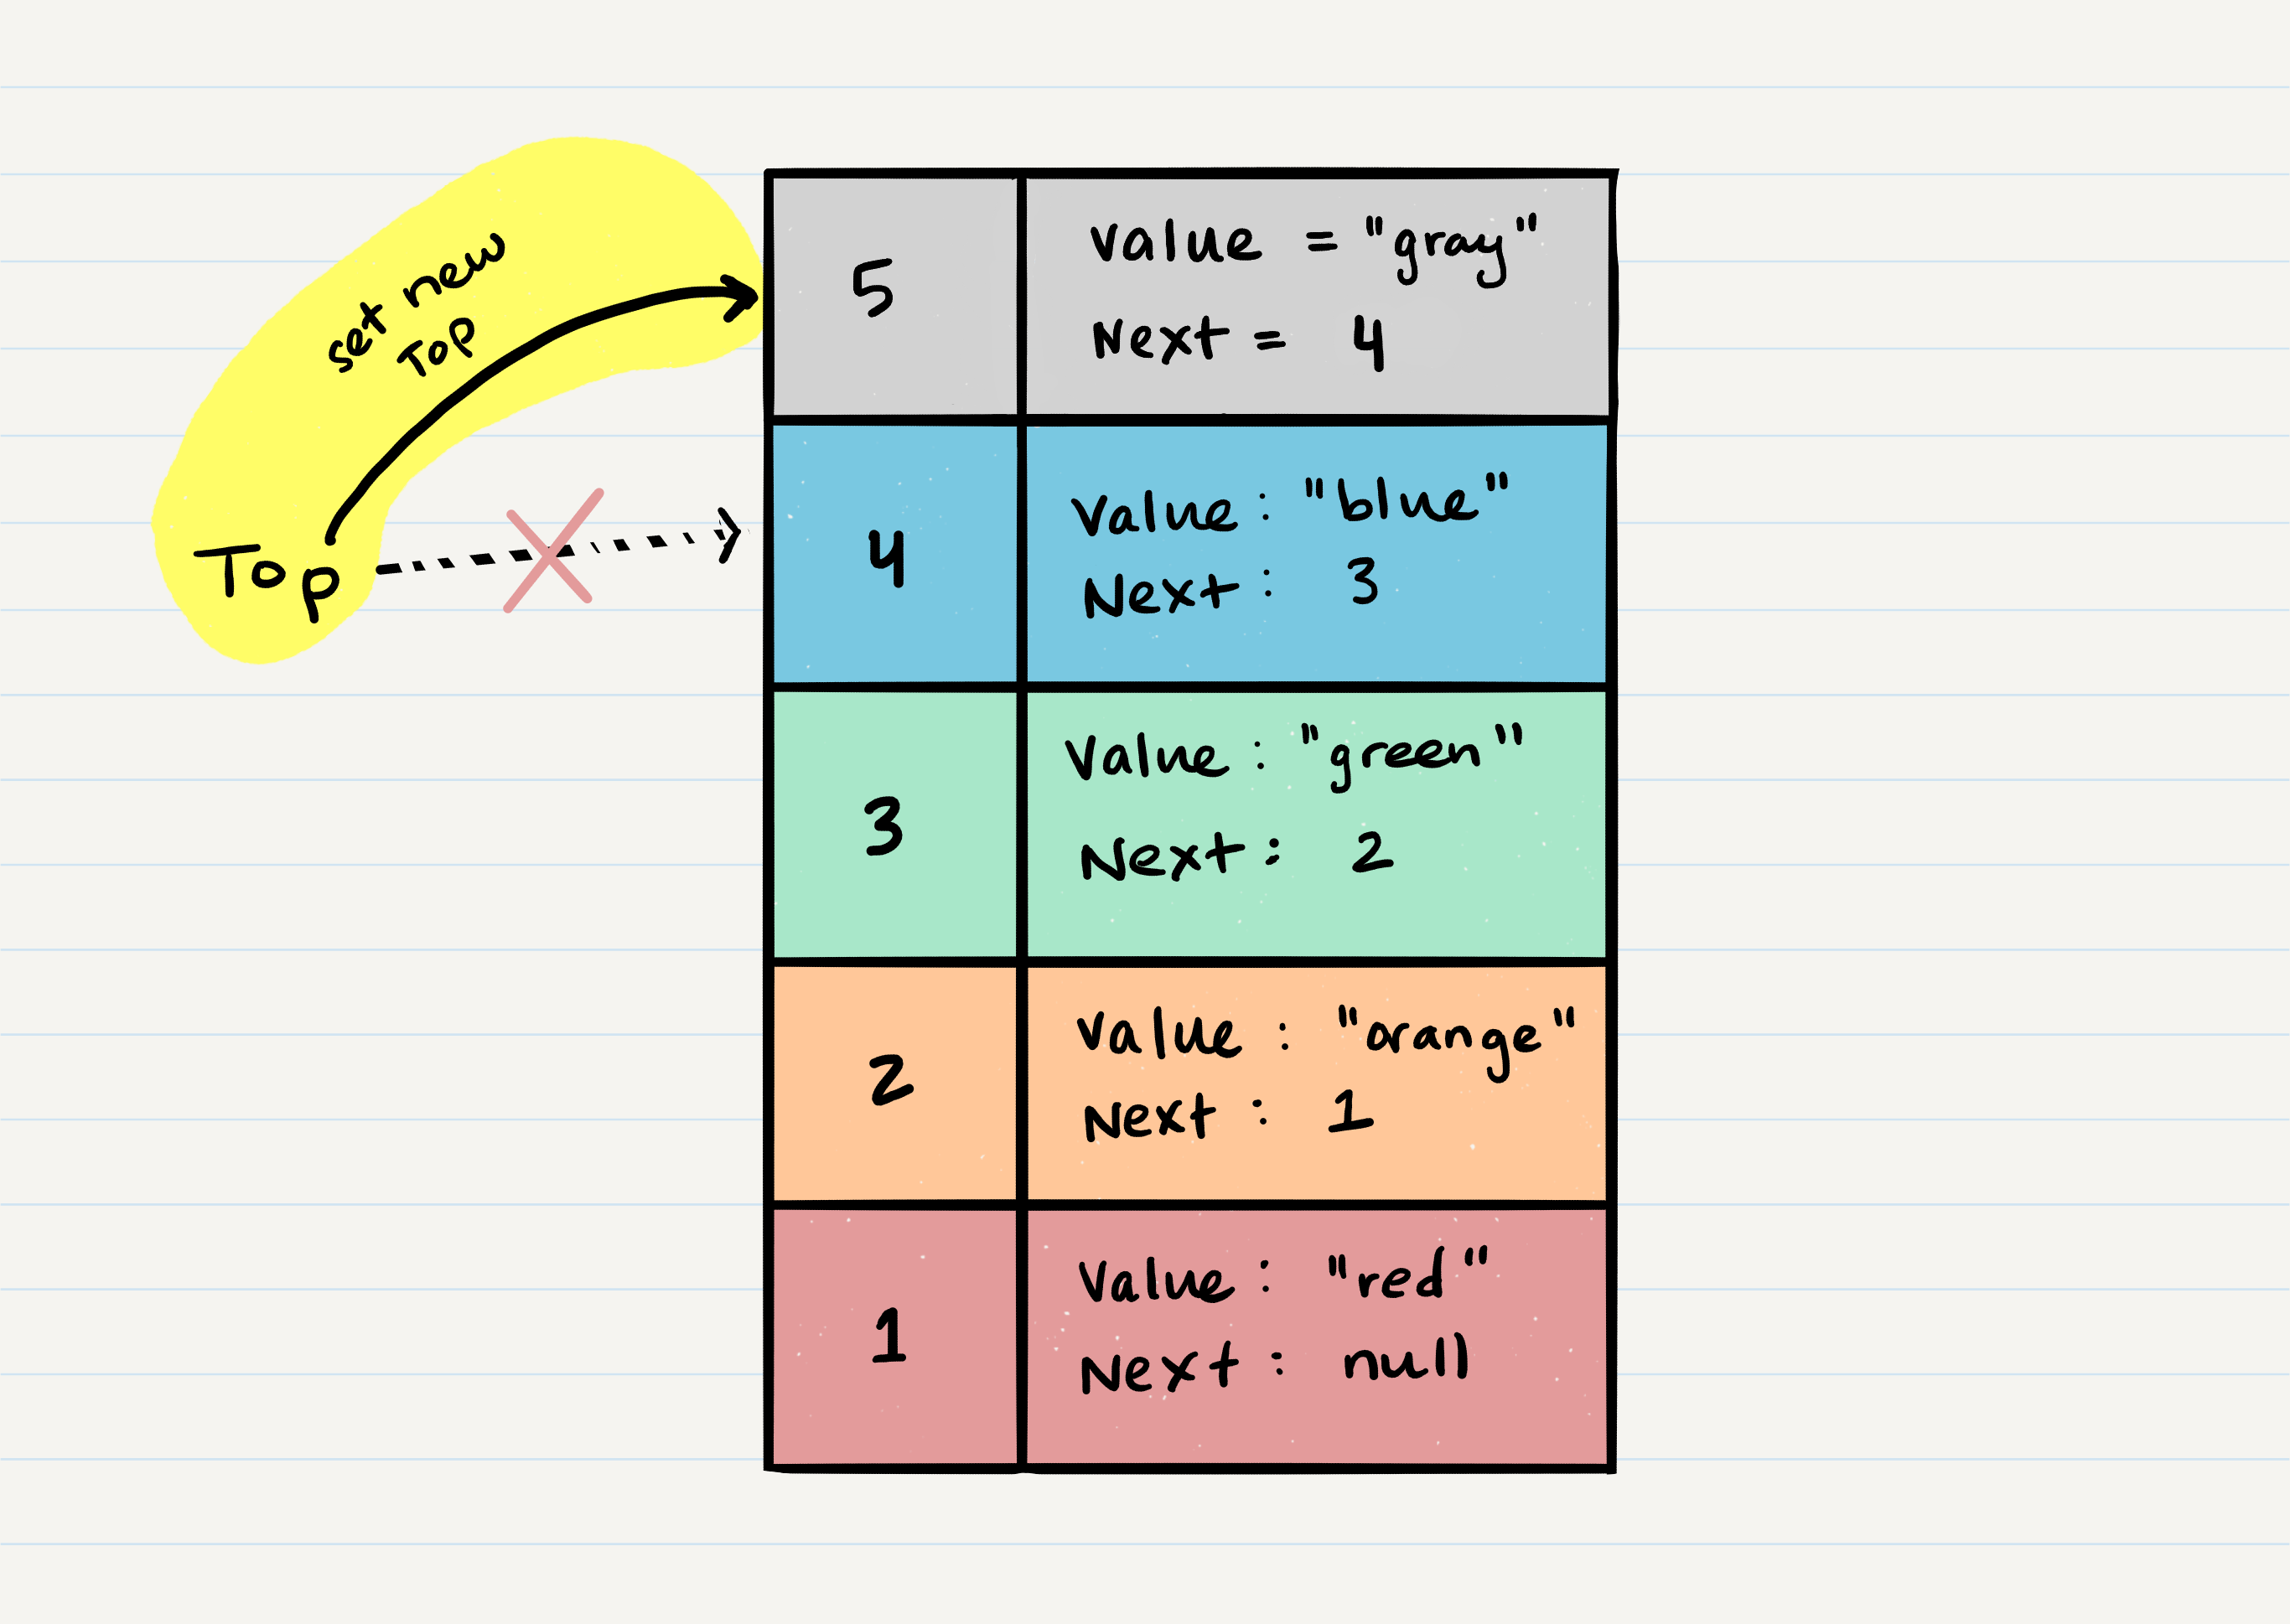
- Congratulations! You completed a successful
pushofNode 5onto the stack.
Here is the pseudo code to push a Node onto a stack:
ALOGORITHM push(node)
// INPUT <-- node to add
// OUTPUT <-- none

   Node.next <-- Top
   top <-- Node
Pop O(1)
Popping a Node off a stack is the action of removing a Node from the top.
When conducting a pop, the top Node will be re-assigned to the Node
that lives below and the top Node is returned to the user.
Let’s try and pop off Node 5 from the stack. Here is a visual of the current state of our stack:
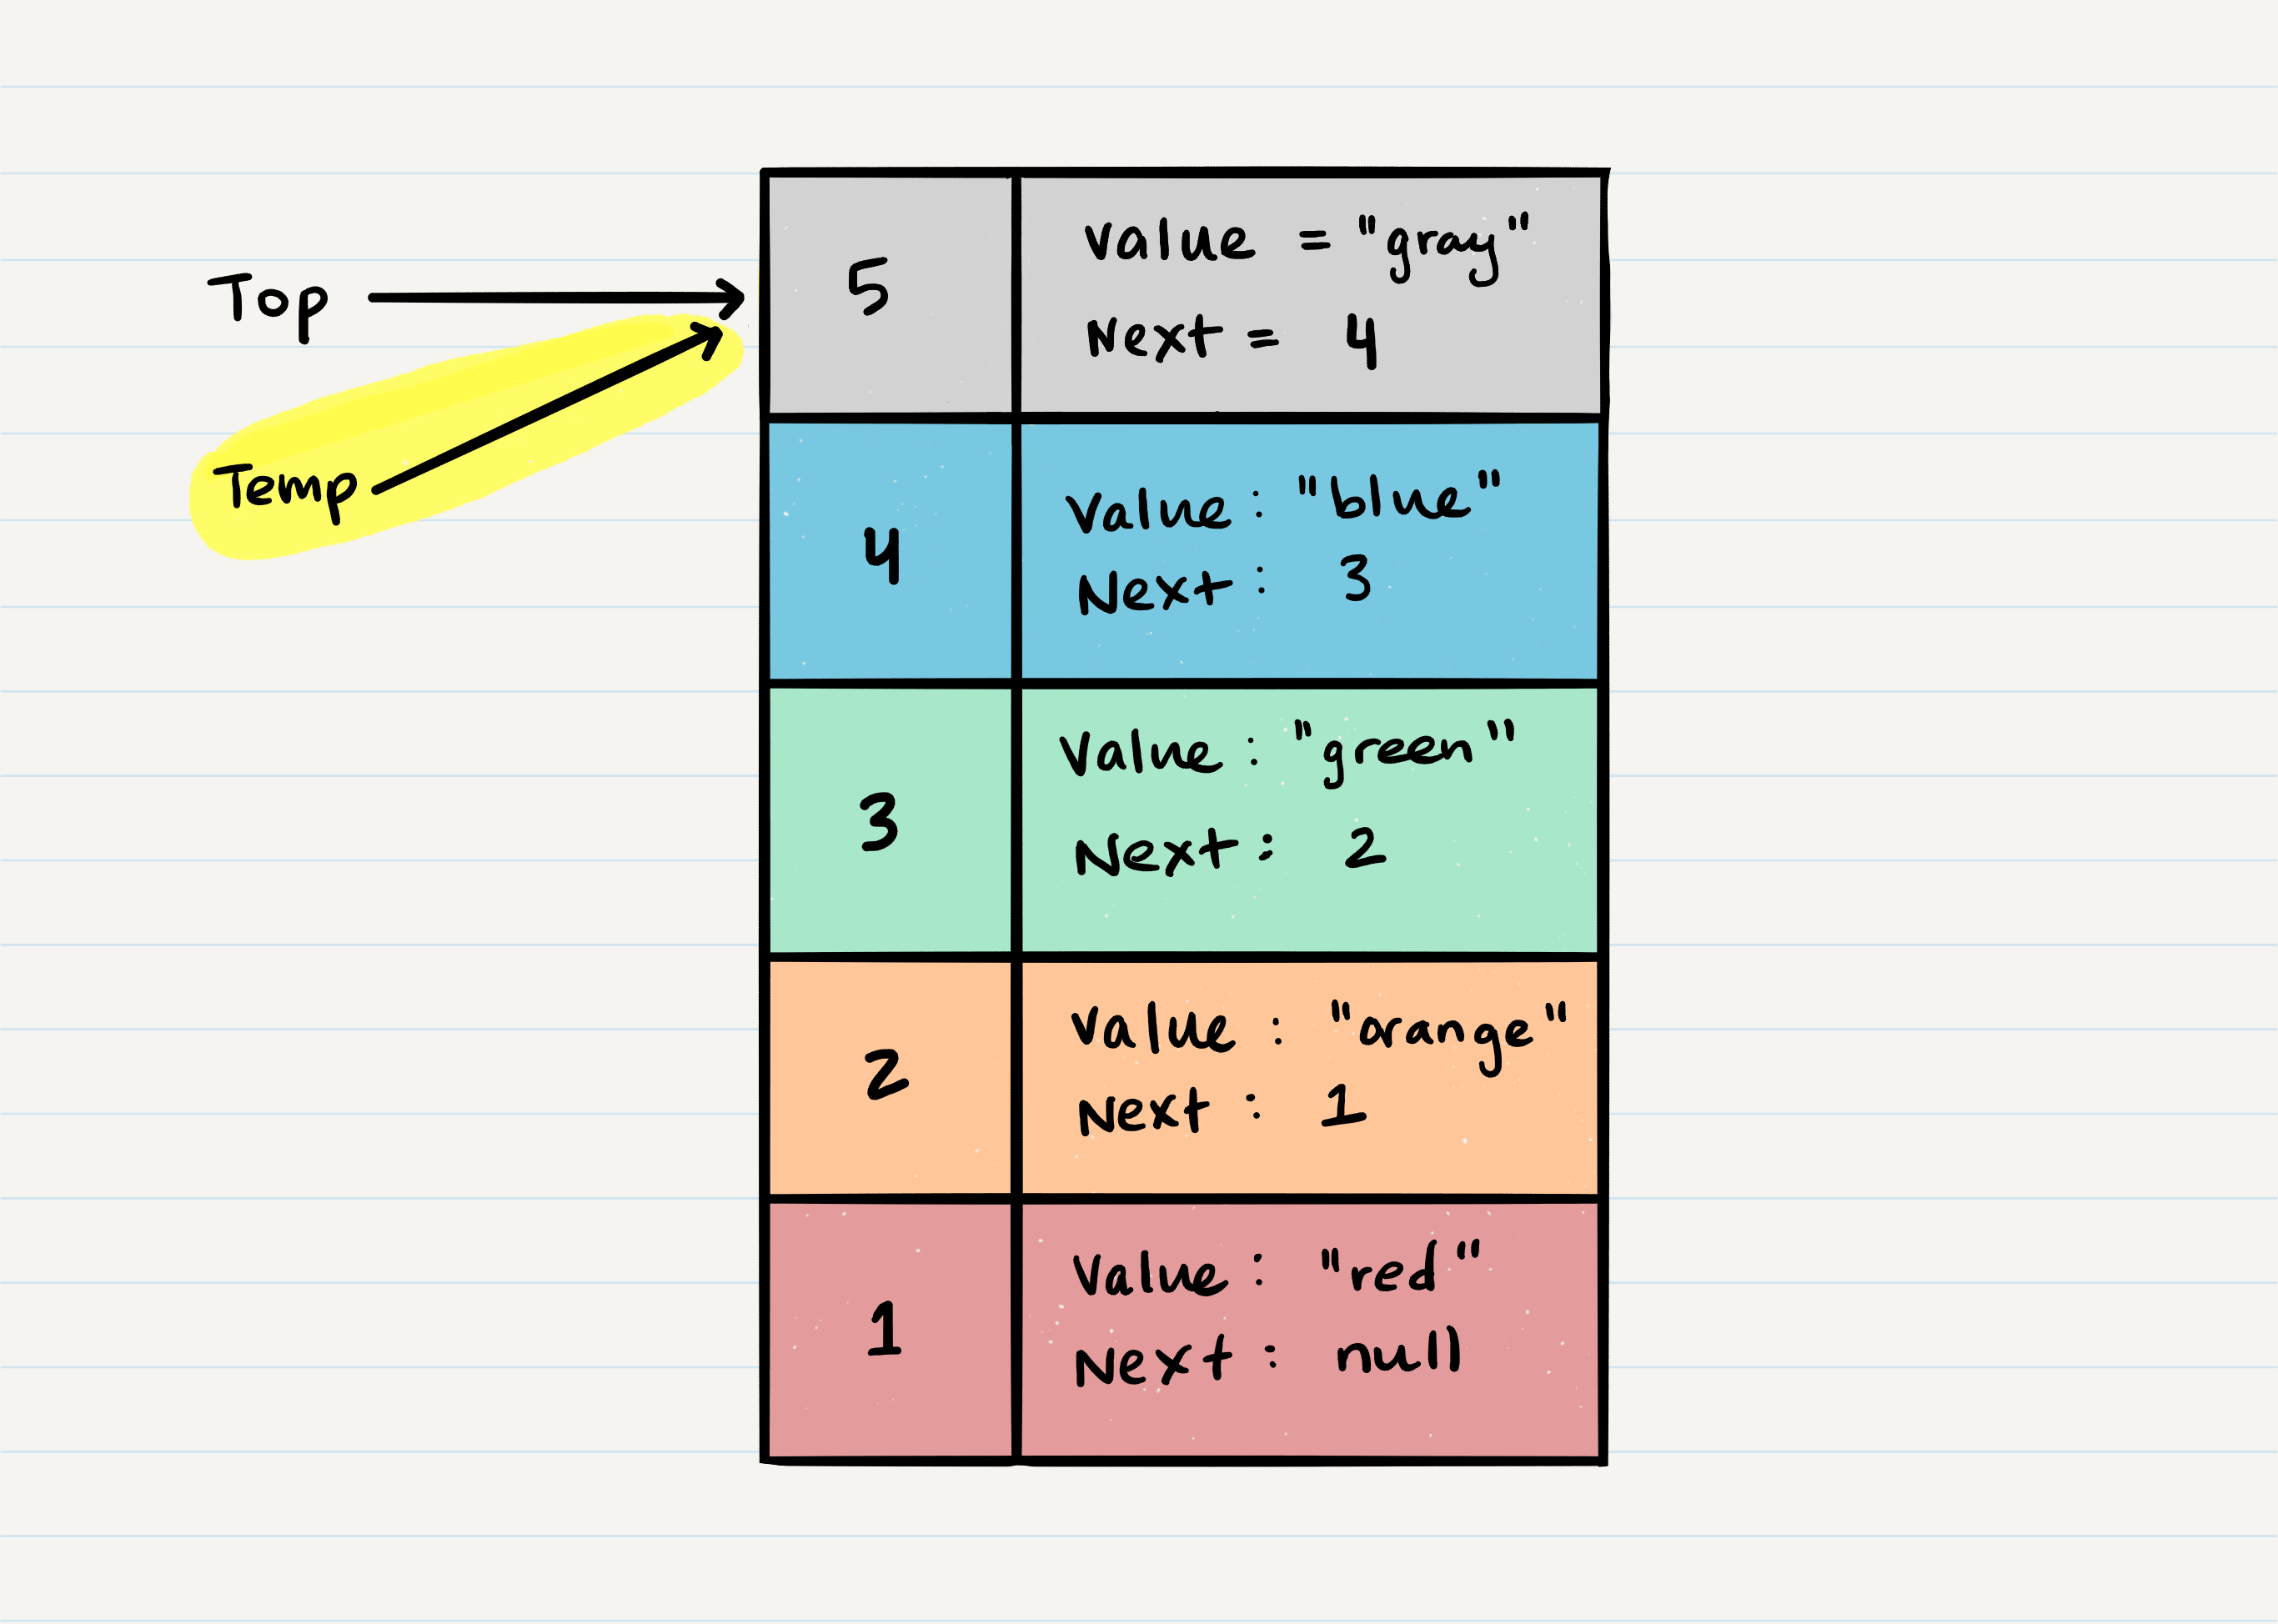
- The first step of removing
Node 5from the stack is to create a reference namedtempthat points to the same Node thattoppoints to.
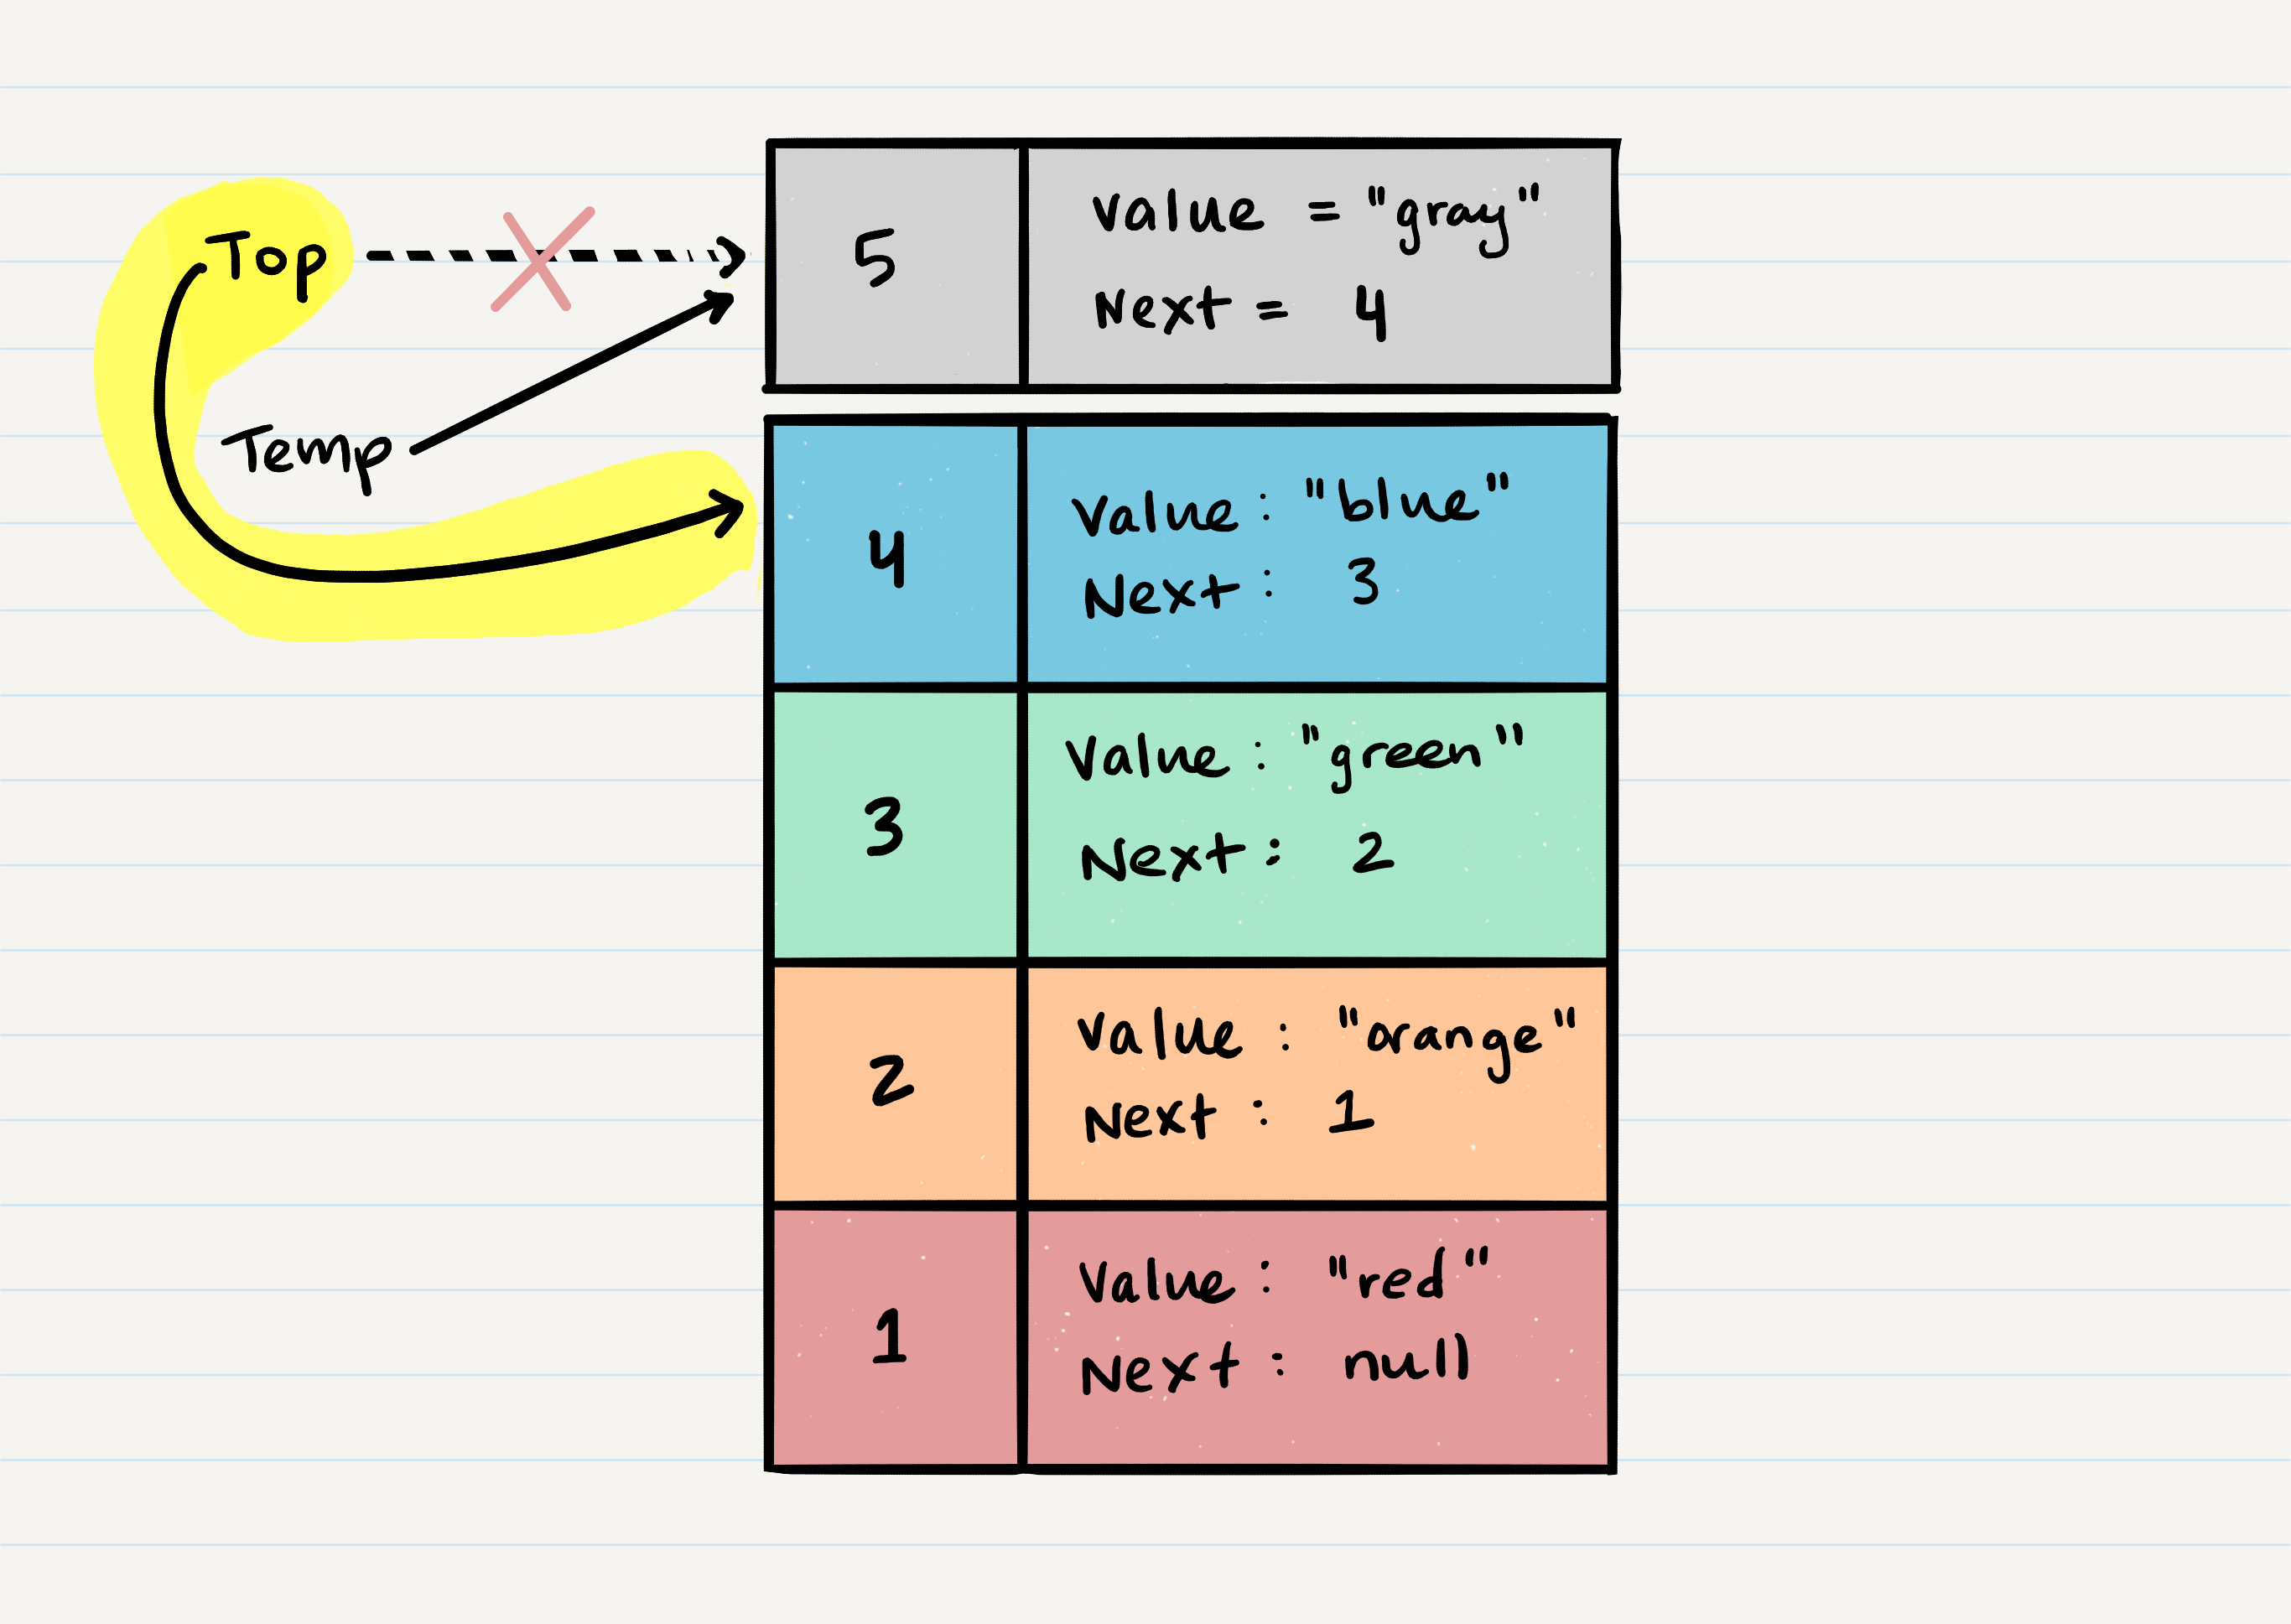
- Once you have created the new reference type, you now need to re-assign
topto the value that thenextproperty is referencing. In our visual, we can see that thenextproperty is pointing toNode 4. We will re-assigntopto beNode 4.
- We can now remove
Node 5safely without it affecting the rest of the stack. Before we do that though you may want to make sure that you clear out thenextproperty in your currenttempreference. This will ensure that no further references toNode 4are floating around the heap. This will allow our garbage collector to cleanly and safely dispose of the Nodes correctly.
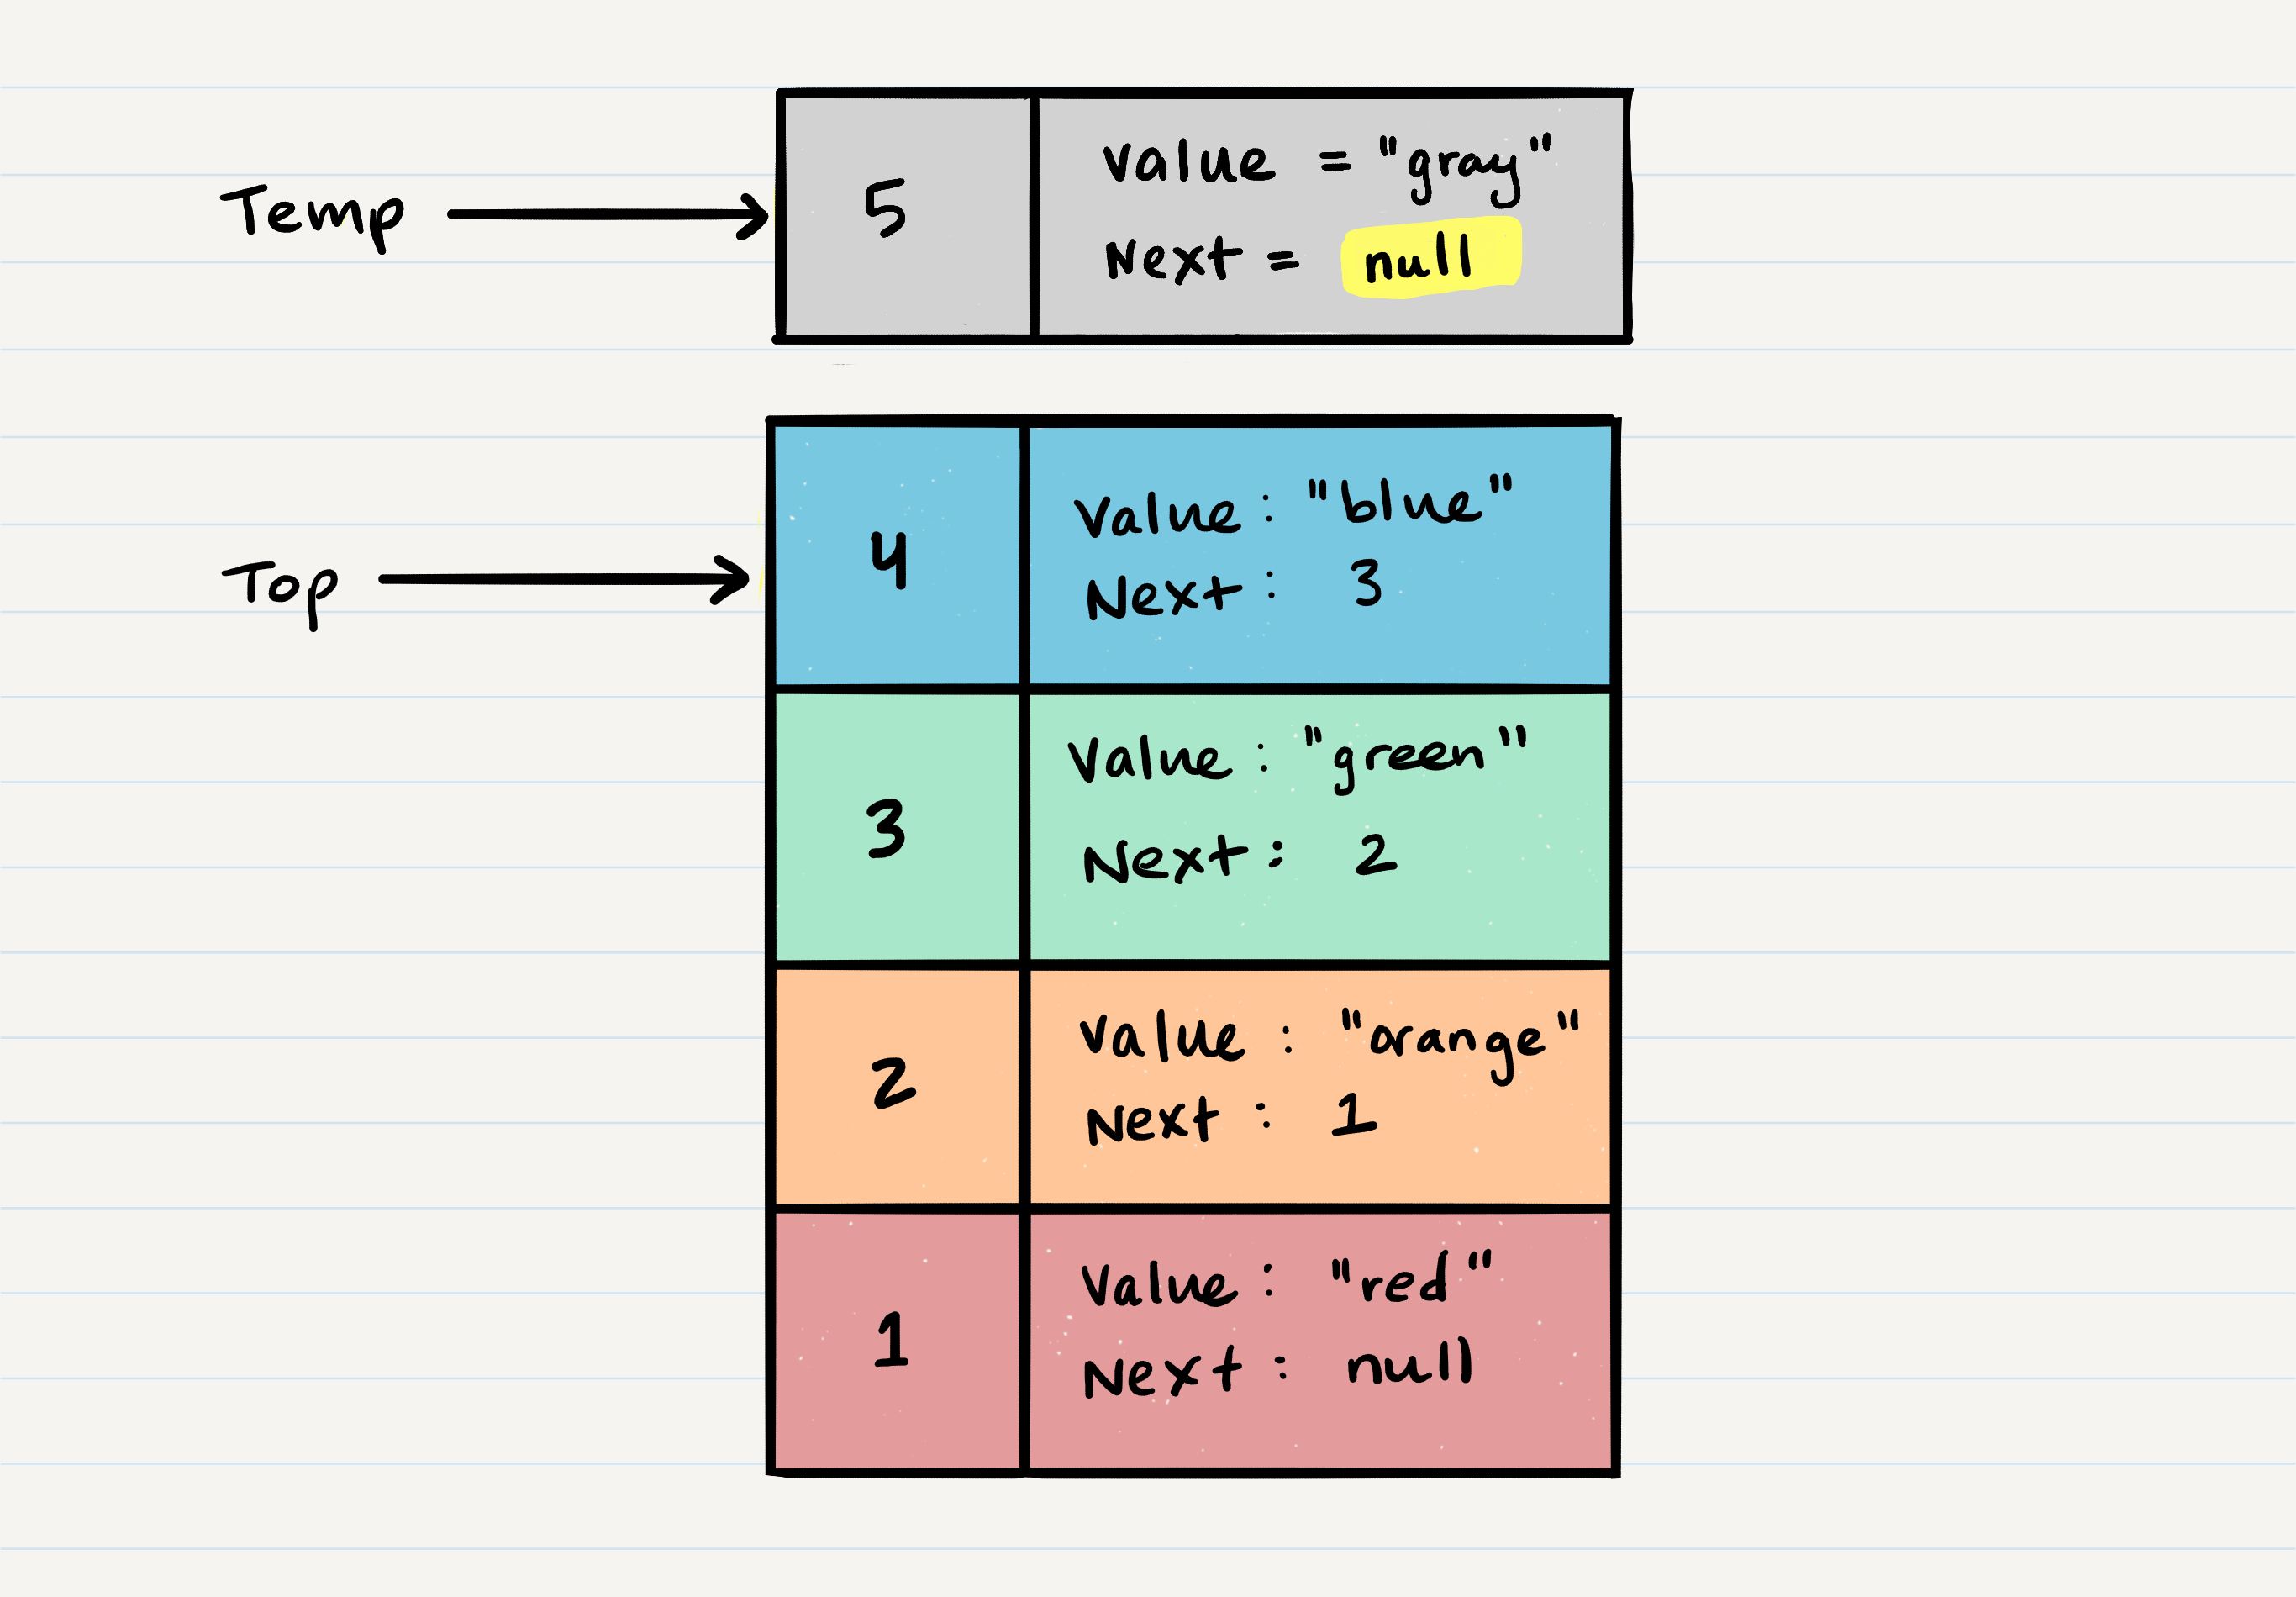
- Finally, we return the
tempNode that was just popped off.
Here is the pseudo code for a pop
ALGORITHM pop()
// INPUT <-- No input
// OUTPUT <-- top Node of stack

   Node temp <-- top
   top <-- top.next
   temp.next <-- null
   return temp
Peek O(1)
When conducting a peek, you will only be viewing the top Node of the stack.
Traditionally, you always want to peek before conducting a pop. This will ensure that you do not receive a NullExceptionError on your pop action.
Here is the Pseudo code for a peek
ALGORITHM peek()
// INPUT <-- none
// OUTPUT <-- top Node of stack

   return top
We do not re-assign the next property when we peek because we want to keep the reference to the next Node in the stack. This will allow the top to stay the top until we decide to pop.
What is a Queue
Common terminology for a queue is
- Enqueue - Nodes or items that are added to the queue.
- Dequeue - Nodes or items that are removed from the queue.
- Front - This is the front/first Node of the queue.
- Rear - This is the rear/last Node of the queue.
- Peek - When you
peekyou will view thetopNode in the queue. If the queue is empty, and you don’tpeek, you will receive aNullReferenceException.
Queues follow these concepts:
FIFO
First In First Out
This means that the first item in the queue will be the first item out of the queue.
LILO
Last In Last Out
This means that the last item in the queue will be the last item out of the queue.
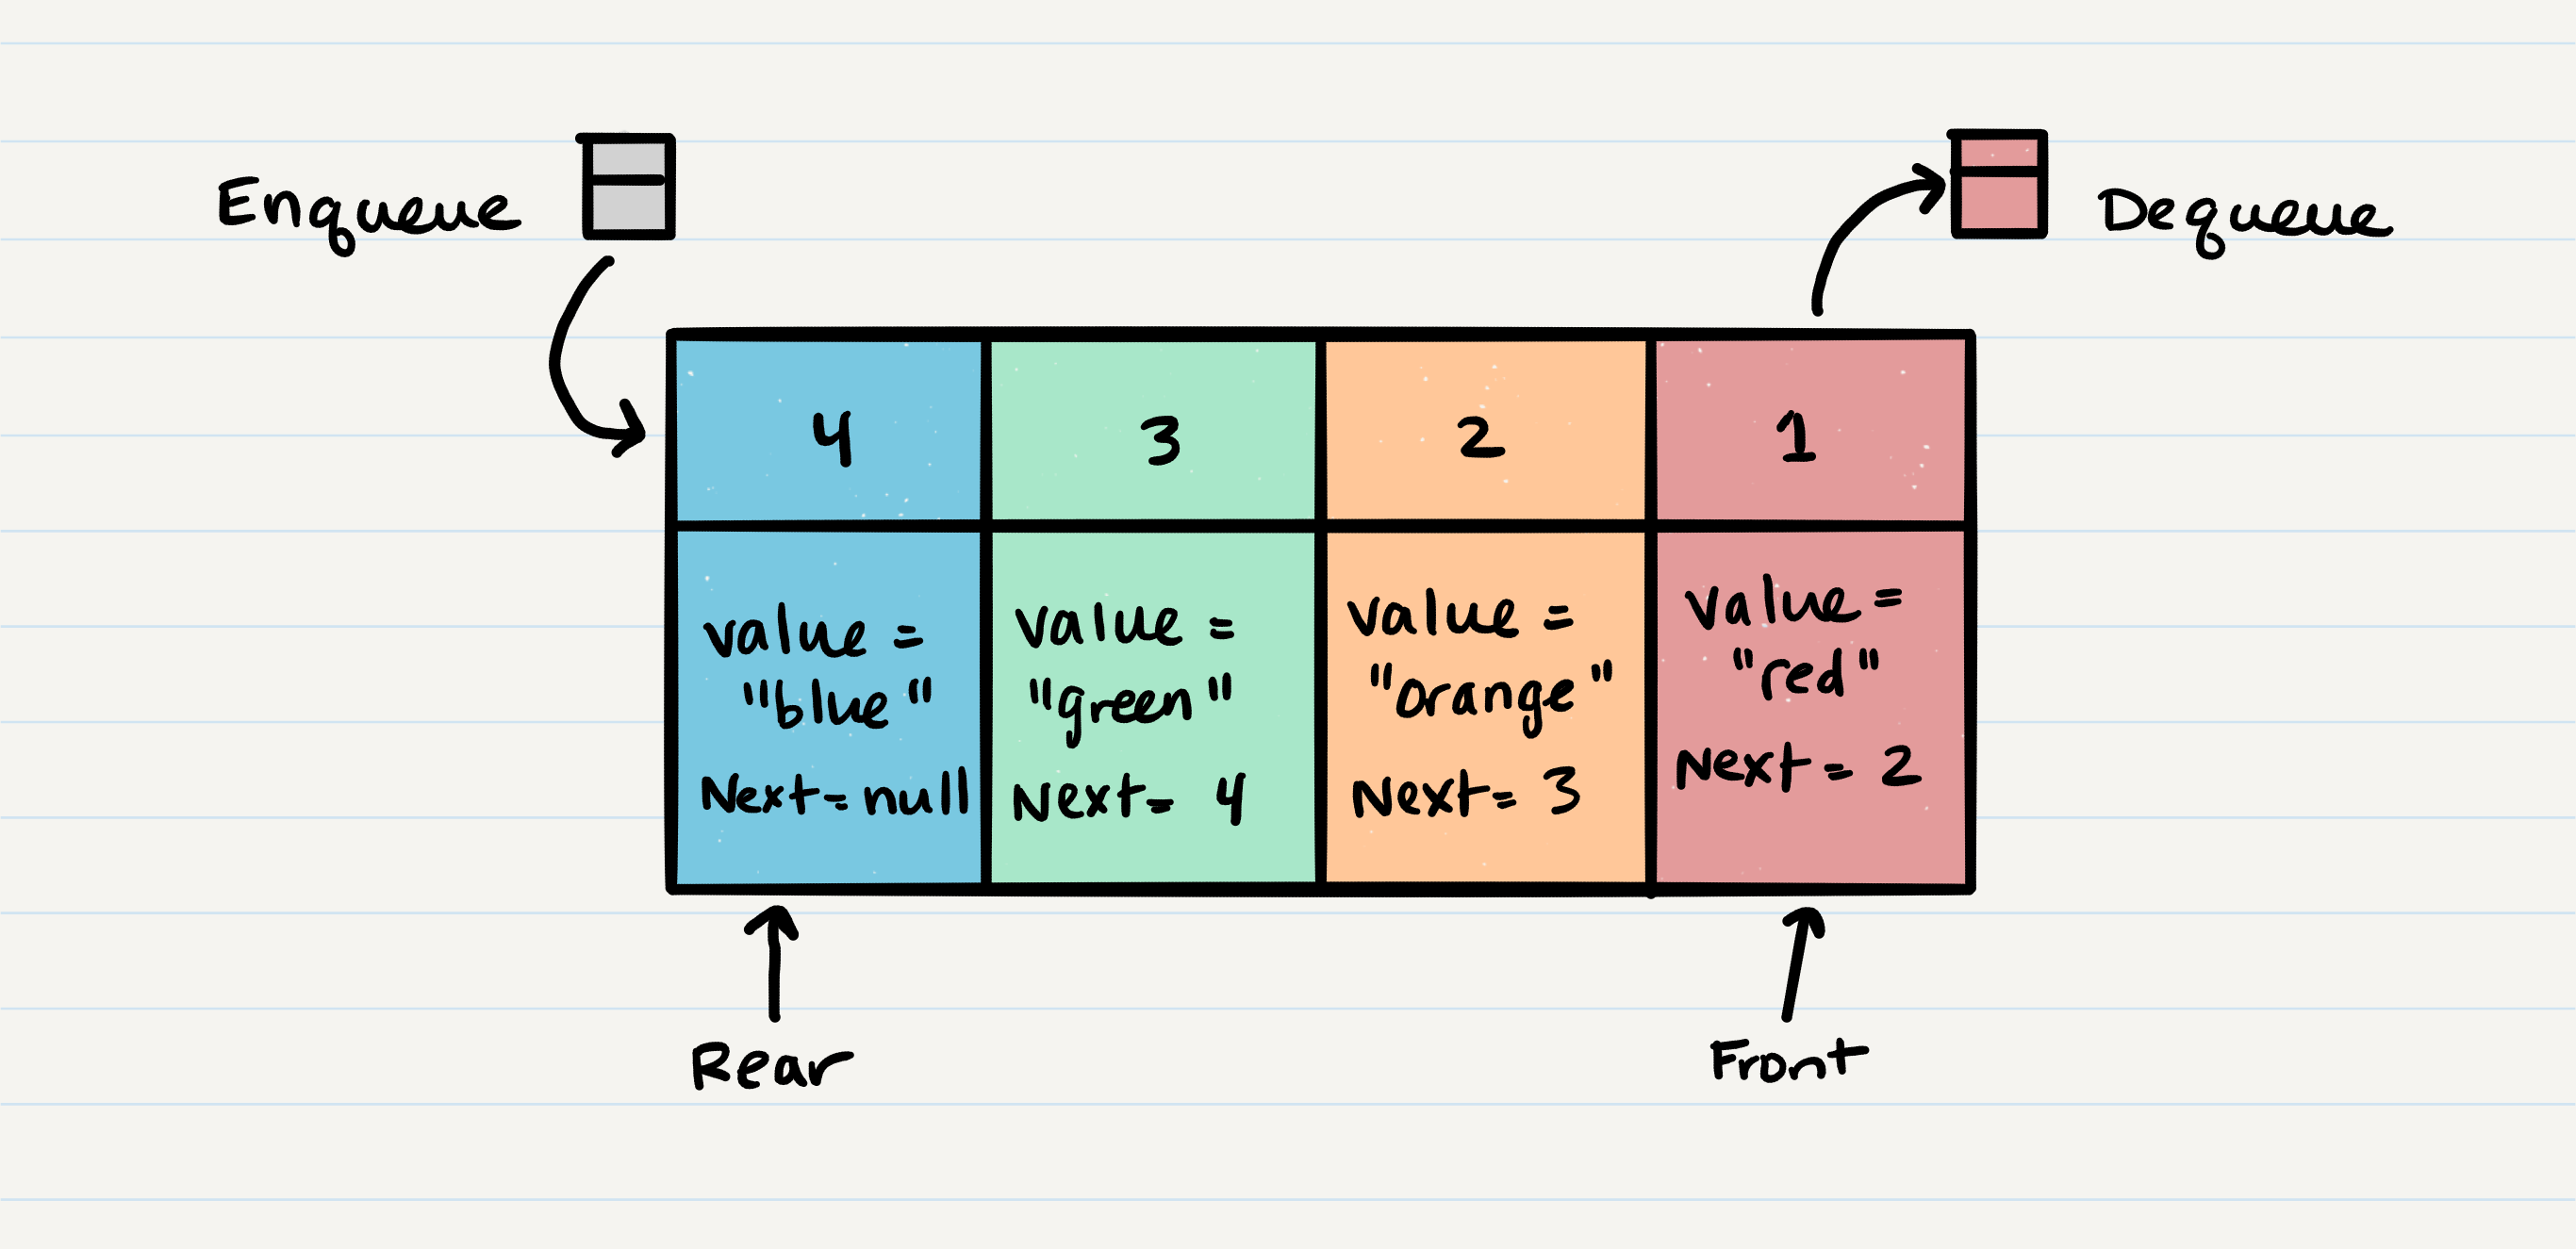
Queue Visualization
Here is what a Queue looks like:
Enqueue O(1)
When you add an item to a queue, you use the enqueue action. This is done with an O(1) operation in time because it does not matter how many other items live in the queue (n); it takes the same amount of time to perform the operation.
Let’s walk through the process of adding a Node to a queue:
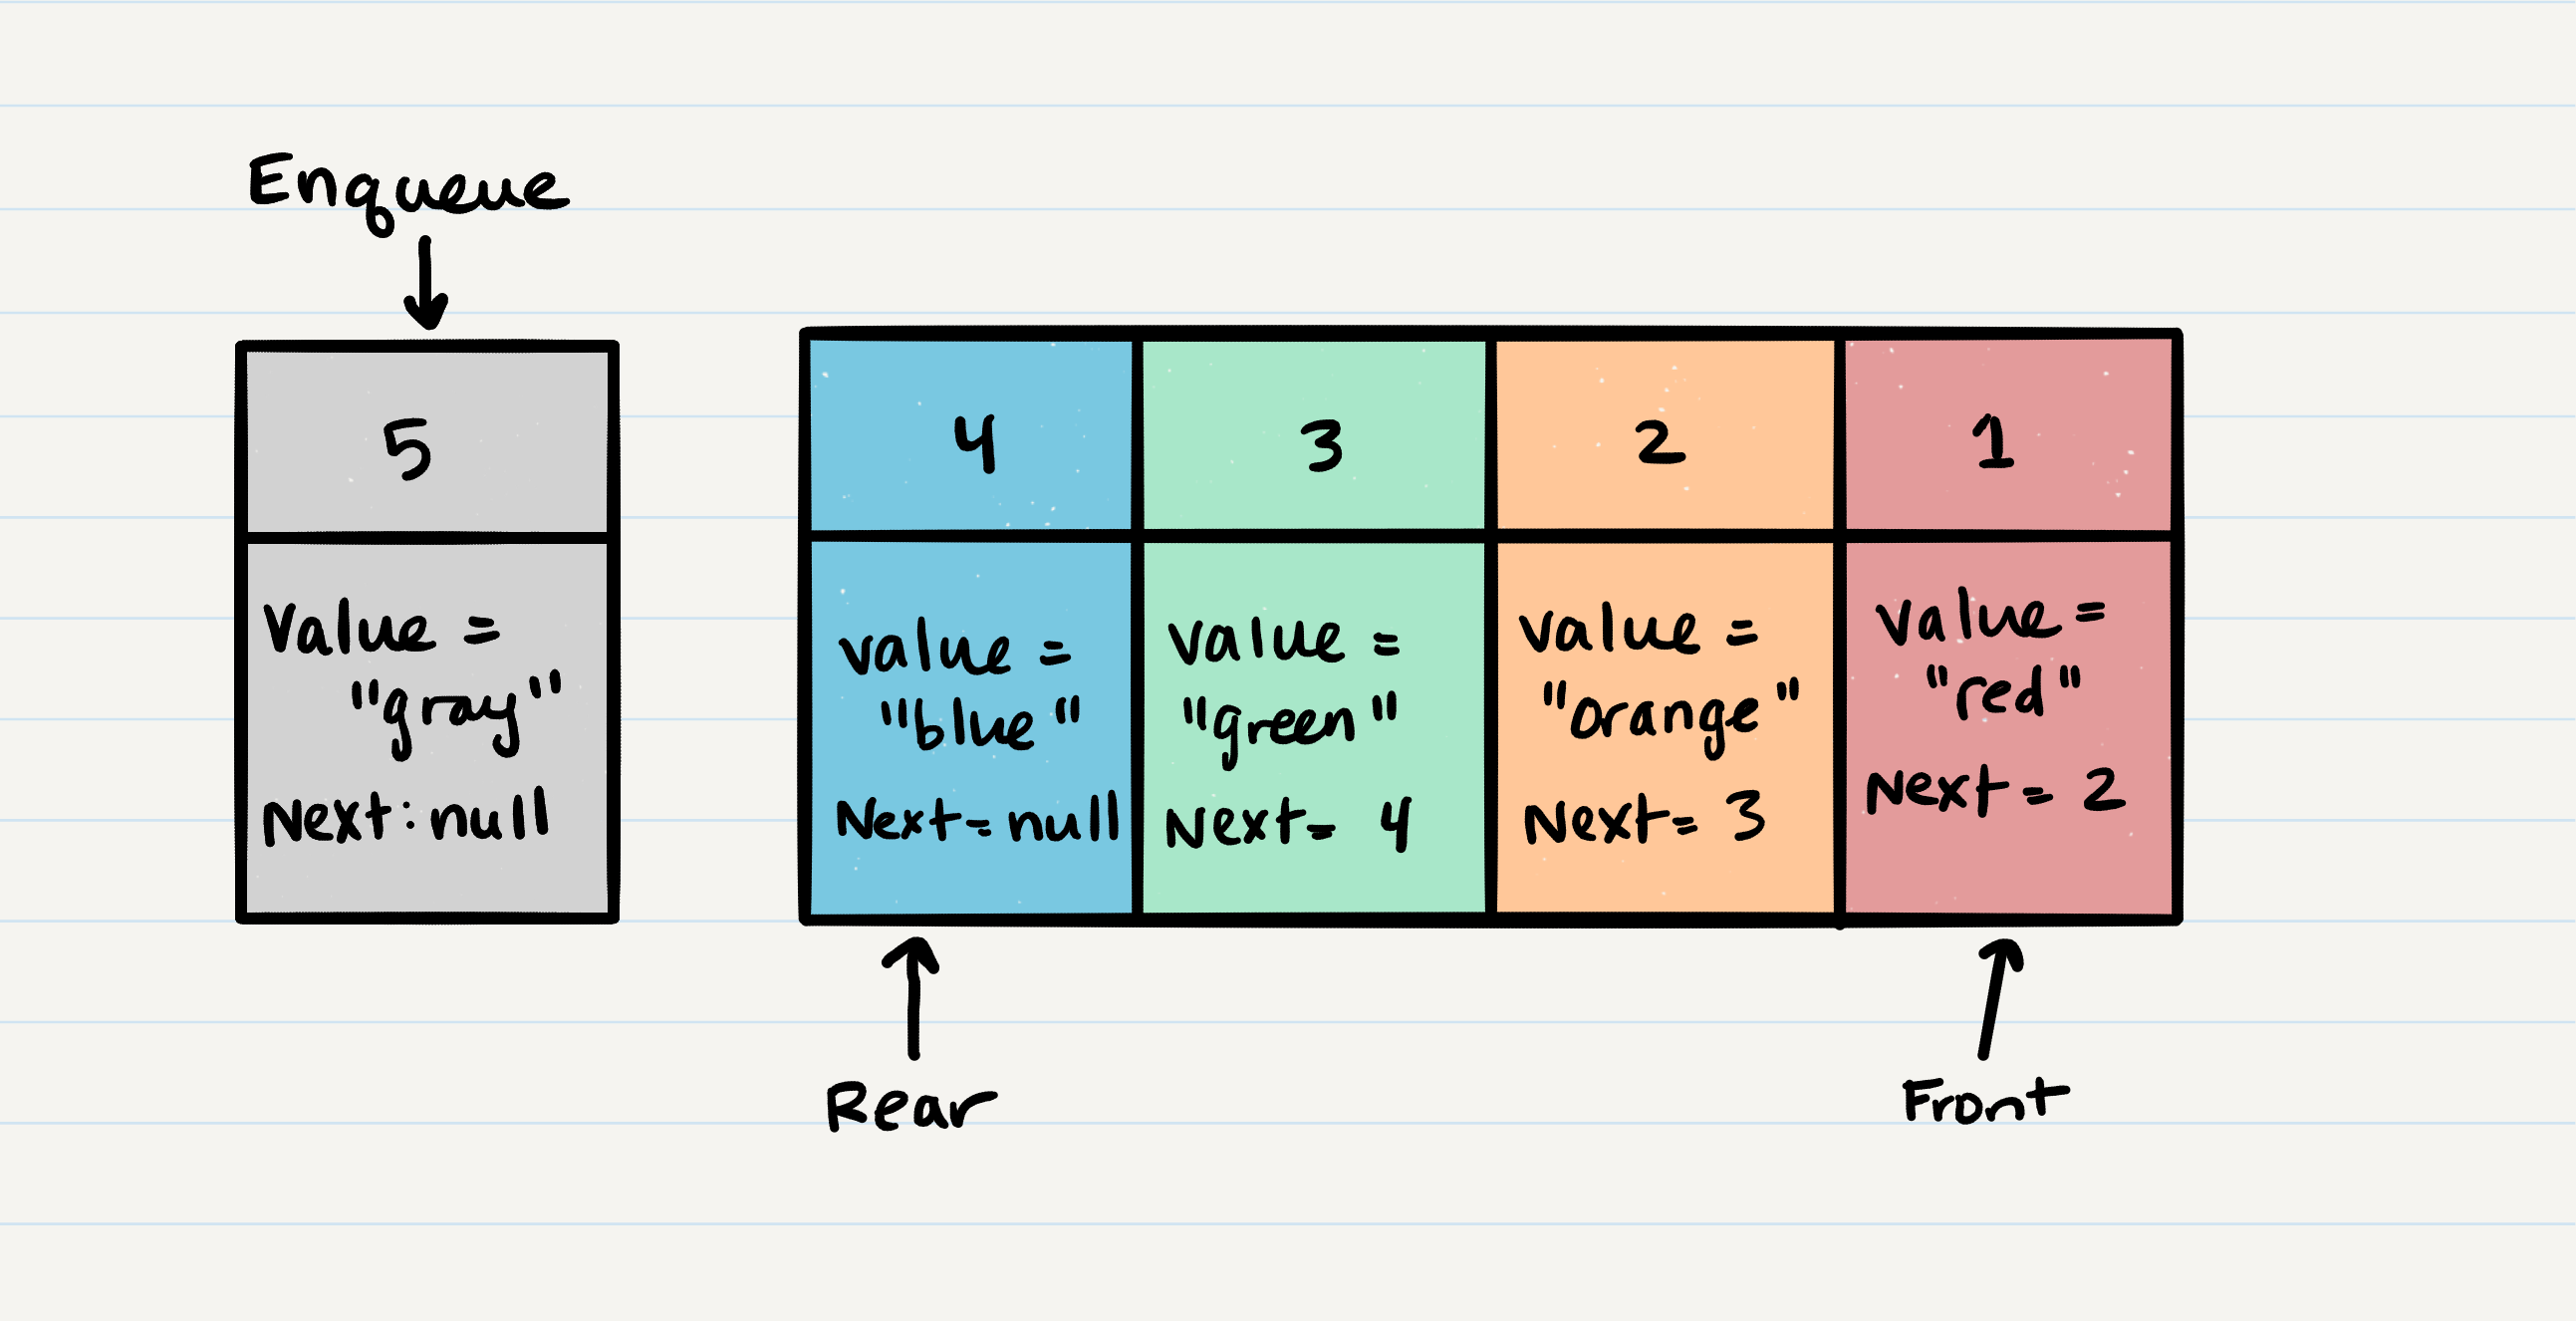
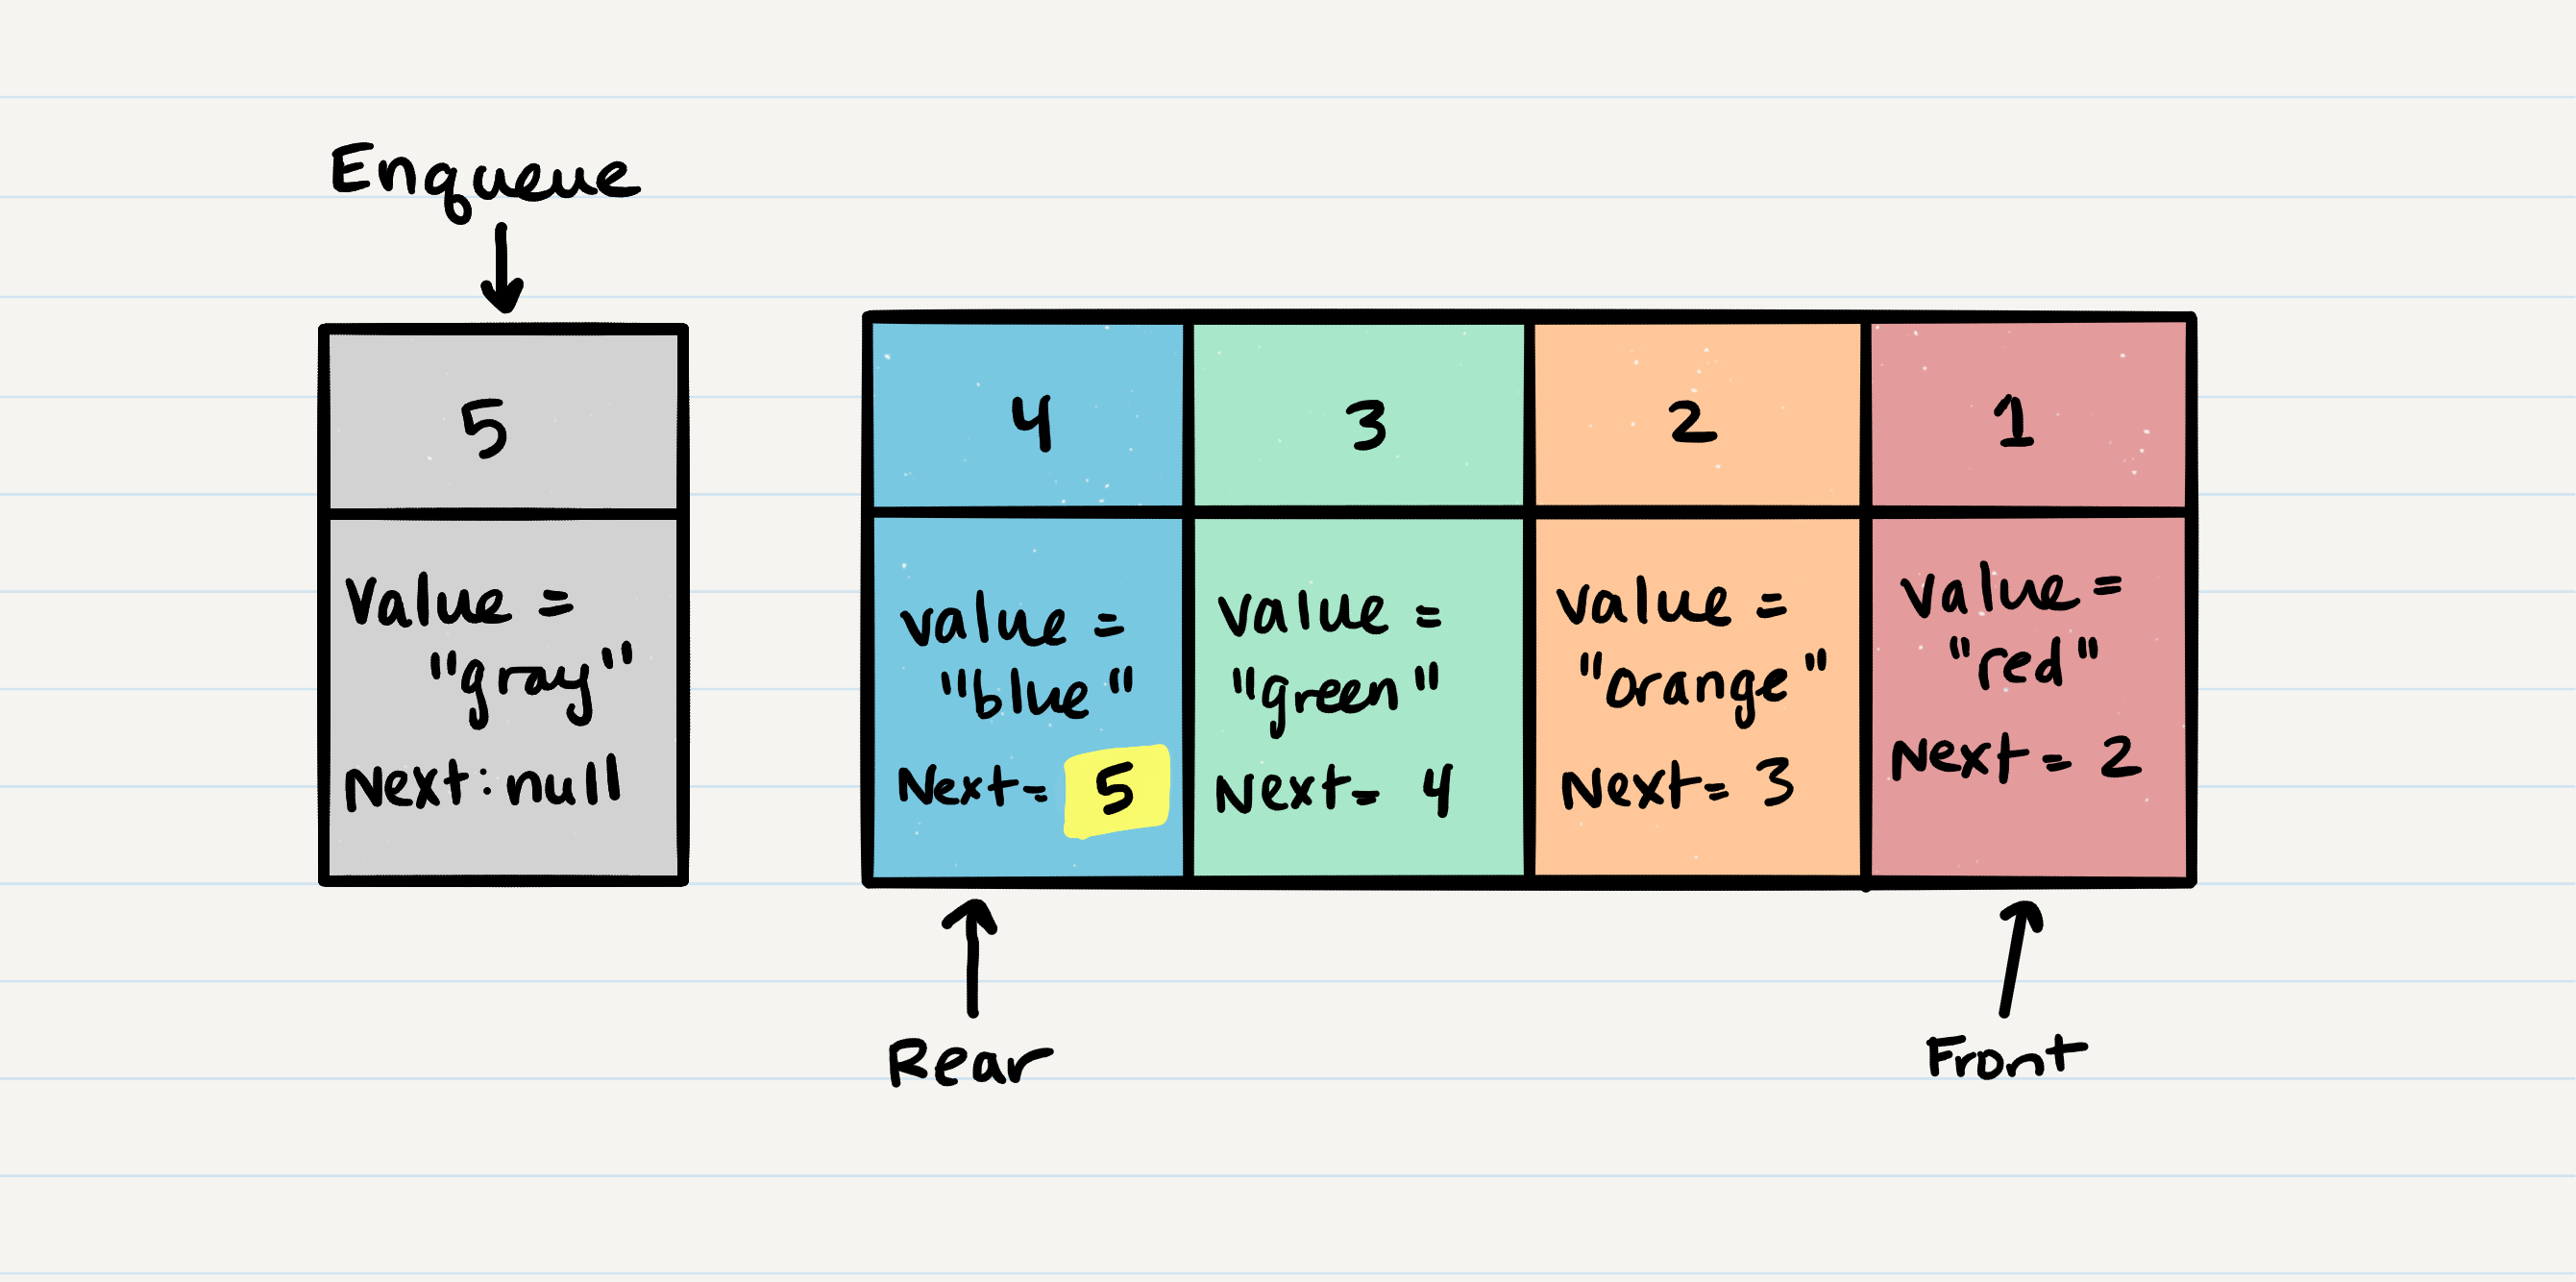
- First, we should change the
nextproperty ofNode 4to point to the Node we are adding. In our case with the visual below, we will be re-assigningNode 4’s.nexttoNode 5. The only way we have access toNode 4is through our referencerear. Following the rules of reference types, this means that we must changerear.nexttoNode 5.
- After we have set the
nextproperty, we can re-assign therearreference to point toNode 5. By doing this, it allows us to keep a reference of where therearis, and we can continue toenqueueNodes into the queue as needed.
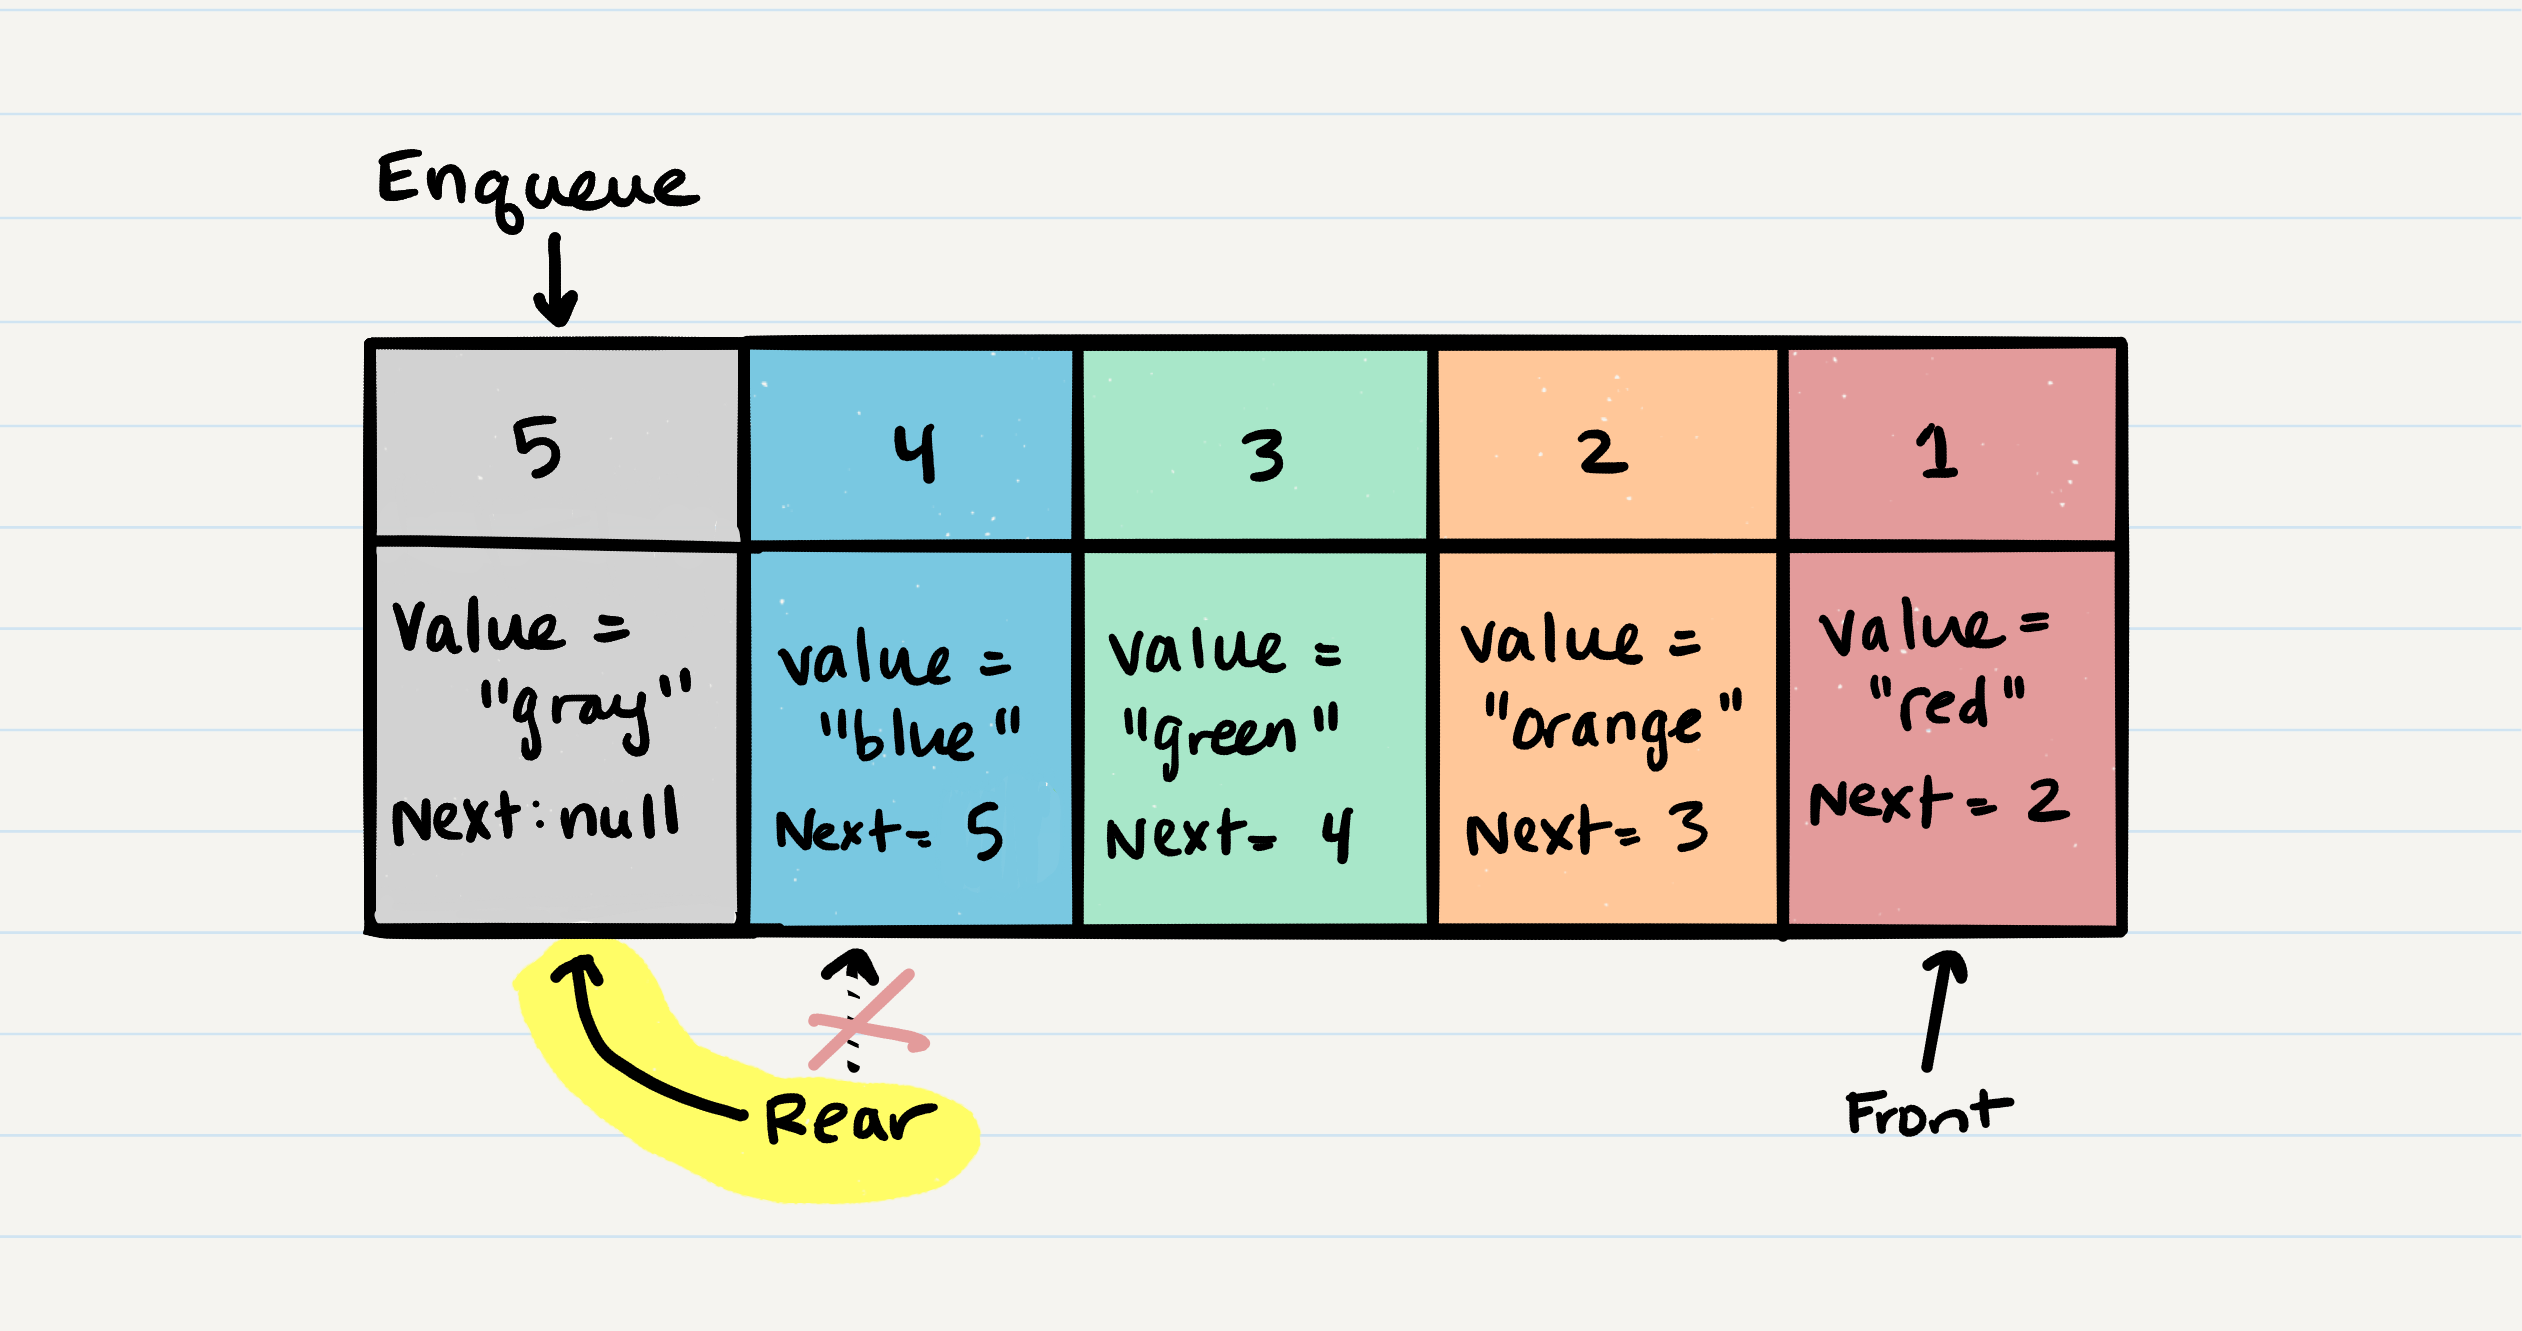
- Congratulations! You have just successfully added a Node to a queue by activating the
enqueueaction.
Code
Here is the pseudo code for the enqueue method:
ALGORITHM enqueue(node)
// INPUT <-- Node to add to queue
// OUTPUT <-- none

   rear.next <-- Node
   rear <-- Node
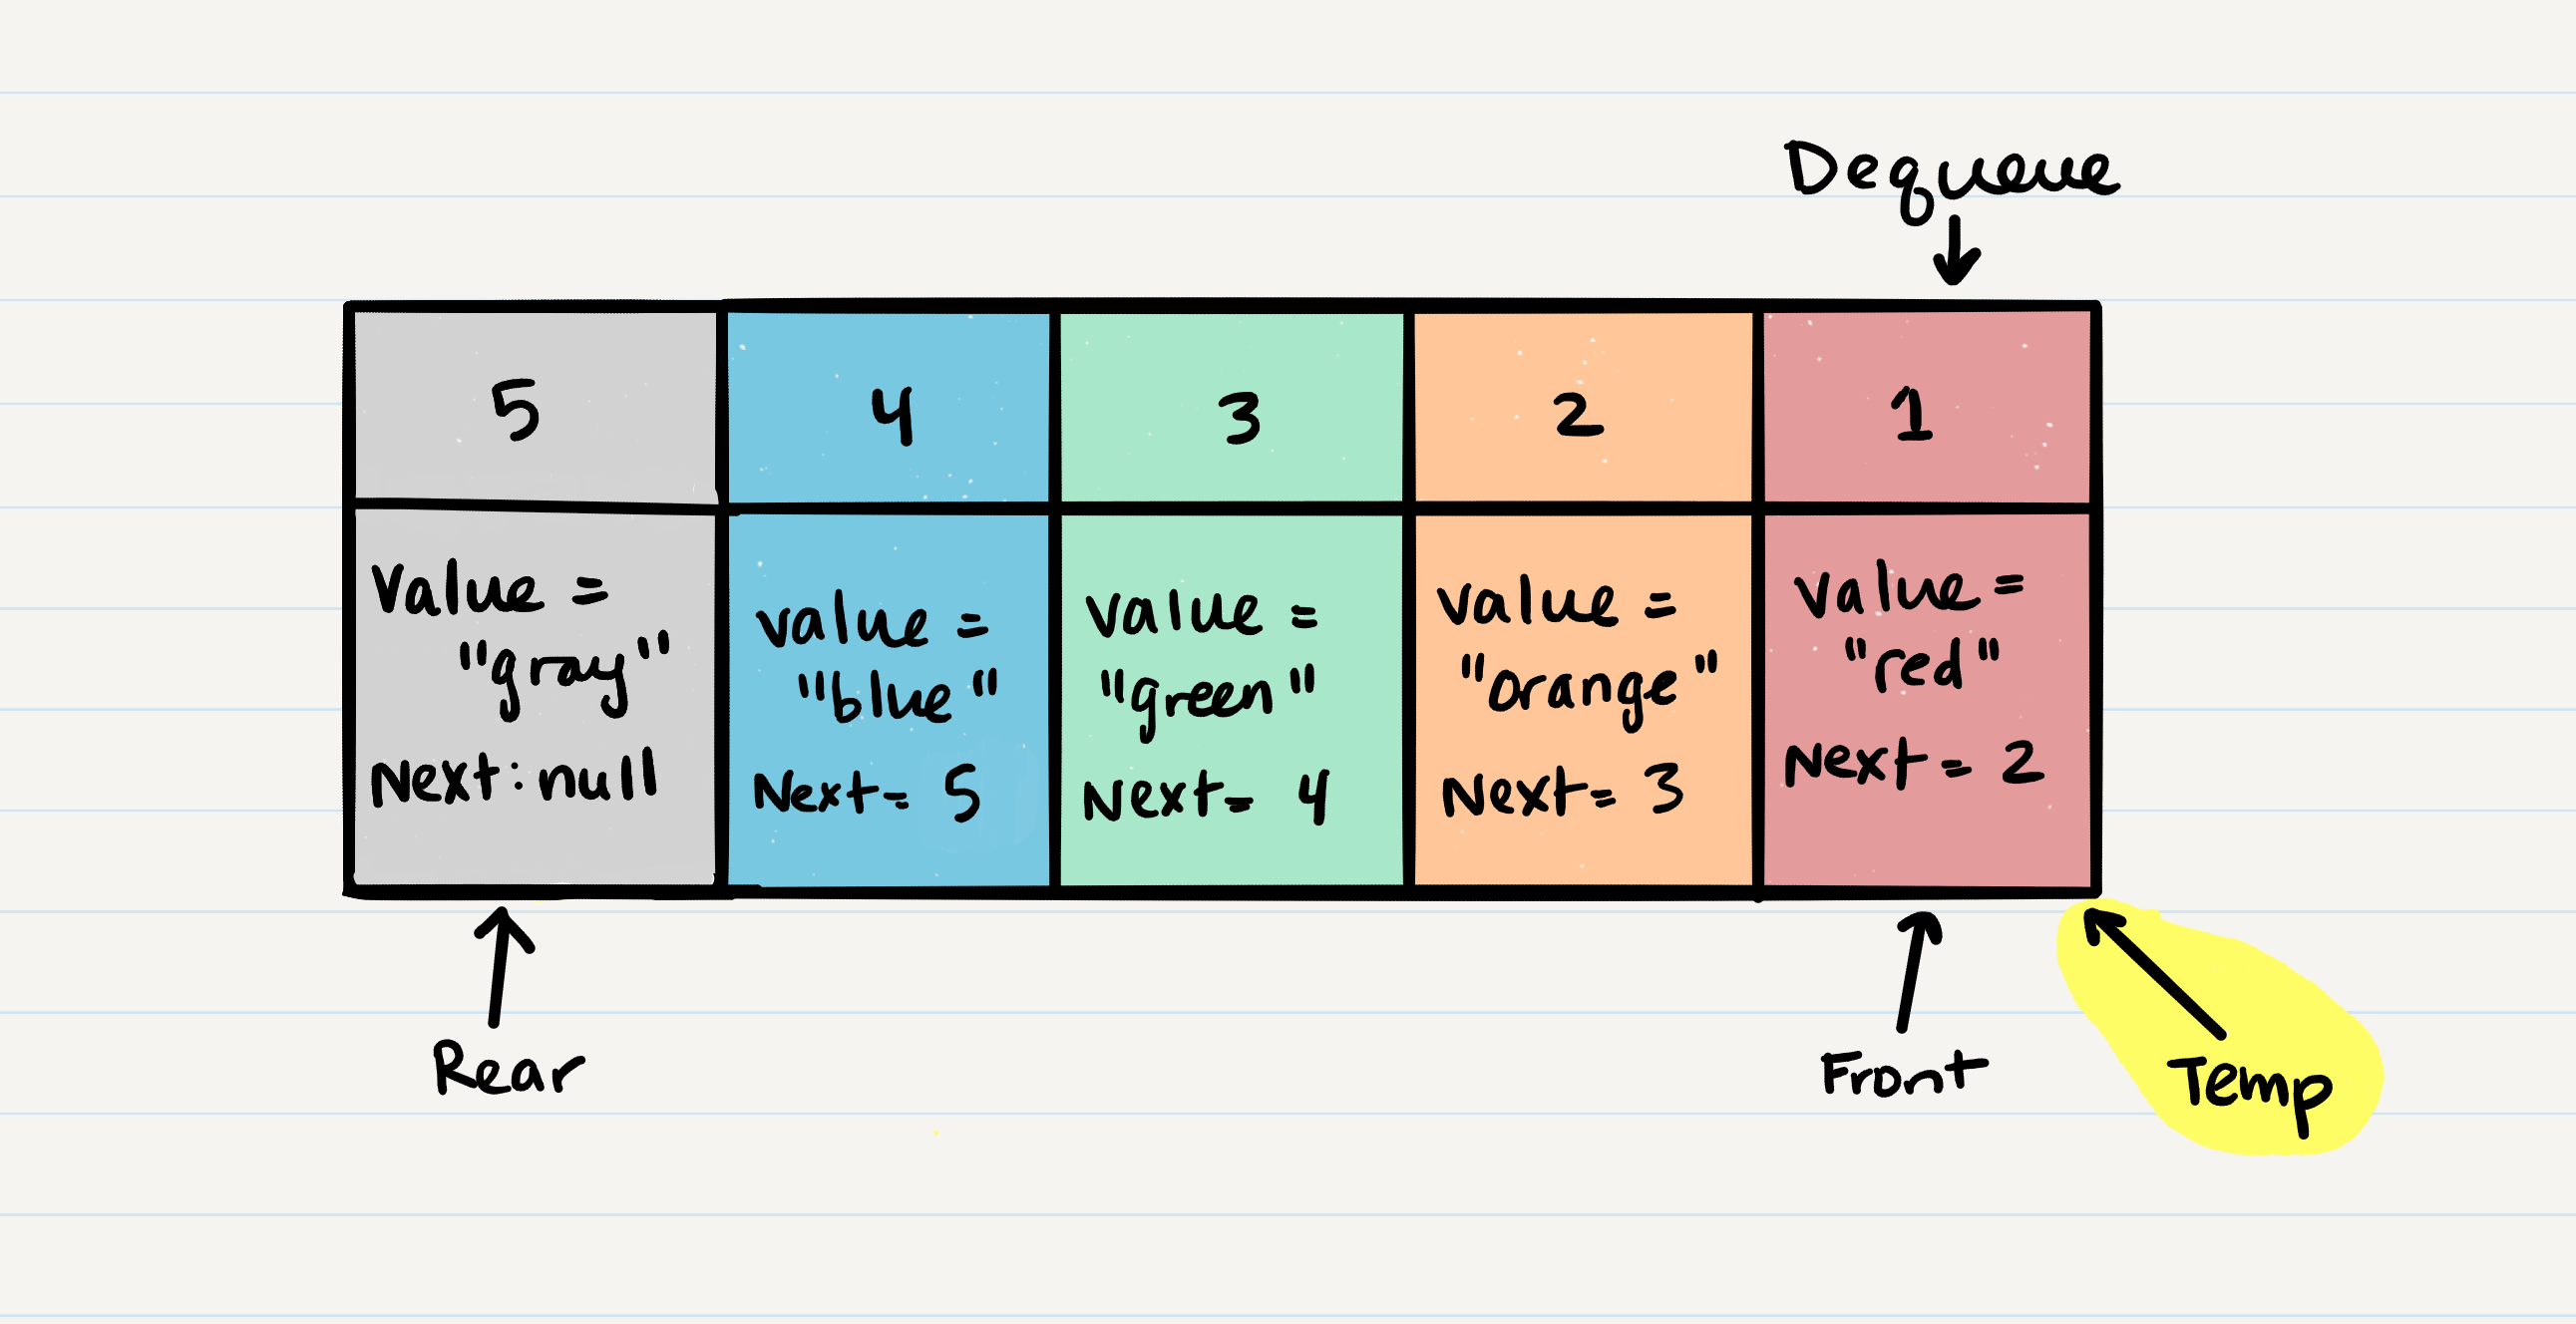
Dequeue O(1)
When you remove an item from a queue, you use the dequeue action. This is done with an O(1) operation in time because it doesn’t matter how many other items are in the queue, you are always just removing the front Node of the queue.
Let’s walk through the process of removing a Node from a queue.
- The first thing you want to do create a temporary reference type named
tempand have it point to the same Node thatfrontis pointing too. This means thattempwill point toNode 1
- Next, you want to re-assign
frontto thenextvalue that the Nodefrontis referencing. In our visual, this would beNode 2.
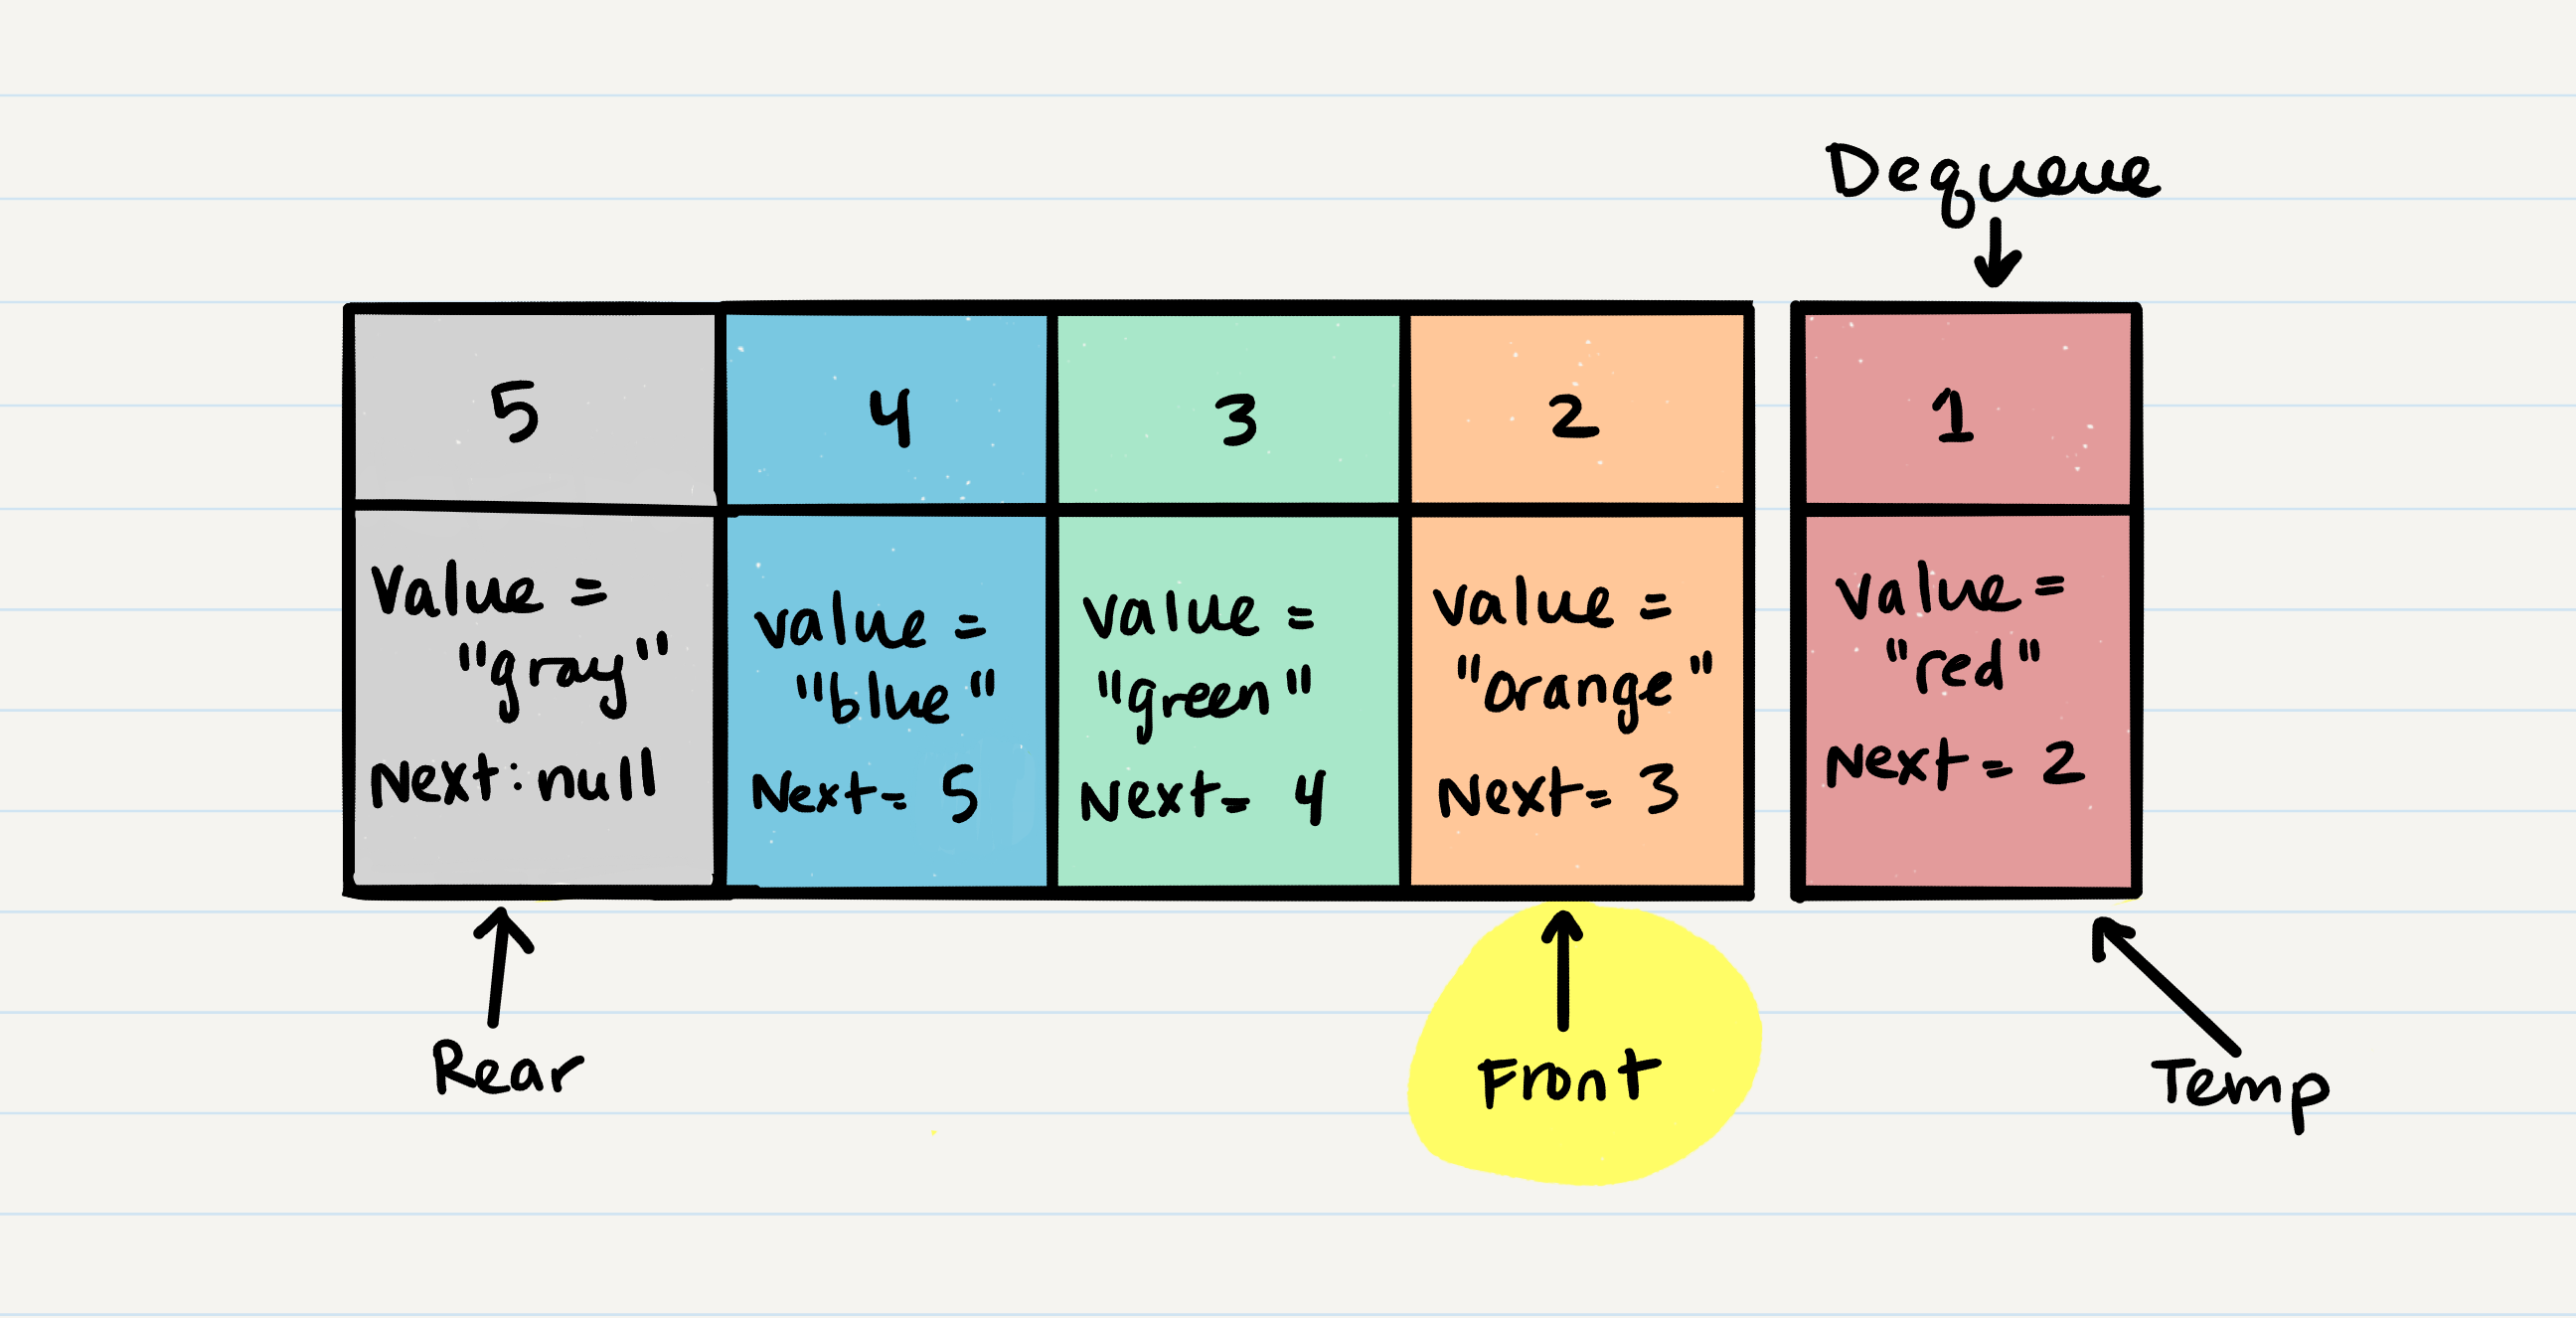
- Now that we have moved
Frontto the second Node in line, we can next re-assign theNextproperty on theTempNode to null. We do this because we want to make sure that all the proper Nodes clear any unnecessary references for the garbage collector to come in later and clean up.

- Congratulations! You have just successfully completed a
dequeueaction on a queue!
Code
Here is the Pseudo Code for the dequeue method:
ALGORITHM dequeue()
// INPUT <-- none
// OUTPUT <-- removed Node

   Node temp <-- front
   front <-- front.next
   temp.next <-- null

   return temp;
Peek O(1)
When conducting a peek, you will only be viewing the front Node of the queue. Traditionally, you always want to peek before conducting a dequeue. This will ensure that you do not receive a NullExceptionError on your dequeue action.
Code
Here is the pseudo code for a peek
ALGORITHM peek()
// INPUT <-- none
// OUTPUT <-- front Node of queue

   return front
We do not re-assign the next property when we peek because we want to keep the reference to the next Node in the queue. This will allow the front to stay in the front until we decide to dequeue
Prerequisites
You should include a requirement in both your Stack and Queue class to
guarantee that you have at least one Node starting out. Don’t forget to assign the proper properties to the correct locations in both the stack and the queue.