An Introduction To Django
A quick introduction to the basics of Django projects, apps and Models.
Starting a Project
Everything in Django stems from the project
When you install Django into a virtualenv, it provides a utility script,
django-admin.py. This script can be used to create a new project:
(djangoenv)$ django-admin.py startproject mysite
Project Structure
Running this command will create a folder called ‘mysite’. It contains the following structure:
mysite
├── manage.py
└── mysite
    ├── __init__.py
    ├── settings.py
    ├── urls.py
    └── wsgi.py
If after running the command you see a structure different than this, you’ll want to check the version of Django you installed. It should be 1.6.5.
Here’s what you have:
- outer *mysite* folder: this is just a container and can be renamed or moved at will
- inner *mysite* folder: this is your project directory. It should not be renamed.
- __init__.py: magic file that makes mysite a python package.
- settings.py: file which holds configuration for your project, more soon.
- urls.py: file which holds top-level URL configuration for your project, more soon.
- wsgi.py: binds a wsgi application created from your project to the
symbol
application - manage.py: a management control script.
django-admin.py vs. manage.py
django-admin.py provides a hook for administrative tasks and abilities:
- creating a new project or app
- running the development server
- executing tests
- entering a python interpreter
- entering a database shell session with your database
- much much more (run
django-admin.pywithout an argument)
manage.py wraps this functionality, adding the full environment of your
project.
When you look in the manage.py script Django created for you. You’ll see
this:
#!/usr/bin/env python
import os
import sys

if __name__ == "__main__":
    os.environ.setdefault("DJANGO_SETTINGS_MODULE", "mysite.settings")
    ...
The environmental var DJANGO_SETTINGS_MODULE is how the manage.py
script is made aware of your project’s environment.
This is why you shouldn’t rename the project package.
Since manage.py contains information about your specific environment, it is the tool you should use to run the development server:
(djangoenv)$ cd mysite
(djangoenv)$ python manage.py runserver
...
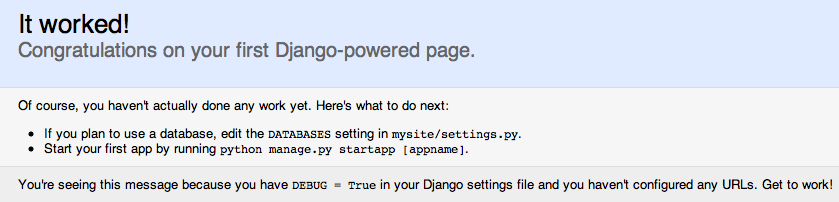
Django runs on port 8000 by default. Once it starts, you can view a new
project by loading http://localhost:8000/. You should see this:
Django and Databases
Django is really strongly tied to the idea of a database-driven
application.
You can create a Django site without a database, but that falls under the sin of fighting the framework, don’t do it.
You must provide connection information for the database you use through
Django configuration.
All Django configuration takes place in settings.py in your project
folder.
In settings.py, add the following to connect to a postgres DB via psycopg2:
DATABASES = {
    'default': {
        'ENGINE': 'django.db.backends.postgresql_psycopg2',
        'NAME': '<db_name>',
        'USER': '<db_user_name>',
        'PASSWORD': '<db_user_password>',
        'HOST': '<host_for_db>',
        'PORT': '<port_for_db>',
    },
}
Note that you will need to use createdb to create the postgresql
database you intend to use before Django can use it.
Note
You can designate more than one database, if needed. The settings for all databases are formatted as a dictionary of dictionaries:
As with any other framework, you have to start by initializing the database so it has the right tables.
In Django, this is done with the syncdb command:
(djangoenv)$ python manage.py syncdb
Creating tables ...
Creating table auth_permission
Creating table auth_group_permissions
Creating table auth_group
...
You just installed Django's auth system,
...
Would you like to create one now? (yes/no):
You can (and should) add your superuser at this prompt.
I usually use ‘admin’ and ‘admin’ for the username and password while playing.
If you choose a fancy name and password and then forget them, or if you forget
to create one when initializing your database, you can always create a new
superuser by using the createsuperuser manage.py subcommand:
[django16env]
heffalump:foo cewing$ python manage.py createsuperuser
Username (leave blank to use 'cewing'):
Email address: cris@crisewing.com
Password:
Password (again):
Superuser created successfully.
[django16env]
heffalump:foo cewing$
Django Apps
The app is Django's top-level unit of work.
Projects vs. Apps
We’ve created a Django project. In Django a project represents a whole website:
- global configuration settings
- inclusion points for additional functionality
- master list of URL endpoints
A Django app encapsulates a unit of functionality:
- A blog section
- A discussion forum
- A content tagging system
One project can (and likely will) consist of many apps. Apps are
made available to a project by including them in the INSTALLED_APPS
setting in the active settings.py file.
Django already includes some apps for you.
INSTALLED_APPS = (
    'django.contrib.admin',
    'django.contrib.auth',
    'django.contrib.contenttypes',
    'django.contrib.sessions',
    'django.contrib.messages',
    'django.contrib.staticfiles',
)
You can extend your Django site by creating an app of your own or by installing apps created by other Django programmers.
As stated above, an app represents a unit of work within a system, the
project. Once you have a project, you can create an app. This is
accomplished using manage.py.
(djangoenv)$ python manage.py startapp myapp
This should leave you with the following structure:
mysite
├── manage.py
├── myapp
│   ├── __init__.py
│   ├── admin.py
│   ├── models.py
│   ├── tests.py
│   └── views.py
└── mysite
    ├── __init__.py
    ...
Installing Your App
Extending Django with your app is accomplished by installing. This is pretty simple:
INSTALLED_APPS = (
    'django.contrib.admin',
    'django.contrib.auth',
    'django.contrib.contenttypes',
    'django.contrib.sessions',
    'django.contrib.messages',
    'django.contrib.staticfiles',
    'myapp', # <- YOU ADD THIS PART
)
Once your app is in this list, you can begin defining your data model by adding the models you will want.
The Django ORM
As stated above, Django is predicated on interactions with a database.
To simplify those interactions, Django uses an ORM (Object Relational Mapper).
The purpose of an ORM is to map the attributes of a software object onto the rows of a relational database.
The ORM is an abstraction of the database itself, and having it allows you to:
- Work with objects without needing to know SQL
- Use different databases without caring about syntax variations
Django Models
An ORM works by representing database tables as objects. In Django these are called models.
The other well-known Python ORM, sqlalchemy, uses the same concept,
but calls it a declarative_base.
Flask-Sqlalchemy masks this difference by returning the model
language.
Any Python class in Django that is meant to be persisted must inherit
from the Django Model class.
This base class hooks in to the ORM functionality converting Python code to SQL.
Learn more about models.
Models must be defined in the models.py Python module in your app.
As an example, consider a model similar to the one you created for your
learning journal project:
from django.db import models
from django.contrib.auth.models import User

class Entry(models.Model):
    title = models.CharField(max_length=128)
    text = models.TextField(blank=True)
    created_date = models.DateTimeField(auto_now_add=True)
    author = models.ForeignKey(User)
This creates a subclass of the Django base Model class. These few first
attributes are instances of types of Django Model Fields.
Model Fields
Fieldclasses are defined in Django (or in add-on packages)- Field attributes on a model map to columns in a database table
- The arguments you provide to each Field customize how it works
- This means both how it operates in Django and how it is defined in SQL
- There are arguments shared by all Field types
- There are also arguments specific to individual types
- You can read much more about Model Fields and options.
There are some features of our fields worth mentioning in specific.
For example, we have no field that is designated as the primary key.
- You can make a field the primary key by adding
primary_key=Truein the arguments - If you do not, Django will automatically create one. This field is always
called
id - No matter what the primary key field is called, its value is always
available on a model instance as the
pkattribute.
title = models.CharField(max_length=128)
The required max_length argument is specific to CharField fields.
It affects both the Python and SQL behavior of a field.
In python, it is used to validate supplied values during model validation
In SQL it is used in the column definition: VARCHAR(128)
author = models.ForeignKey(User)
Django also models SQL relationships as specific field types.
The required positional argument is the class of the related Model.
By default, the reverse relation is implemented as the attribute
<fieldname>_set.
You can override this naming behavior by providing the related_name
argument. You can also prevent the reverse lookup through customization.
created_date = models.DateTimeField(auto_now_add=True)
auto_now_add is available on all date and time fields. It sets the
value of the field to now when an instance is first saved.
auto_now is similar, but sets the value anew each time an instance is
saved.
Setting either of these will cause the editable attribute of a field to
be set to False.
text = models.TextField(blank=True)
The argument blank is shared across all field types. The default is
False
This argument affects only the Python behavior of a field, determining if the field is required
The related null argument affects the SQL definition of a field: is the
column NULL or NOT NULL
It is generally advised that you not use null for text-type fields. This allows Django to by-default provide an empty string if blank input is allowed.
Initializing Your Tables
Once your models are set, you have to create the database tables they define. This is accomplished in the same basic way as for the pre-installed apps:
(djangoenv)$ python manage.py syncdb
Creating tables ...
Creating table myapp_entry
Installing custom SQL ...
Installing indexes ...
Installed 0 object(s) from 0 fixture(s)
Django has now created a table for the new model. Notice that the table name is a combination of the name of the app and the name of the model. You can manually determine the names of the tables, but it’s not suggested.
Django and WSGI
As with Flask and other modern Python web frameworks, Django operates as a
WSGI application.
Let’s take a moment to trace how that works.
WSGI Plumbing
In your project, you’ll find a file called wsgi.py. Open it and you’ll
find the following code:
import os
os.environ.setdefault("DJANGO_SETTINGS_MODULE", "mysite.settings")

from django.core.wsgi import get_wsgi_application
application = get_wsgi_application()
That points us to a functon called get_wsgi_application in the
django.core package.
from django.core.handlers.wsgi import WSGIHandler

def get_wsgi_application():
    """
    ...
    """
    return WSGIHandler()
Again, it would appear that the application is a class instance. It must be callable. Let’s look it up:
class WSGIHandler(base.BaseHandler):
    initLock = Lock()
    request_class = WSGIRequest

    def __call__(self, environ, start_response):
        # ...
        signals.request_started.send(sender=self.__class__)
        try:
            request = self.request_class(environ)
        except UnicodeDecodeError:
            # ...
            response = http.HttpResponseBadRequest()
        else:
            response = self.get_response(request)
        # ...
        status = '%s %s' % (response.status_code, response.reason_phrase)
        response_headers = [(str(k), str(v)) for k, v in response.items()]
        for c in response.cookies.values():
            response_headers.append((str('Set-Cookie'), str(c.output(header=''))))
        start_response(force_str(status), response_headers)
        return response
Next Steps
Tonight, you’ll explore the basics of Django further by walking through the Django Tutorial.
As you go along, pay attention to how the steps you take are similar to (and different from) working in Flask.
In our next session, we’ll begin defining models for our class Django project, a photo-sharing site with features like Flickr or Instagram.