Whiteboard Challenge Workflow
This file contains details on what is expected when completing a whiteboard challenge. Please refer to the visual as a guideline to what content is required for each whiteboarding challenge.
Overall Guidance on Whiteboard Workflow
The steps in this document are meant to show you one solid workflow. It’s a structure that works for most people to help them solve whiteboarding problems effectively.
As you get started doing whiteboards, we suggest that you stick to the steps we recommend, in the order that we recommend. Once you gain more confidence in the process of whiteboard interviewing, you are welcome to deviate from this process at your own risk. If you find that pieces of the process do not work well for you, or make more sense in a different order, that’s allowed! And during an interview, you should always be prepared for an interviewer to ask you to complete steps in a different order than you’re used to, or to ask you to clarify your thinking even when your normal process would move on. Listening to and working with your interviewer is always the best option, and you should expect that not every whiteboard interview will go the same way.
For an example of an instructor solving a whiteboard (quickly) with a modified version of this process, see this YouTube video.
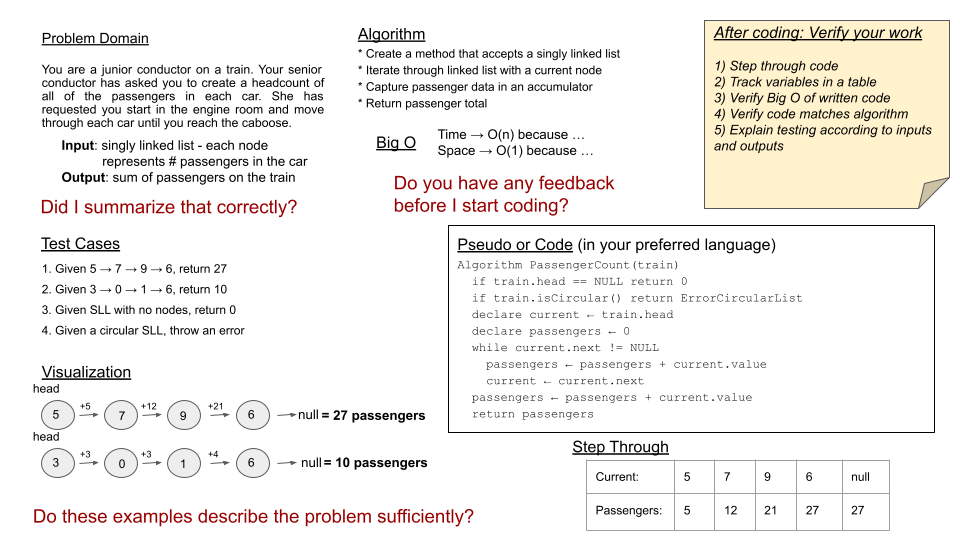
1. Problem Domain
Re-iterate the problem domain that you have been asked. This can be done either verbatim from the initial question, or a summary in your own words, whatever makes more sense to you.
2. Visual
Draw out what the problem domain is and visually solve the problem. Label all of the appropriate properties, define your input and output, and show how you will approach the problem towards a solution.
(It’s common for people to switch up the ordering on visuals/problem domain depending on the problem; sometimes, drawing a picture helps you understand the problem better, at which point you can write out the problem domain.)
3. Algorithm
The algorithm is a breakdown of what you need to achieve. This should be a bulleted list or a general overview of what you plan to implement later in the interview.
The most practical way of creating an algorithm is often to focus on the example input/output in your visual. You should consider the steps that your algorithm will take to use the input in moving towards the output. This process of working through the problem yourself, and noticing the steps you take along the way, should naturally help you flesh out the steps that will be part of your algorithm.
4. Big O
Analyze the space AND time efficiency of the algorithm that you just proposed. You should revisit this analysis throughout the interview as you make updates to your algorithm during pseudocode/code/stepthrough.
5. Pseudocode
Write out pseudocode that defines your algorithm! Use the pseudocode cheat sheet as a guideline to what symbols are acceptable.
6. Code
Write out syntactically correct code in the language of your course to solve the problem presented. Your real code should be based off of your pseudocode.
7. Test
There are two main parts to testing. First, walk through both the problem domain and your solution to make sure that it both works and is efficient. This should be a careful, line-by-line stepthrough of your code, where you track variables in a written table along the way. It’s very normal to start the stepthrough, realize that you have a bug in your code, and go back to your code to try and fix the bug; in this case, make sure to go back to careful stepthrough for any modified parts of your code.
Secondly, you should talk about how you would test this code if you were writing unit tests. This means listing out a variety of test cases; your goal is to show the interviewer that you know what kinds of tests are useful to ensure that a function is working. At a minimum, you want to list out:
- a standard input and output
- a standard input that has a different output than your first listed i/o
- some edge cases in how the data is structured; you’ll probably list several of these (the array is already sorted! the tree is very unbalanced! the string is just the character ‘a’ twelve times! etc.)
- the input is null/negative/zero (the “normal” edge cases)
Examples of What That Looks Like
In the best possible interview, you might have all of the ideas that you need and be able to move in this perfect linear order. In most interviews, though, you won’t have that perfect flow from step 1 linearly through to step 7.
While no two interviews will look the same, here is one example of a normal interview process:
- Step 1: You write down the problem domain as the interviewer reads the problem to you.
- Step 2: You draw a picture of what that input will look like and write down what you think the output will be.
- Step 1 Again: The interviewer corrects you: your proposed output is incorrect. You revisit the problem domain.
- Step 2 Again: Now that you understand the problem better, you come up with a more representative visual.
- Steps 2 And 3: You develop your algorithm. You show with arrows in your visual how you’ll transform the input into the output, and write down a bulleted list of steps as you go.
- Step 4: You analyze the runtime and space complexity of the algorithm you just proposed, using big O notation.
- Step 4.5: The interviewer asks you why you’ve chosen to use a particular data structure instead of some other choice, and how that impacts your runtime and space complexity. You reason through the use of that data structure vs. alternatives verbally with the interviewer, and decide your choice of data structure was good, and you’ll continue using it.
- Step 5: You decide your algorithm has some ambiguity, so you start writing pseudocode that matches your algorithm.
- Step “Oh No”: You realize which part of your algorithm was imprecise; there’s more going on in this problem than you realized. You go back to your visual and algorithm and try to work through how this new realization fits in.
- Steps 2 And 3 And 4 Again: You figure out how you’ll work through this issue, and add that into your arrows and your bullet points. Since you’ve changed your approach, you also change your estimate of the runtime/space complexity.
- Step 5 Again: You keep working through your pseudocode.
- Step 6: You write out syntactically correct code that matches your pseudocode.
- Step 7: You start stepping through your example input from Step 2, walking through your syntactically correct code line by line.
- Step “Oh No” Again: You realize as you step through that your code doesn’t actually generate the output that you expected.
- Step 6 Again: You debug your code and get it working on your example input.
- Step 4 Again: Since you changed your code while debugging, you re-analyze runtime/space complexity.
- Step 6 Again: You finish your stepthrough on the example input, and it’s now generating the correct output.
- Step 7, Continued: You list out test cases that you would want to test this program on.
- Step 8: Whatever your interviewer says!
Advanced Whiteboard Interviewing: Making this process your own
After practicing whiteboard interviews, many people find that they want to modify this process. Here are some common things students want to do, and our analysis of those options.
Skipping or Shortening the Problem Domain
It’s possible to have a successful whiteboard without writing the problem domain on the whiteboard first. It’s often okay to just write a few notes of the important pieces of the problem and use a visual with example input/output to verify with your interviewer that you understand the problem. Be aware that some interviewers will not correct you if you are working on the wrong problem, so it is extremely important that you verify the problem domain verbally, even if you don’t write it on the whiteboard.
Shortening Algorithm, Pseudocode, and Actual Code
We include all 3 of algorithm/pseudocode/actual code because, for many people, each of those steps helps to refine their algorithm. The first iteration of the algorithm helps get ideas of thoughts down on the whiteboard; the second iteration helps ensure that those ideas will translate well into code; and the third iteration allows you to focus on your language’s syntax. If you are a person who writes an extremely exact code-like algorithm, or if you are very comfortable with your language’s syntax, you may find that the pseudocode step slows you down without providing any benefits. In that case, it’s fine to skip the pseudocode step.
“Skipping Around” between Algorithm and Actual Code
It is almost always a bad idea to figure out half of your algorithm, write code for that half of your algorithm, and then figure out the rest of your algorithm. If you have half a strategy, but have no idea how to do the second half, you’ll often need to change the first half of your strategy once you figure out a complete algorithm. You run the risk of coming up with the start of your strategy, taking the time to write out code for that part of your strategy, coming back to thinking about your strategy, and realizing you need a different strategy and no longer need the code that you wrote. It’s best to have some idea of how you’ll solve the entire problem before you start writing code.
There’s one exception: sometimes you have the majority of your algorithm, and you’re confident it will work, but you’re not sure about some small piece (whether the loop should run n or n-1 times, or whether to use a HashTable or a HashSet, or something else insignificant compared to the “interesting” part of the algorithm). In that case, writing out your code and then coming back to the tiny-question afterwards is usually a good strategy; a good stepthrough will help you know the right solution.
Writing Headings on the Whiteboard
Some people love writing the headings “Problem Domain”, “Visual”, etc. on the whiteboard to help them remember the steps they want to take. Other people find that feels robotic, and that they naturally flow among different parts of the whiteboard during problem solving. Either strategy is reasonable, as long as you’re consistent (either lots of headings, or no headings).