Linked Lists
What is a Linked List
A Linked List is a sequence of Nodes that are connected/linked to each other. The most defining feature
of a Linked List is that each Node references the next Node in the link.
There are two types of Linked List - Singly and Doubly. We will be implementing a Singly Linked List in this implementation.
Terminology:
- Linked List - A data structure that contains nodes that links/points to the next node in the list.
- Singly - Singly refers to the number of references the node has. A
Singlylinked list means that there is only one reference, and the reference points to theNextnode in a linked list. - Doubly - Doubly refers to there being two (double) references within the node. A
Doublylinked list means that there is a reference to both theNextandPreviousnode. - Node - Nodes are the individual items/links that live in a linked list. Each node contains the data for each link.
- Next - Each node contains a property called
Next. This property contains the reference to the next node. - Head - The
Headis a reference of typeNodeto the first node in a linked list. - Current - The
Currentis a reference of typeNodeto the node that is currently being looked at. When traversing, you create a newCurrentvariable at theHeadto guarantee you are starting from the beginning of the linked list.
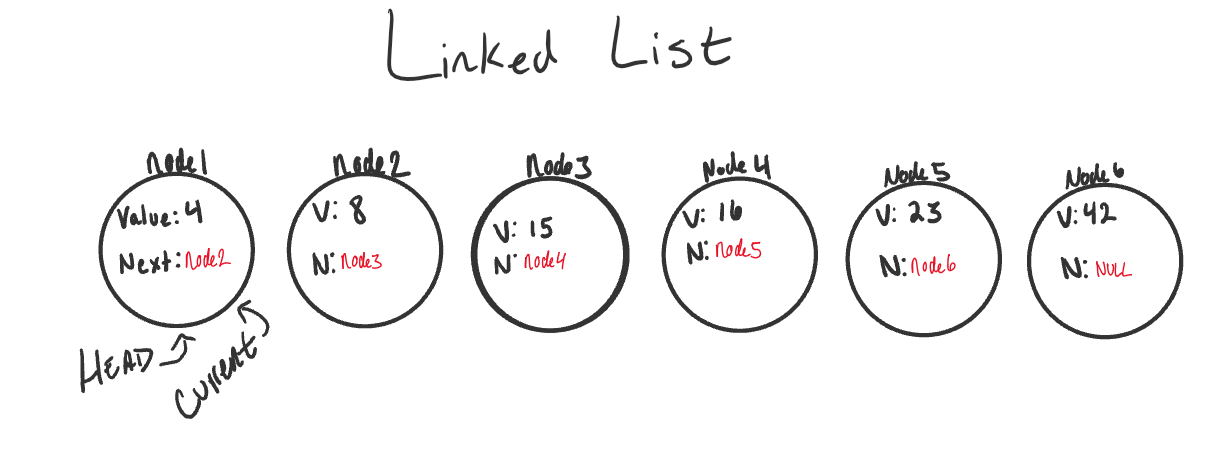
What does it look like
This is what a Singly Linked List looks like
Traversal
When traversing a linked list, you are not able to use a foreach or for loop. We depend on the Next value
in each node to guide us where the next reference is pointing. The Next property is exceptionally important because
it will lead us where the next node is and allow us to extract the data appropriately.
The best way to approach a traversal is through the use of a while() loop. This allows us to continually check
that the Next node in the list is not null. If we accidentally end up trying to traverse on a node that is null,
a NullReferenceException gets thrown and our program will crash/end.
When traversing through a linked list, the Current variable will tell us
where exactly in the linked list we are and will allow us to move/traverse forward until we hit the end.
Traversal Example
Let’s put a use case on our traversal. We want to check whether or not our LinkedList Includes a specific value.
The pseudo-code for an Includes is as so:
ALGORITHM Includes (value)
// INPUT <-- integer value
// OUTPUT <-- boolean

  Current <-- Head

  WHILE Current is not NULL
    IF Current.Value is equal to value
      return TRUE

    Current <-- Current.Next

  return FALSE
Let’s talk out what exactly is happening:
-
We are first creating
Currentat theHeadto guarantee we are starting from the beginning. (Remember thatHeadis always the first node in a Linked List) -
We create a
whileloop. This loop will only run if the node thatCurrentis pointing to is not null. This also means we can guarantee that we are still looking at a Node while the loop is running. -
Once we are in the while loop, we are checking if the value of the current node is equal to the value we are looking for. Given the logic, if that condition is true, then we have found the value we were looking for, so we return true.
-
If the
Currentnode does not contain the value we are looking for, we then must move Current to the next node that is being referenced. Again, because the condition of this while loop is to only run if we are still at a node, we can safely traverse to the next node without fear of getting aNullReferenceException. -
At this point, the while loop is re-evaluated. Step 3 & 4 will continue until
Currentreaches the end of the LinkedList. We will know we are at the last node in the linked list because the current node will be null. Once this condition becomes true, the while loop breaks, and we now know that we are at the end. -
Once we hit the end, we know that we did not find the value and return true at any point, so the value is not in the LinkedList. We return false.
Traversal Big O
The Big O of time for Includes would be O(n). This is because, at its worse case, the node we are looking for will be
the very last node in the linked list. n represents the number of nodes in the linked list.
The Big O of space for Includes would be O(1). This is because there is no additional space being used than what is already given to us with the linked list input.
Adding a Node
Adding O(1)
Order of operations is extremely important when it comes to working with a Linked List. What I mean by this is you must be careful that all references to each link/node is properly assigned.
An example can be with adding a node to a linked list.
If we want to add a node with an O(1) efficiency, we have to replace the current Head of the linked list with the
new node, without losing the reference to the next node in the list.
Here are the required steps to add a new node with an O(1) efficiency.
-
We can then instantiate the new node that we are adding. The values passed in as arguments into the
Add()method will define what the value of the Node will be.
-
newNode.Nextby default is set tonull. We want to setnewNode.Nextproperty to the same location that theHeadnode is pointing towards. BecauseHeadis just a reference type, we will be assigning it to the same allocation in memory as the node it is pointing too. In this case, it’sNode1.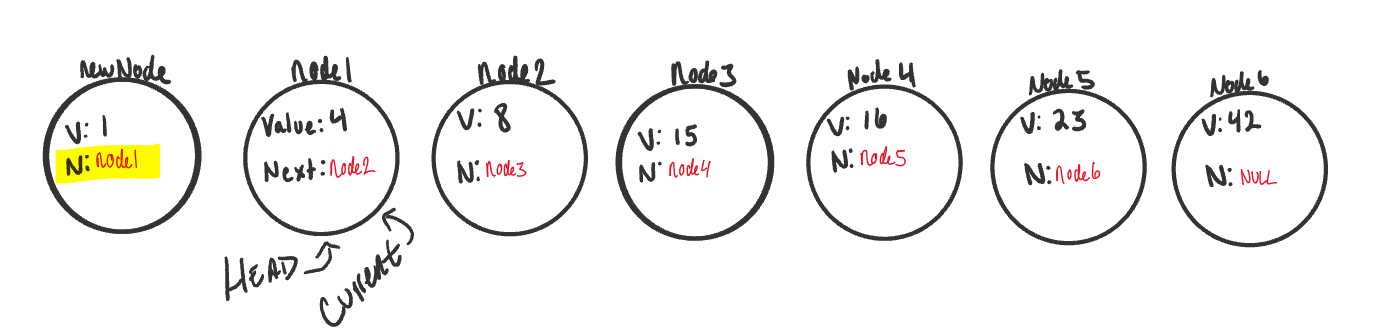
-
At this point in the program we now “technically” have
newNodeat the beginning of the linked list, but we are not done yet. We now have to re-assign whereHeadis pointing too. SinceNode1is no longer the first node in the list, we want to re-assignHeadto point atnewNode.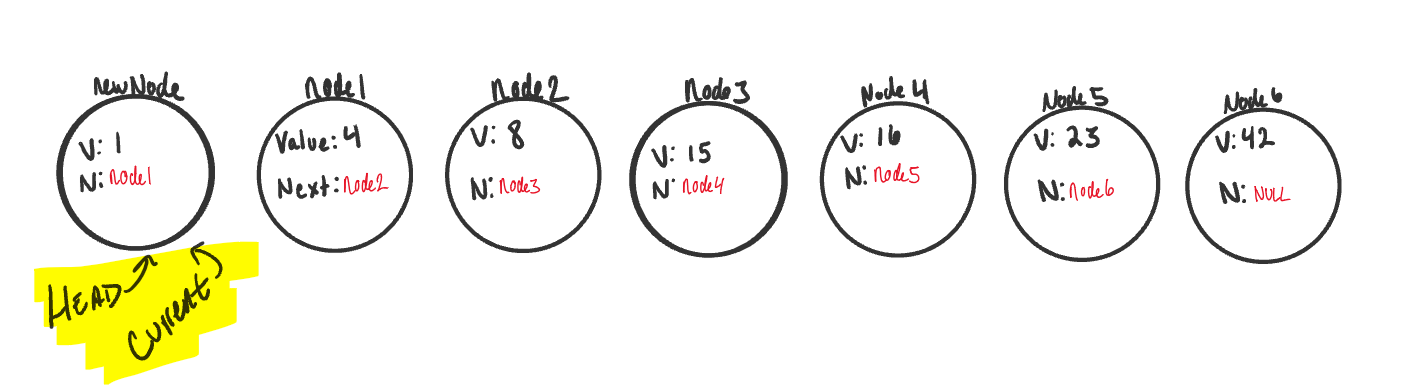
Add Code
Here is the Pseudo code for an Add method on a Linked list
ALGORITHM Add(newValue)
// INPUT <-- Value to add
// OUTPUT <-- No output

  newNode <-- NEW Node
  newNode.Value <-- newValue
  newNode.Next <-- Head
  Head <-- newNode
Add Big O
Regardless of the number of Nodes that this linked list has, it will always be a O(1) time and space because it takes the same amount of time to add a new node to the beginning of the list, and no additional resources are being used
Adding a Node O(n)
Adding a node to the middle of a linked list is a bit different than adding to the beginning. This is because we are working with more nodes and must re-allocate to make room for the new node.
-
Let’s start out with a basic Singly Linked List:

-
Now let’s create a new node (node6). We will set the value of
node6to be 16. TheNextwill be null because we haven’t yet attached it into the linked list.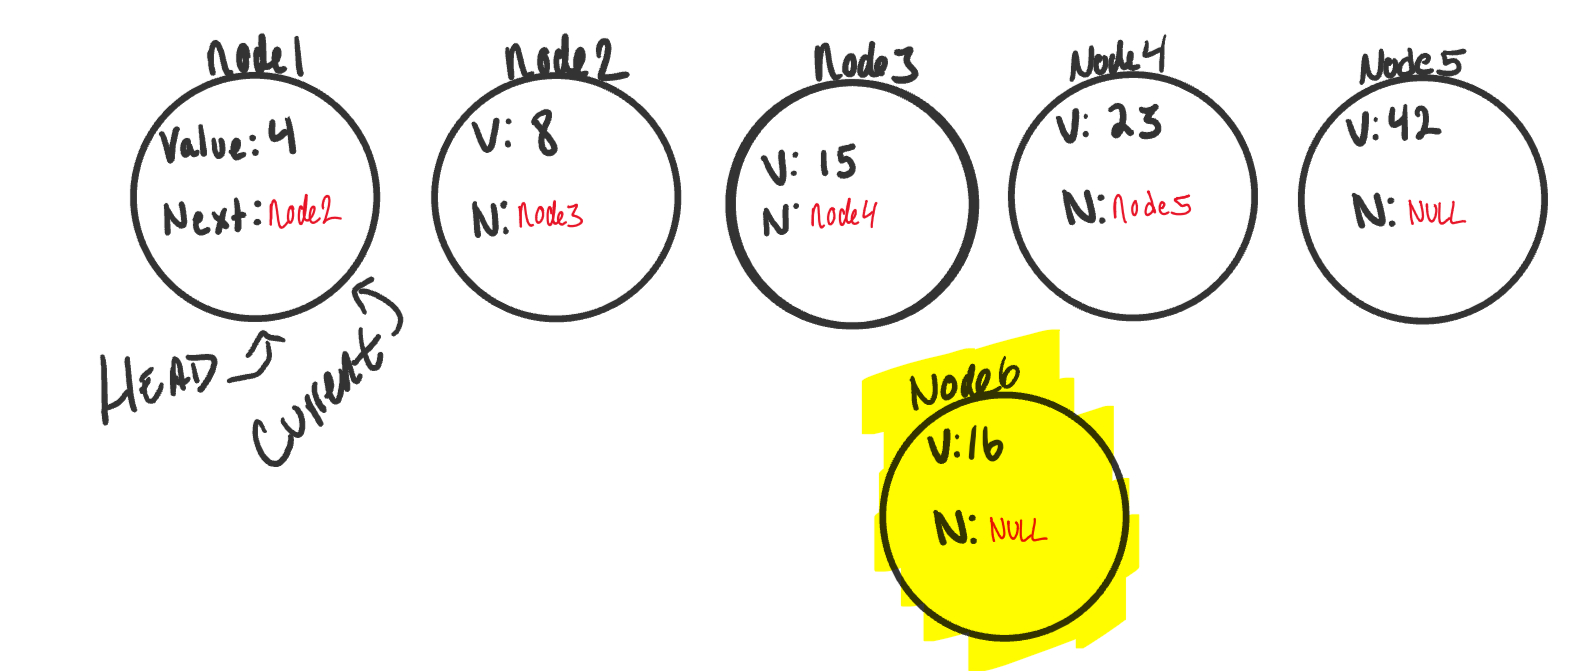
-
Now let’s start the adding. We can do an
AddBeforemethod or anAddAfter. For this documentation, we will do anAddBefore. TheAddAfteris extremely similar…see if you can figure it out on your own!
Our AddBefore method that we will demonstrate will insert node6 before node4.
We already learned how to traverse earlier, and that is exactly what we want to do now. We will traverse while
the next node is not null. Before moving Current to the next node, we want check if the value of the next node
is equal to the value we are supposed to be watching for (the value of the existing node we are inserting before).
If it is, we want to set the new node (node6)’s .Next equal to the existing node.

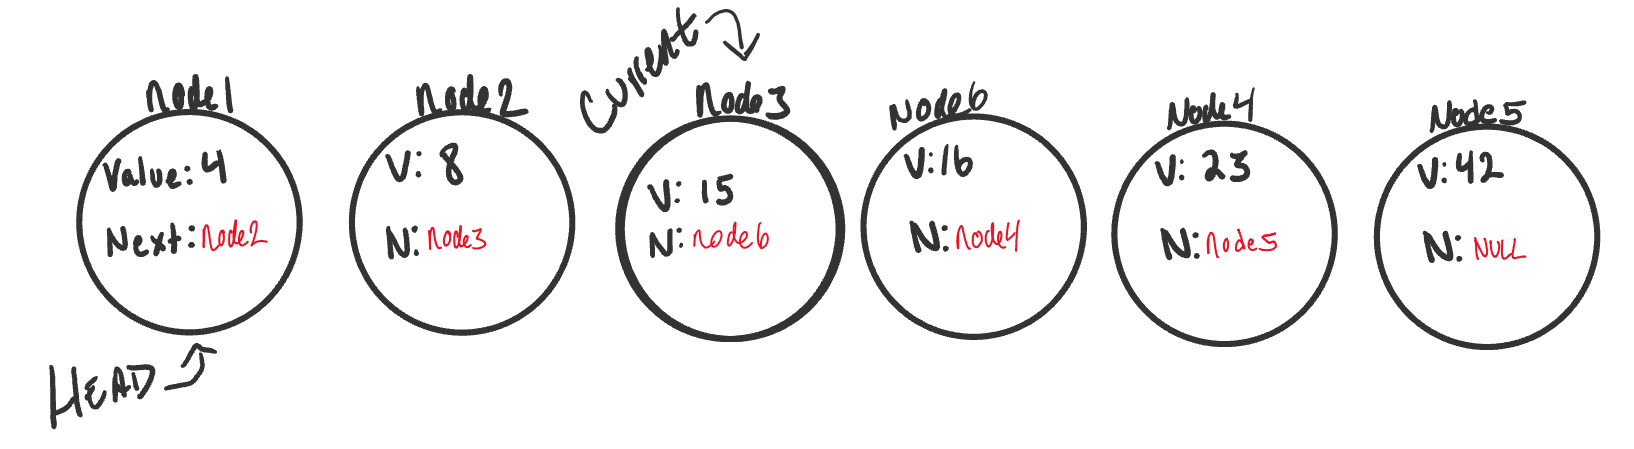
The Linked List image above is in the following state:
Currentis pointing tonode3.node3.Nextproperty is equal tonode4.- Since this is the node we want to insert before, we can now set our
node6.Nextproperty also tonode4. We do this at the time the node is found to prevent settingnode6.Nextto a node that may not exist. - Uh-Oh, now both
node3andnode6are pointing to the same next node.node6is not quite fully apart of the linked list. - Next, we have to adjust
node3.Nextto point to the newly created node,node6. Since we still haveCurrentpointing tonode3this will be a straightforward transaction. We just simply tellCurrent(because it is pointing to the same memory location asnode3) to change it’sNextto point to the new node (node6).
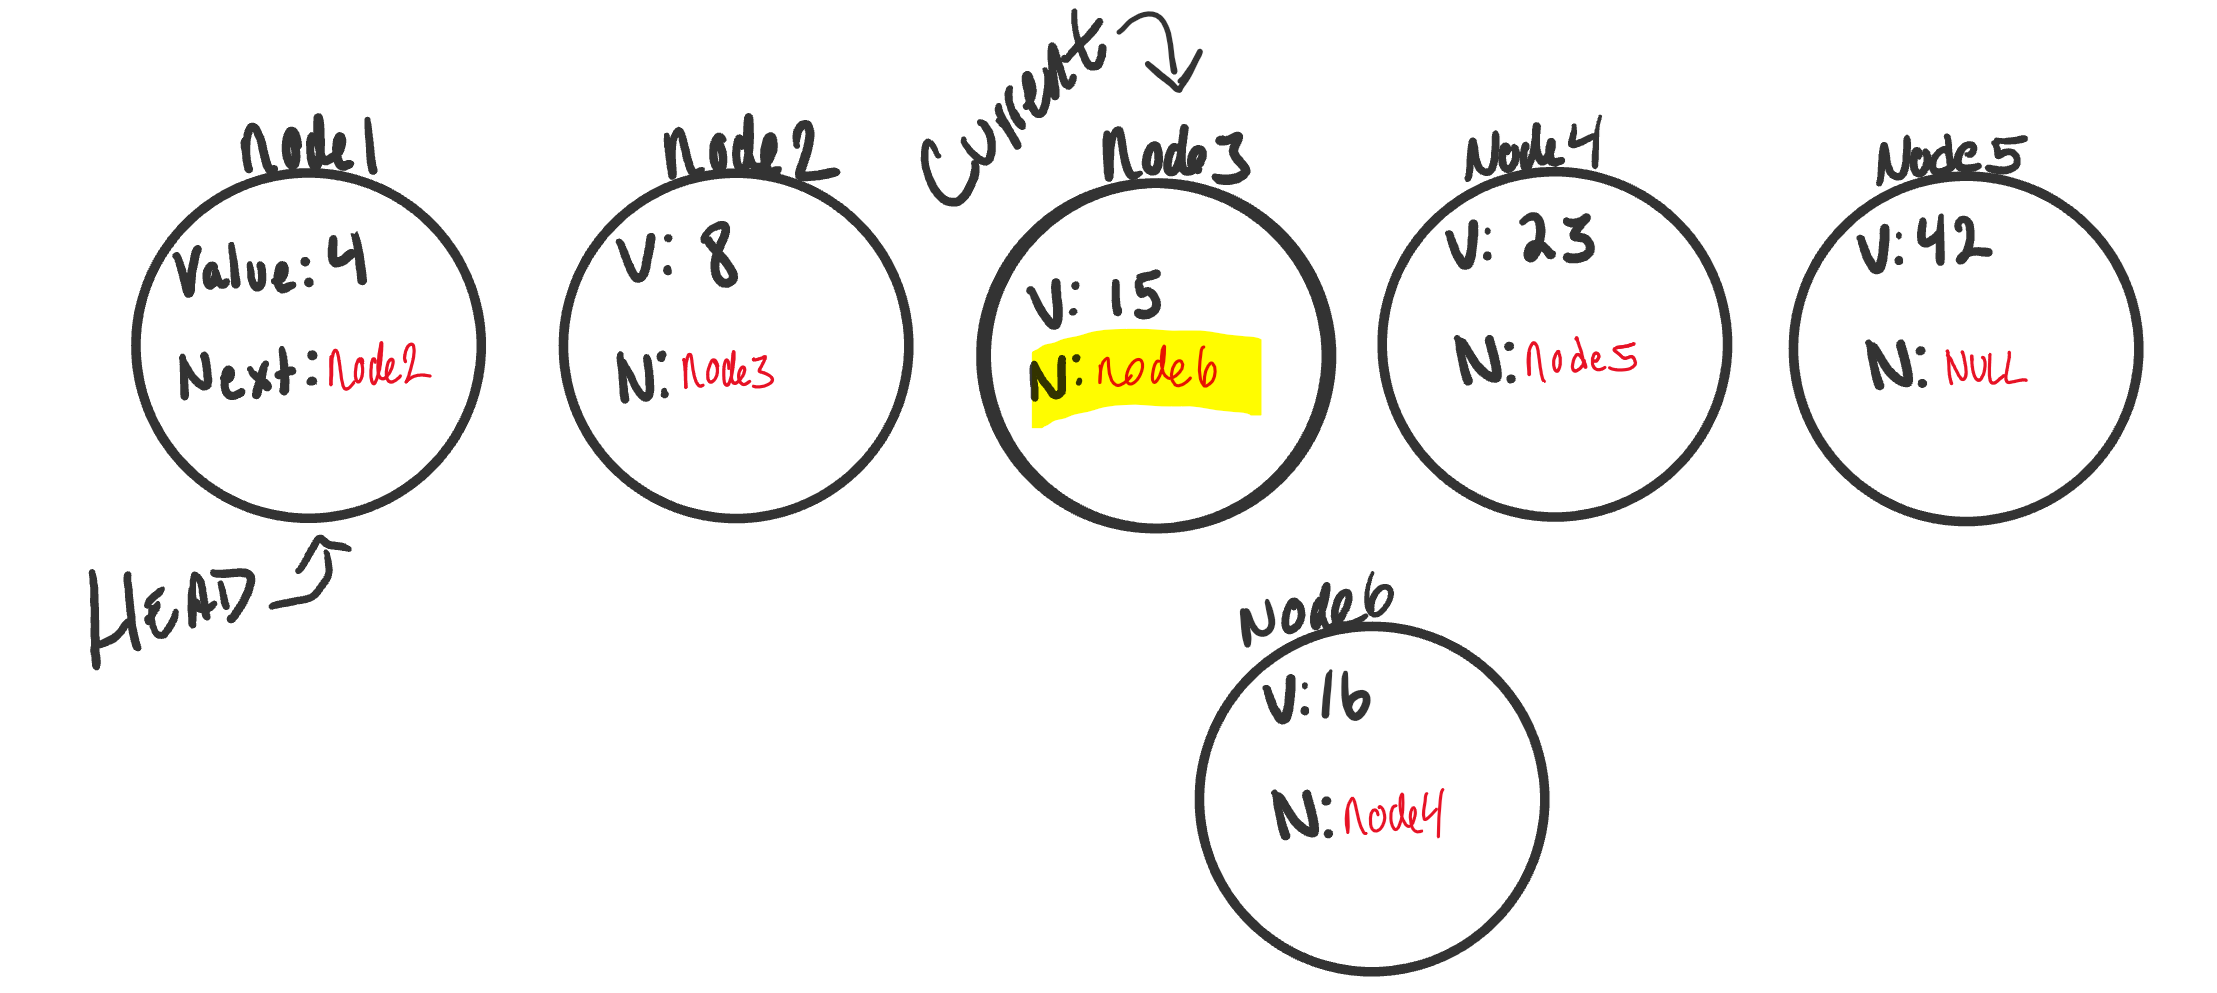
And now we have a complete link list with the newly added node exactly where we wanted it.
AddBefore Code
Here is the Pseudo code for an AddBefore method in a linked list
ALGORITHM AddBefore(newValue, valueToAddBefore)
// INPUT <-- New value, Value to add before
// OUTPUT <-- boolean

  Current <-- Head

  IF Current is equal to NULL
    return FALSE

  WHILE Current.Next is not equal to NULL
    IF Current.Next.Value is equal to valueToAddBefore
      newNode <-- NEW Node
      newNode.Value <-- newValue
      newNode.Next <-- Current.Next
      Current.Next <-- newNode
      return TRUE

    Current <-- Current.Next;

  return FALSE
AddBefore Big O
The time efficiency of this transaction would be O(n) because we could be inserting the new node, worst case scenario, at the end. With n being the number of nodes possible, we would therefore have O(n) time efficiency.
Space efficiency would stay at an O(1) because, like before, no additional space is being used allocated outside of what is given to us on the input
Print Out Nodes
Printing out all of the nodes in a Linked List is very similar to what we did in the Includes() method. This is because
we are leveraging our Current node and a while loop to traverse through the existing linked list.
Here is the pseudo code for a method to print out all the nodes in a linked list:
ALGORITHM Print()
// INPUT <-- None
// OUTPUT <-- string to console

  Current <-- Head

  WHILE Current is not equal to NULL
    OUTPUT <-- "{Current.Value} --> "
    Current <-- Current.Next

  OUTPUT <-- "NULL"
Much like in Includes, we are creating a while loop to check and make sure we are not at the end of a linked list. Right
before the while loop restarts, we move Current to equal the next node in the list.
Once we hit the end, we write out the null pointed to by the last node (or Head, if it’s empty).
Prerequisites
When constructing your code, a few things to keep in mind.
- When making your
Nodeclass, consider requiring a value to be passed in to require that each node has a value.