Technical Whiteboarding
Part one of a series:
- Drawing Data Structures
- The Forward Backward Method
- Tracing Code
- Analyzing Algorithms
- Study Guide & Glossary
Technical Whiteboarding is a systematic approach to designing algorithmic programming solutions to problems identified in a software environment. While the practice is best known for its use in technical interviewing, the process works any time there is a problem to solve with code! Applying a consistent approach to problem solving is shown to improve the quality of the solution and shorten development time.
Ask clarifying questions. Clarify the problem domain by asking ‘what’ and ‘how’ types of questions. Good questions will address ambiguity, edge cases, and terminology used. Define the types of inputs and outputs that the problem expects and produces.
Find a visualization test case. The next step is to find a visualization test case, which is an example of the problem that contains the core elements, but is small enough to be easily understood and worked with. This test case is a simple input and output that will be used to test and validate the solution.
Iterate using forward/backward method. Work backwards and forwards with the example case or cases. Drawing the expected output at the bottom, ask “what information gives this value?” Continue working backwards until there is an intermediate data structure that gives the information for those steps. Then, work forwards from the input to build that intermediate data structure. The visualization will have a drawing of the steps to take for the specific case.
Formalize the steps into an algorithm. Looking at each step found in the forward backward method, describe it in one or two plain language sentences, that would work for any input or intermediate value.
Write code. After using the forward/backward method to describe an algorithm to solve a problem, the next step is to write an implementation in code. This will involve translating the steps in your plain language algorithm into actual code that can be run and tested.
Walk through the minimum interesting example. After writing your code, the next step is to walk through the examples used during forward/backward to ensure that your solution works correctly. This will involve running the code on the test case and verifying that it produces the expected output. If this is truly a “whiteboard only” without an editor and runtime, instead perform a memory trace of the function with the minimum interesting example.
Analyze the complexity and efficiency of your algorithm using big-O notation: The final step in your process is to evaluate the Big-O of your solution. This will help you understand the performance characteristics of your solution and ensure that it is scalable and efficient.
Diagram
The output of this process is a whiteboard that looks something like this.
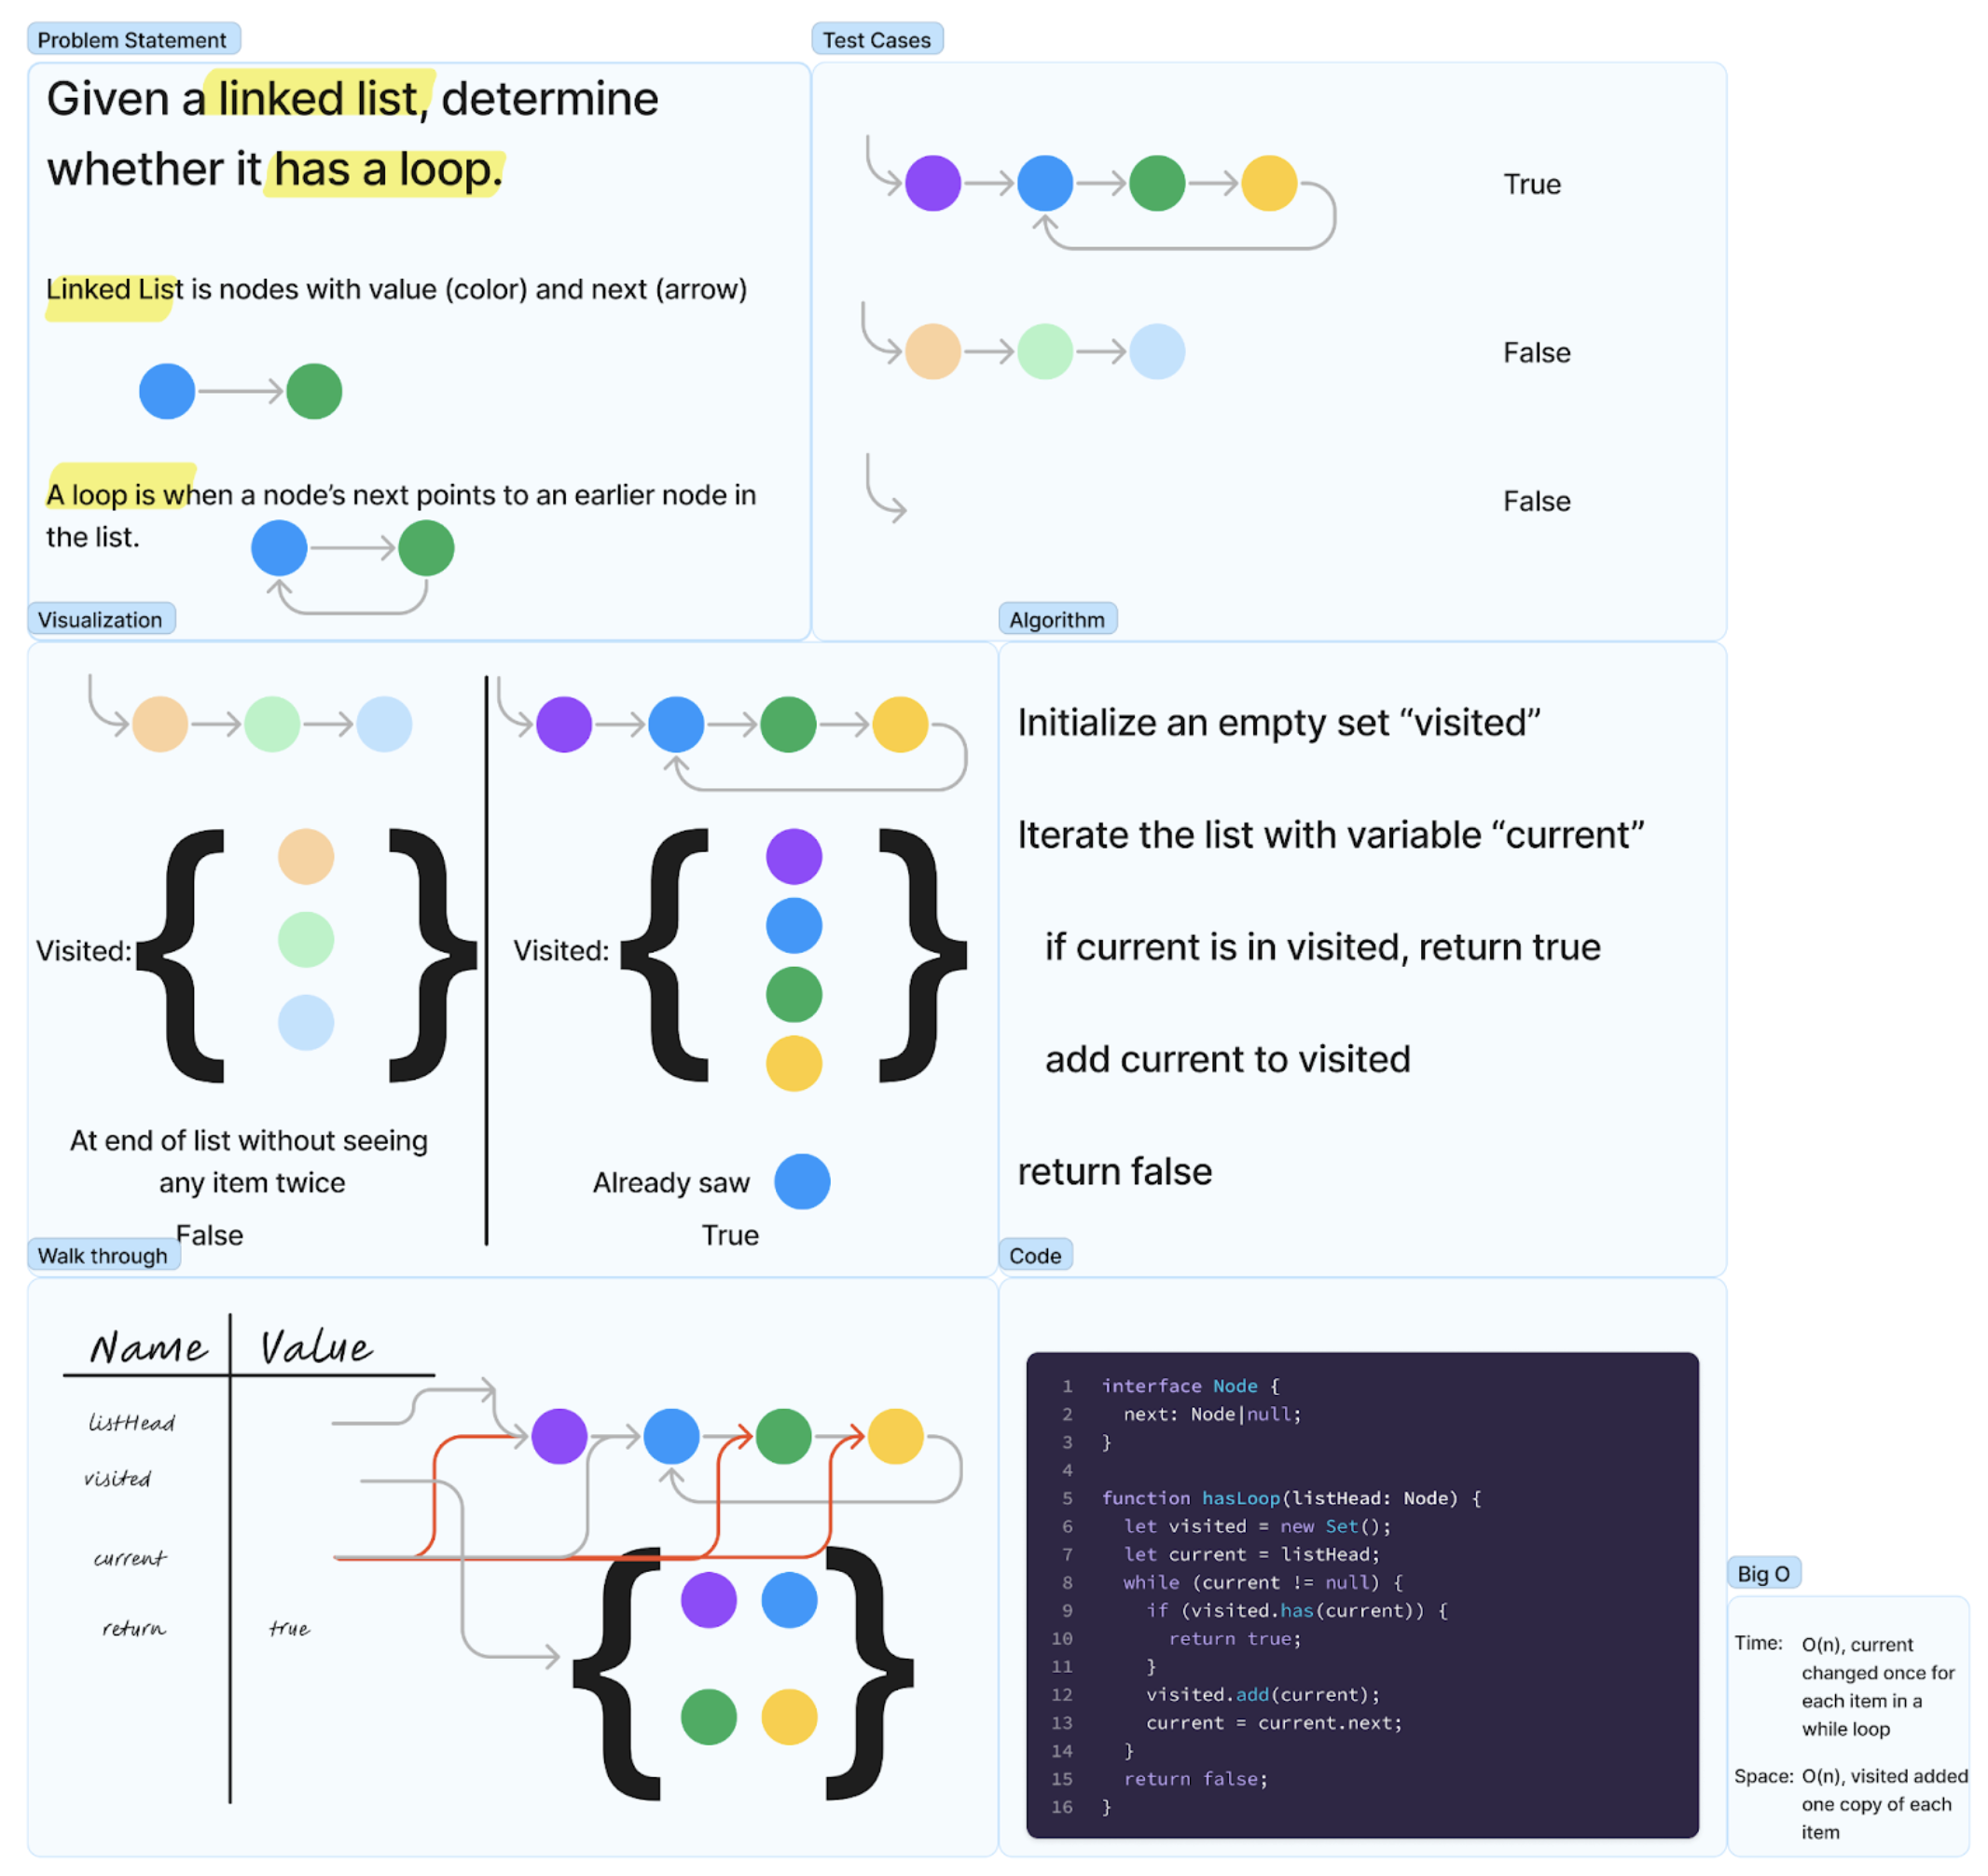
This whiteboard shows a completed “Circular Linked List” interview process. The problem statement box copied the problem, and defined specific terms in the prompt. The whiteboard captures three test cases: the empty list, a list with a loop, and a list without. The visualization shows the conclusion of the forward/backward process for both true and false test cases. The algorithm is a plain language summary of those steps. The code includes the definition of the Node data type (though it elides the value, which isn’t used in this problem). It then uses JavaScript built in data structures, and iterates the list as described. The step through here is “completed”, but during its creation the “current” arrow was duplicated, updated, and changed from gray (active value) to red (prior values). Finally, the big-O was analyzed with remarks.
Approach
Creating a white board is challenging because the problems that need software for a solution are challenging. This approach incorporates a number of techniques that have been shown to be effective techniques for understanding the programming process. Being intentional in following these steps as listed guides the process, letting the engineer focus on the hard questions specific to the problem.
1. Problem Statement & 2. Examples
State or restate the problem in a single, clear sentence. Some interviews will already be in a short problem statement. Others will be presented as a word story, and pulling the problem statement out can take a bit of time. Write down the high level nouns and verbs, and ask for clarification if possible and repetition if necessary. Highlight and define domain specific words & phrases, and areas of possible misunderstanding. Nouns will become values and objects; adjectives or descriptors will be the properties of the data. Verbs are the actions that the algorithm will perform on the data to get the desired result.
List several inputs & outputs. Brainstorming several input/output test cases will make it obvious what the problem statement expects to have happen during the algorithm. Ask for a sample test case, if there hasn’t been one clearly stated. Create two or three additional test cases, assuming the inputs conform to the type signature (that is, if the interface doesn’t allow undefined, don’t discuss how to handle undefined). The test cases should include an “empty” input, a “realistic” input, and the one to use for the rest of the process - the “smallest interesting” input.
The empty input will depend on your data type. None, null, undefined, or other “missing” inputs are rarely considered the “empty” case. Instead, the empty case is an object or instance without values - a linked list whose head is null, a tree with no root, or an array with length zero.
For an algorithmic function, declare the function signature (name, return type, input arguments & their types). For a user interface component, describe a single user journey with acceptance criteria. When defining the input & return types, consider whether they should be concrete data types (string, number, boolean, Person, Flight) or collection data types with a generic value (Array<number>, Record<String, Person>).
Choose a test case to use for the rest of the white board. The visualization test case requires building up from empty and cutting down from smallest to find a sample input that demonstrates interesting things about the problem, but is small enough to keep in mind throughout the rest of the process. Highlight this test case, and use it during the visualization and step through phases of the white board.
Interview Timing: this part of the interview should aim to take about 5 minutes. Write the interview prompt verbatim. Highlight jargon and key phrases, and ask for clarification & definitions. Write down the answers to those questions. Finding the Smallest Interesting Input relies on experience doing walkthroughs with a range of data structures and problems. That said, for most problems, three to five items should feel about right.
3. Visualization & Algorithm
Draw input at the top of the visualization and the output at the bottom. The second phase of the whiteboard is developing a general solution to the problem. The visualization and algorithm developed here will have the full details of how to take an input and generate the correct output.
Work towards the middle, using forward/backward find small algorithmic steps. There are a number of techniques to develop an algorithm. They should all involve a visual exploration of the problem using the specific data from the test case, and a written description of the algorithm’s steps. The visualization should use a consistent design language.
Identify intermediate data structure(s) from the visualization. The goal here is to have a description of a solution to the problem. It is not to have a program that solves the problem for any input. With the white board after the visualization and algorithm boxes, any programmer could take this description and write that program in their programming language.
Describe, in plain language, the steps the visualization describes. Pseudocode is not helpful here. The algorithm should be a plain-language description of how to go about the visualization, but it does not need to use specific programming functions or variables. It should be phrased in terms of concepts, not any specific programming language.
Interview timing: this should take the bulk of the time of the interview. Twenty minutes is not an unreasonable amount of time to spend iterating between the algorithm and the visualization. While it’s important to leave enough time for the code & walkthrough, fully developing the algorithm should make that a straightforward process. However, the thirty minute mark should be an absolute last time to move on to coding.
4. Code, 5. Walkthrough, & 6. Big-O
Write code to implement those steps, using your language’s idioms. With the algorithm written and visualization sketched out, it’s time to translate that to the language of choice. While the algorithm is written as “for every item in input”, the code may change depending on what the input type is. If it’s an array, and the index isn’t used in the algorithm, the loop could be for (const item of array) { … } or array.forEach(item => …). But if it’s a linked list, that would need to traverse with let current = linked_list.head; while (current !== null) { …; current = current.next; }.
The two areas receiving the most attention writing code are that it be syntactically correct (it will be run on a machine with rules and state), and that it uses reasonable idioms and style for the language. Code that runs for the solution gets the job done, and is sufficient. Code that is clear, clean, and elegant makes it easier to understand and collaborate. While there are some differences in opinion on “best” style, good style is generally agreed upon. This is indicated in attention to detail for whitespace, correctly spelling variable names, choosing expressive and consistent variable names, avoiding needless repetition, and similar coding style practices.
With the test case, visually step through the code recording the change in values. After writing code, it is imperative to run that code. When an editor & runtime is available, that can be as easy as calling the method with an input and using the language’s built-in assert methods to ensure the result is correct. For a white board, specific techniques like Tracing Code can ensure an accurate walkthrough to find any bugs in the code or verify the code is likely bug-free.
Provide a Big O analysis, justifying the time and space complexity. Using either the code or the trace, justify a time and space complexity for the solution. For more details, read the guide Analyzing Algorithms.
Interview Timing: Ten minutes for coding and five minutes for a walkthrough is reasonable with a well-developed algorithm in part 3. By the time the walkthrough is complete, the Big-O should be apparent and can be stated in a few moments. Some engineers may prefer to spend more time iterating on the code. That’s up to the individual engineer to know where they are more comfortable developing their ideas.
Timing
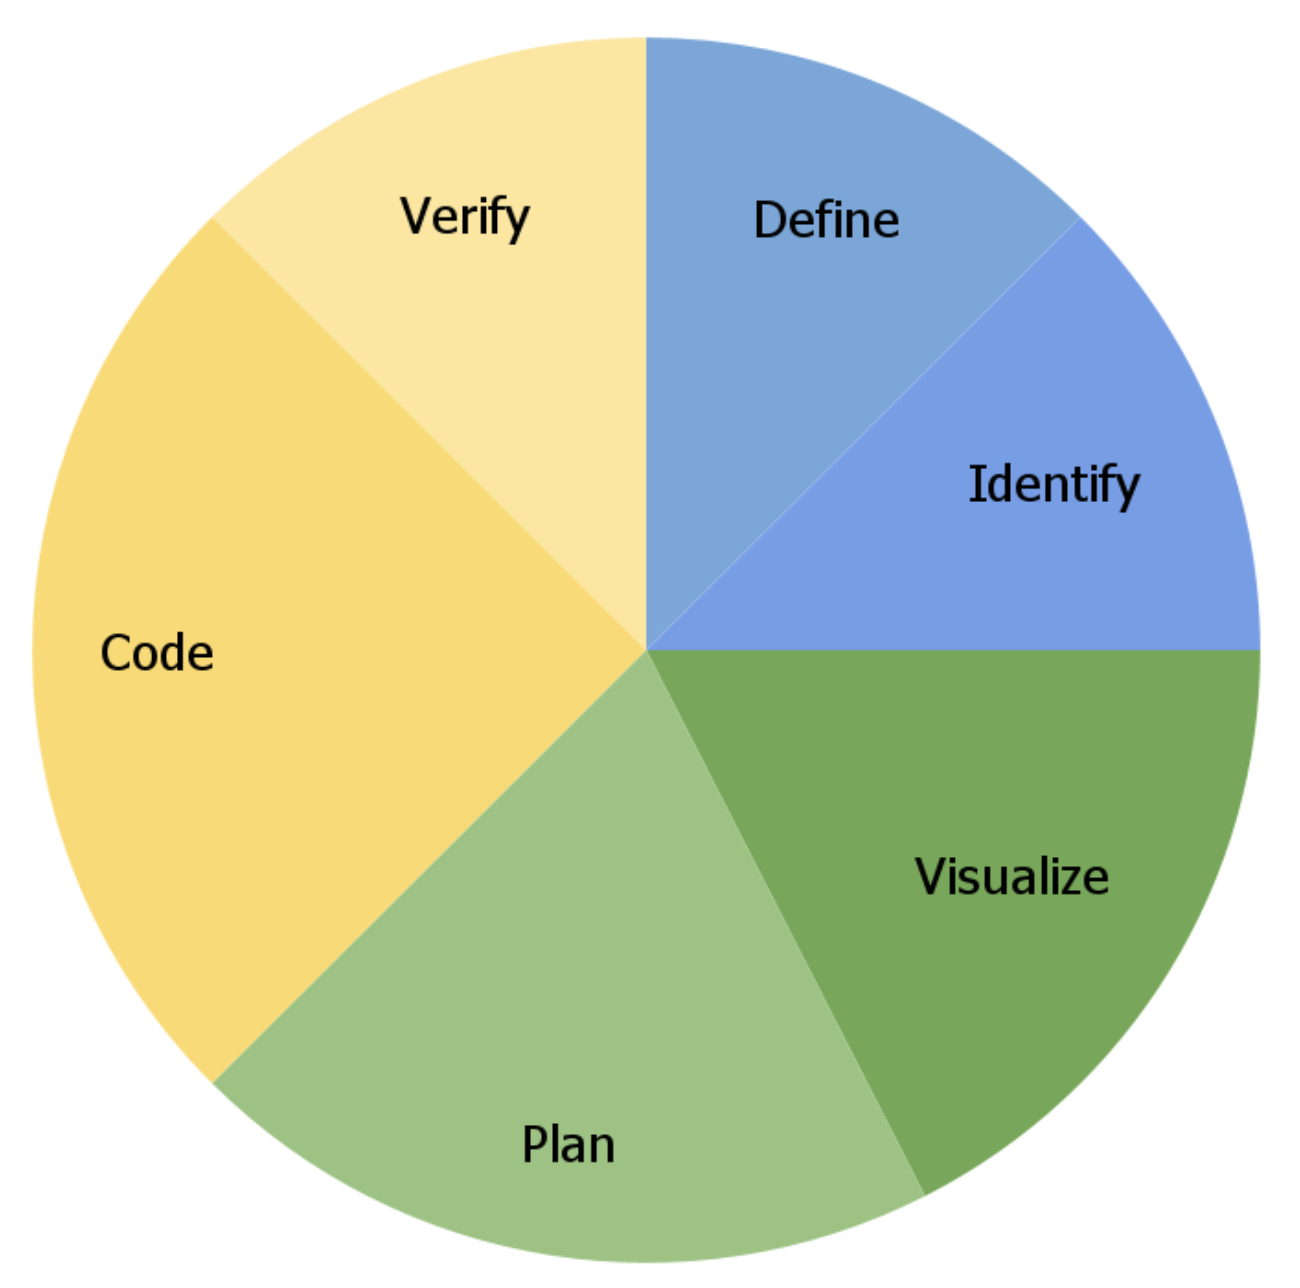
An average breakdown of the relative amount of time spent in each step of the process. Defining & researching the problem space and identifying appropriate test cases should take about a quarter of the time allotted for the task. The forward/backward method’s two portions, the visualization development and the plain language description, are an iterative process that can build on one another. Either way, the design work here should take half of the remaining time after researching and defining the problem. In this design-heavy approach, coding alone takes about a quarter of the time for the task. Verification is the important final step.
In a 45 minute interview, leave 5 minutes for general conversation & buffer time. Then, aim for about 10 minutes getting into the problem. By that 10 minute mark, settle on a test case for the problem. Visualizing and planning should be about 50/50 of their portions, finishing at about 25 minutes in. The biggest chunk, but not a majority, of time should be spent coding, about 15 minutes. Leave another 5 minutes to work through the test case, fixing any issues that arise.
Summary
Technical Whiteboarding is a systematic approach to designing algorithmic programming solutions to problems identified in a software environment. This approach involves defining the problem’s input and output types, identifying a minimum interesting test case, creating a visualization and plain language algorithm, writing code, walking through the minimum interesting example, and evaluating the big-O of the solution. This process helps to improve the quality of the solution and shorten development time.
This process is particularly useful when solving complex problems with code, as it provides a consistent approach to problem solving. By following these steps, an engineer or engineering team is able to focus on the specific challenges of the problem at hand, rather than becoming bogged down in the general process of problem solving. Additionally, creating a whiteboard allows for clear communication of the solution to others, making it a valuable tool in group settings.
Checklist
Step 1: Define the problem
- Copy the problem statement.
- Highlight and define domain specific words & phrases.
Step 2: Identify Test Cases
- Ask for a sample test case.
- Create two or three new test cases, including empty, edge, and wrong.
- Write the function definition.
- Choose a test case to use for the rest of the white board.
Step 3: Visualize the solution
- Draw input at the top of the visualization and the output at the bottom.
- Work towards the middle, using forward/backward find small algorithmic steps.
Step 4: Plan the algorithm
- Identify intermediate data structure(s) from the visualization.
- Describe, in plain language, the steps the visualization describes.
Step 5: Code
- Write code to implement those steps, using your language’s idioms.
Step 6: Verify
- With the test case, visually step through the code recording the change in values.
- Provide a Big O analysis, justifying the time and space complexity.